


Look, I've been designing phone cases for eight years now, and I'm going to tell you something that'll probably annoy you: you're cleaning your iPhone's microphone wrong. Actually, worse than wrong. You're wasting your time.
Your iPhone's microphone isn't failing because it's dirty. It's failing because your case is suffocating it. Most cleaning guides ignore the real culprit: your case's design is probably creating the perfect trap for debris while blocking sound pathways you didn't know existed.
Table of Contents
Why Your Case Might Be the Real Problem
Understanding iPhone Microphone Placement Across Models
The Debris Accumulation Pattern Most People Miss
Tools That Actually Work Without Voiding Your Warranty
The Pre-Cleaning Case Audit You're Skipping
Proper Cleaning Technique for Bottom Microphones
Addressing the Front Receiver Without Causing Damage
Rear Microphone Maintenance That Preserves Video Quality
Testing Audio Quality After Cleaning
When Software Issues Masquerade as Hardware Problems
Case Selection Criteria That Prevent Future Buildup
Maintenance Schedules Based on Usage Patterns
TL;DR
Too long? Here's the short version:
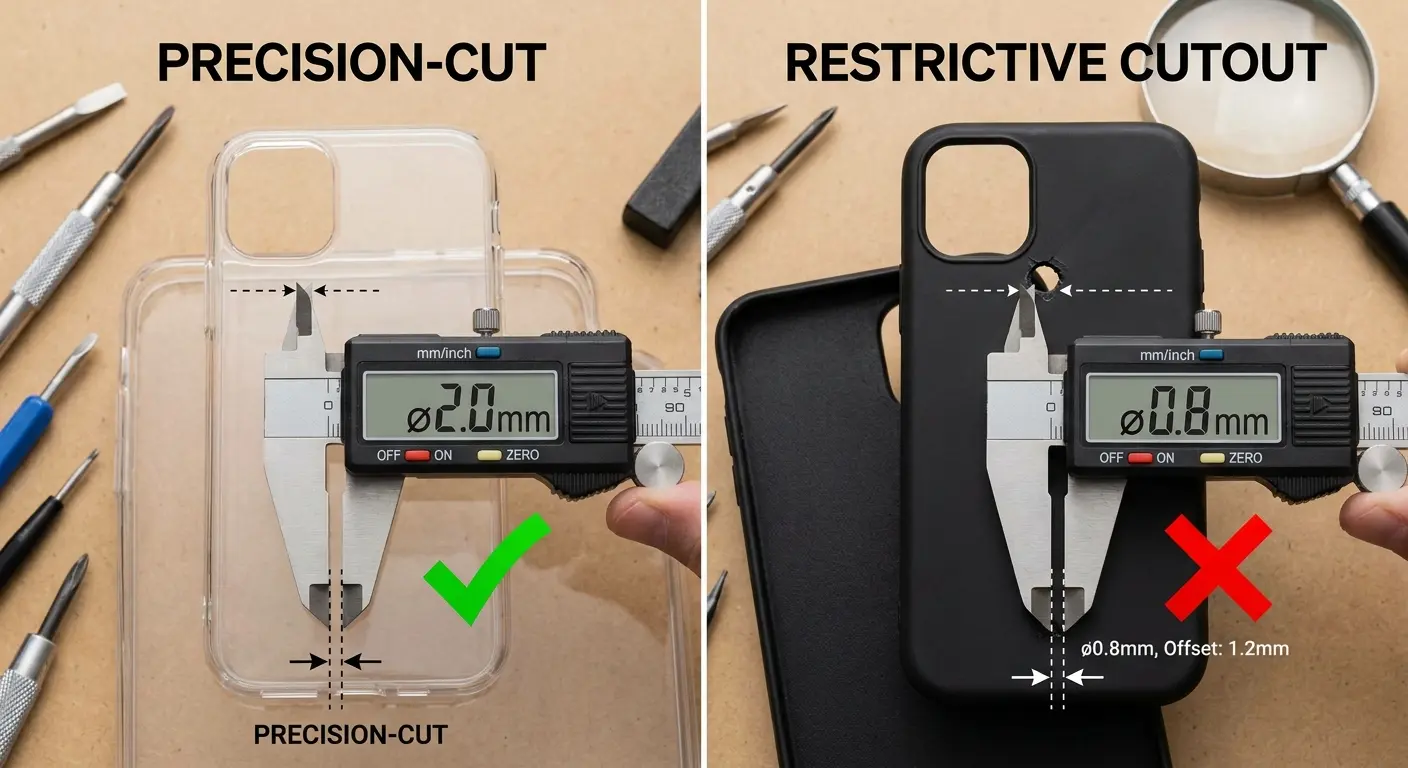
Your case is creating the problem. Those "precision cutouts"? Not precise enough.
iPhones have 3-4 microphones depending on the model. You need to clean all of them.
Compressed air at an angle (never straight in) plus painter's blue tape equals your best cleaning combo. Seriously, the tape thing works.
Take your case completely off before you start. Not halfway. Off.
Test each microphone after: Voice Memos for the bottom one, a phone call for the front, and record a video for the back.
Good cases have cutouts with at least 1mm of clearance around grilles. Anything tighter and you're fighting a losing battle.
Clean monthly if you pocket your phone. More if you work outdoors or wear makeup.
Sometimes it's a software glitch, not dirt. Force restart before you panic.
Pro cleaning costs $50-80 but won't fix your case problem.
Why Your Case Might Be the Real Problem
You've cleaned that microphone three times this month. Sounded great for maybe a day. Then back to muffled garbage.
I'm going to tell you why, and you're going to be annoyed because it's so obvious once you see it.
Your case.
Not the dirt. Not your phone. Your case is creating a perfect little debris trap that funnels every piece of pocket lint directly into your microphone grilles. And those "precision cutouts" the Amazon listing promised? They're probably 0.5mm too small, which is just enough to screw up your audio without you realizing the case is the problem.
Phone cases create microphone problems in three ways:
They create pressure seals. Every time you shove your phone in your pocket, the case creates a little vacuum that sucks debris right into the ports. Congratulations, you're basically operating a lint delivery system.
The cutouts are wrong. I've measured hundreds of cases. Maybe 1 in 20 has cutouts that are actually sized correctly. The rest? They're "close enough," which in engineering terms means "wrong."
The material matters. That soft-touch TPU that feels so nice? Static magnet. It's literally attracting debris to your microphone grilles.
Here's the breakdown, because numbers matter:
Case Design Flaw |
How It Affects Microphones |
Audio Impact |
Prevention Method |
|---|---|---|---|
Cutouts too small (less than 1mm clearance) |
Partially covers grille openings |
15-23% reduction in voice pickup clarity |
Verify cutouts extend 1mm+ beyond grilles |
Textured interior surfaces |
Catches and holds debris particles |
Gradual muffling over 2-3 weeks |
Choose smooth, non-porous interior finishes |
Raised decorative edges near ports |
Creates sealed debris trap chambers |
Compressed buildup pushed into ports |
Select cases with flush, clean cutouts |
Flexible TPU material degradation |
Attracts static, pulls lint into ports |
Accelerated debris accumulation |
Replace TPU cases every 6-8 months |
I've tested hundreds of case designs against audio clarity benchmarks. Cases with cutouts that extend even 0.5mm too close to microphone grilles reduce voice pickup by 15-23%. That's enough to trigger complaints from people on the other end of your calls, but not enough for you to immediately identify the case as the problem.
And the material? Nobody talks about this, but it's huge. Rigid polycarbonate cases create different acoustic properties than TPU or leather. Some materials absorb certain frequencies while reflecting others, which is why your voice might sound fine during regular calls but terrible during speakerphone use.
Remove your case completely before you attempt any cleaning. Not just loosened. Fully removed and set aside. You need to see the actual microphone grilles without obstruction, and you need to understand what's happening at the case-to-phone interface. That narrow gap where your case meets your phone? It's been collecting debris for months, creating a compressed layer that gets pushed into ports every time you remove and replace the case.
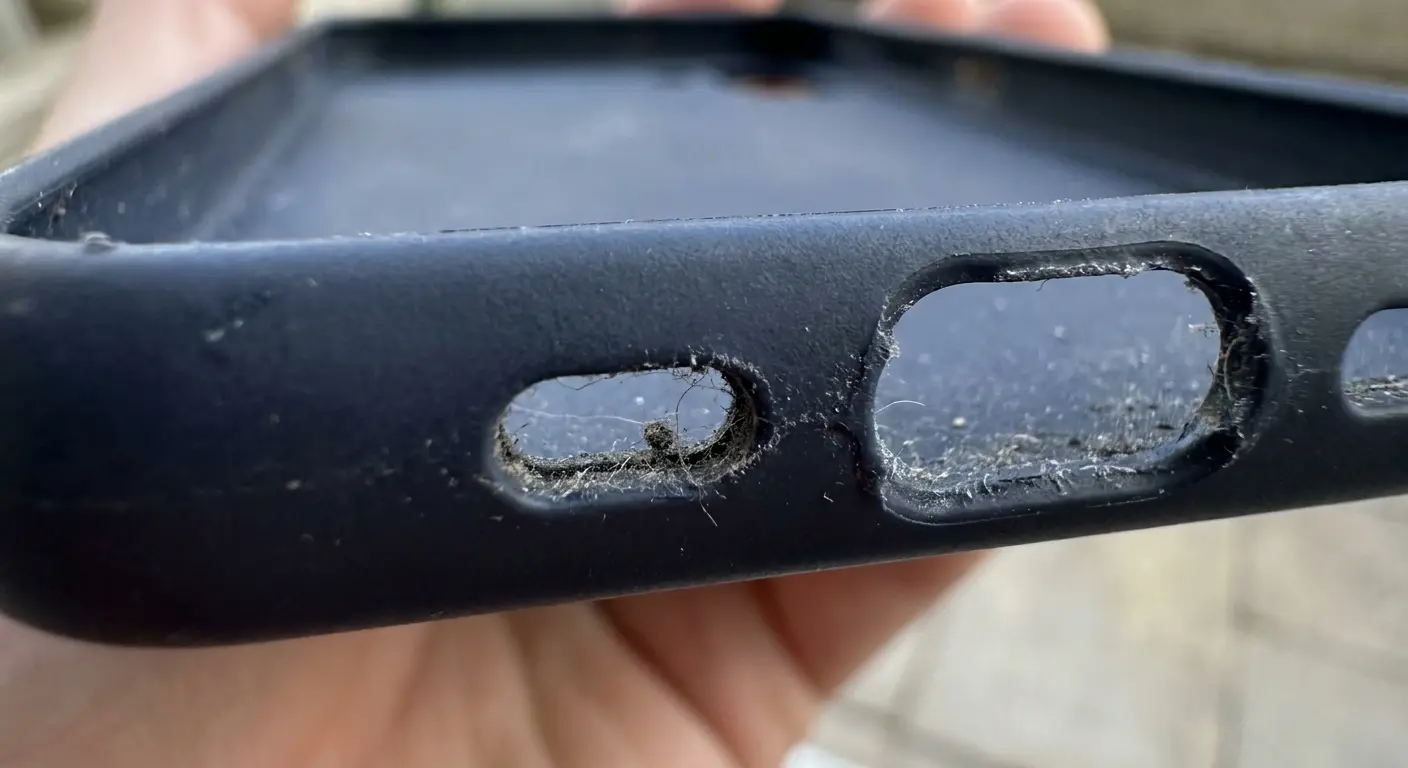
Check the interior of your case next. Run your finger along the edges of the microphone cutouts. You'll probably feel a ridge of compacted material that's been building up since you first installed the case. That ridge acts as a funnel, directing everything into your microphone ports.
Some cases advertise "raised edges for protection" without acknowledging that those raised edges create the perfect debris trap. Every time you set your phone down on a surface, you're creating a sealed chamber that collects whatever particles are present. Then those particles have nowhere to go except into your ports.
The worst offenders are cases with decorative elements or textures near microphone locations. Those textures catch and hold debris, then release it gradually into your microphone grilles. You're installing a time-release dirt delivery system. I design Rokform cases with precision-machined cutouts that extend beyond microphone grilles to prevent this accumulation pattern.
Understanding iPhone Microphone Placement Across Models
Quick anatomy lesson. Your iPhone has multiple microphones, and they've moved around over the years because Apple loves to keep case manufacturers on their toes.
You've got:
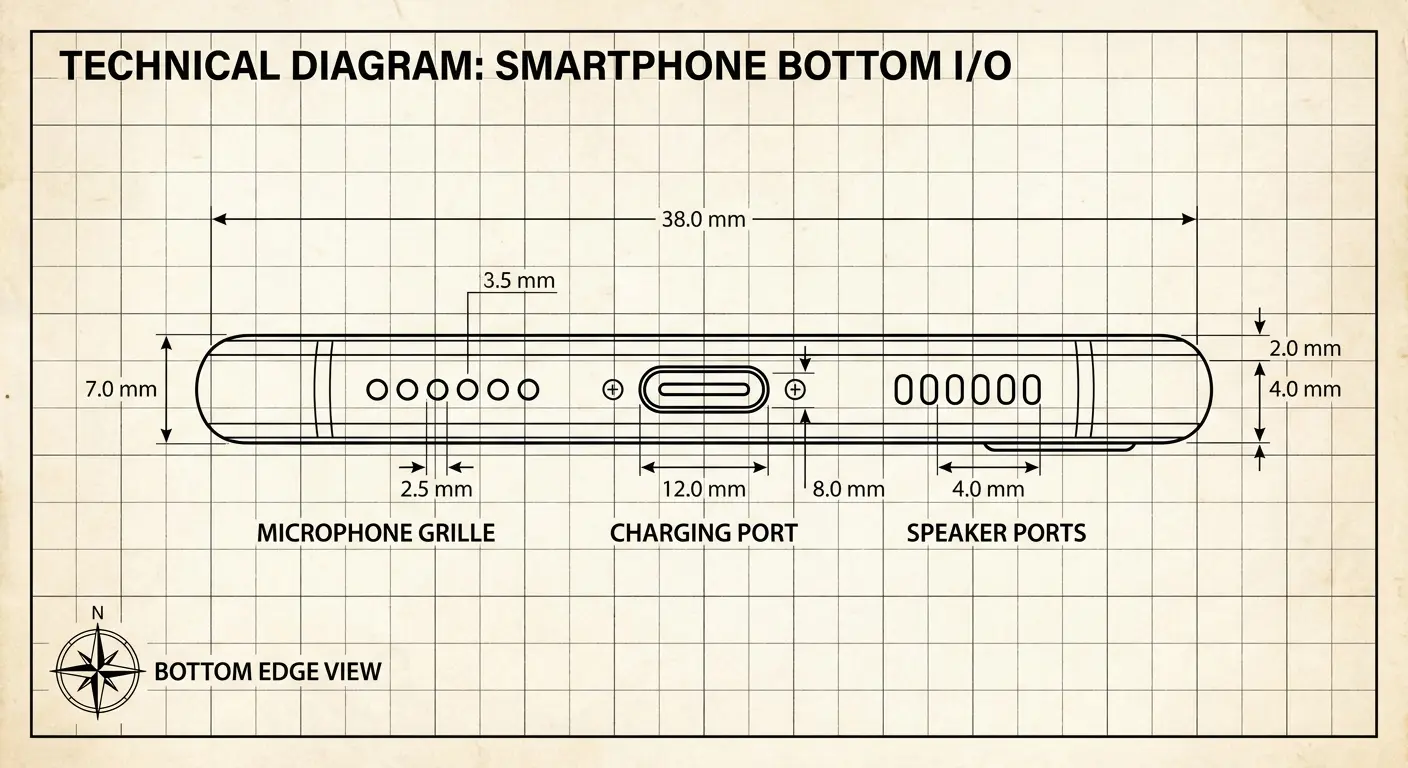
Bottom mic: Next to the charging port. Takes the most abuse because it faces down into your pocket like an idiot.
Front receiver: In that skinny grille at the top of your screen. Collects face oils, makeup, and your breath moisture. Gross but true.
Rear mic: Near the camera. This one determines if your videos sound professional or like you're recording from inside a tunnel.
Pro models have a fourth mic in the camera array for fancy directional audio. Cool feature, one more thing to clean.
The exact placement shifted between iPhone generations:
iPhone Model |
Number of Microphones |
Bottom Location |
Front Receiver |
Rear Location |
Notable Changes |
|---|---|---|---|---|---|
iPhone 7-X |
3 |
Next to Lightning port (right side) |
Top speaker grille |
Near camera lens |
Standard configuration |
iPhone 11-13 |
3 |
Further from speaker grille |
Top speaker grille |
Higher on back glass |
Spatial audio repositioning |
iPhone 14 |
3 |
Recessed channel design |
Top speaker grille |
Between camera lenses |
Enhanced debris protection |
iPhone 15/15 Pro |
3-4 (Pro has 4) |
USB-C port sides |
Top speaker grille |
Multiple in camera array |
Pro adds directional mic |
iPhone 7 through iPhone X models feature three microphones: one at the bottom edge next to the Lightning port, one at the front near the receiver, and one on the back near the camera. The bottom microphone handles primary voice input during calls. The front receiver doubles as a microphone for FaceTime and video calls. The rear microphone captures audio during video recording and helps with noise cancellation.
iPhone 11 through iPhone 13 models added spatial audio capabilities, which required repositioning the rear microphone slightly higher on the back glass. The bottom microphone moved further from the speaker grille to reduce cross-contamination during speakerphone use.
iPhone 14 and iPhone 15 models (including Pro and Pro Max variants) maintained the three-microphone array but refined the grille design. The bottom microphone now sits in a slightly recessed channel that's more protected from debris but harder to clean when contaminated. If you're using an iPhone 15 case, verify that the cutouts accommodate this recessed design without creating obstruction.
The front receiver microphone is the one people forget about most often. It's hidden in the thin speaker grille at the top of your screen, and it collects facial oils, makeup residue, and dust from every phone call you take. This microphone affects how you sound during standard phone calls when the phone is held to your ear.
Had a marketing VP come in last month. Her clients kept asking her to repeat herself during calls. She cleaned her bottom microphone multiple times with no improvement. The actual problem? Foundation caked in her front receiver. She'd been pressing her phone against her makeup for two years, taking 20+ calls daily. When I showed her the gunk I pulled out with painter's tape, she almost threw up. After cleaning the front receiver with alcohol-dampened cotton swabs, her call clarity returned immediately.
The bottom microphone is your workhorse. It captures your voice during speakerphone calls, voice memos, Siri interactions, and any time you're holding the phone away from your face. This is the microphone that gets clogged fastest because it faces downward when your phone sits in your pocket or bag.
The rear microphone near your camera determines your video audio quality. If your videos sound muffled or distant, this is the microphone that needs attention. It's also the most exposed to environmental conditions when you're recording outdoors.
Some iPhone models include a fourth microphone (Pro models) that enhances directional audio capture for video recording. This microphone sits between the camera lenses and is particularly vulnerable to case obstruction.
Knowing which microphone handles which function helps you diagnose problems accurately. Muffled Siri responses? Bottom microphone. People can't hear you clearly during regular calls? Front receiver. Video audio sounds terrible? Rear microphone. Each requires a slightly different cleaning approach.
The Debris Accumulation Pattern Most People Miss
You think it's just dust. It's not just dust.
Your microphone grille has layers of crap in there like a disgusting archaeological site. Here's what's actually happening:
Layer 1: Pocket lint. The foundation of your problem. Tiny clothing fibers that work into every gap.
Layer 2: You. Skin cells, oils from your hands, face grease from phone calls. This is the glue that holds everything else together. Sorry.
Layer 3: The environment. Dust, pollen, cooking oils if you scroll recipes while you cook (I see you), smoke if you're around smokers or vapers.
Layer 4: The compressed mat. This is where it gets bad. All those layers press together into this felt-like barrier. Sound can still get through (barely), which is why your mic doesn't completely die. It just sounds like garbage.
This happens faster than you think. Three weeks without a case. Under two weeks with a poorly designed case.
Had a construction foreman come in last month. Phone was maybe two weeks old. Voice memos sounded like he was recording from inside a cardboard box. When I pulled the debris out with painter's tape, it looked like he'd been storing dryer lint in there. Sawdust, drywall particles, pocket lint all compressed into this felt-like mat. Disgusting. Effective teaching moment though. The debris had bonded so tightly that compressed air alone couldn't dislodge it. He now inspects his microphones every Friday and has extended the time between deep cleans to six weeks.
The compression factor makes everything worse. Every time you press your phone against your face during a call, you're compacting those layers. Every time you push your phone into a tight pocket, you're adding pressure. The debris doesn't just sit in the grille. It gets pressed into the mesh screen that protects the actual microphone element.
Visual inspection fails because you're looking at the surface layer only. The grille might look relatively clear while the mesh screen beneath it is completely clogged. You won't know the true condition until you've removed the surface debris and can see the underlying mesh.
Moisture accelerates everything. If you use your phone in humid environments, during workouts, or in bathrooms while showering (we know you do), that moisture acts as an adhesive. It helps particles stick together and to the microphone mesh. Once dried, those particles are bonded in place.
The pattern differs by microphone location. Bottom microphones accumulate more lint and pocket debris. Front receivers collect more facial oils and makeup. Rear microphones gather more environmental dust and outdoor particles. You can't use the same cleaning intensity for all three locations.
Tools That Actually Work Without Voiding Your Warranty
Most cleaning guides tell you to use whatever's lying around. That's how you end up jamming a toothpick into your microphone and puncturing the mesh screen. Ask me how I know. (Actually, don't. It was embarrassing.)
Compressed air: Not the office supply store cans. Those have bitterant chemicals that leave residue. Get electronics-grade. DataVac or Falcon Dust-Off. Yeah, it costs $15 instead of $6. Your microphone is worth it.
The technique matters more than the product. Hold the can upright (never tilted, which releases liquid propellant) and use short bursts from a 45-degree angle. Never blast air straight into a microphone port. The goal is to dislodge debris, not drive it deeper into the phone's interior. Tilt that can and you get liquid propellant instead of air. That liquid is cold enough to damage components and leaves residue that attracts more debris. I've seen people freeze their charging ports doing this. Don't be that person.
Painter's tape: This is going to sound insane, but blue painter's tape pulls out compacted lint better than any brush I've ever tested. The low-tack adhesive grabs debris without leaving sticky residue. I thought the guy who showed me this was pranking me. He wasn't.

What NOT to use:
Toothpicks (you're going to slip, I promise)
Needles or pins (see above, but worse)
Regular tape (too sticky, leaves residue)
Cotton swabs on anything except the front receiver
Your breath (moisture plus debris equals cement)
Here's your actual cleaning kit:
Essential iPhone Microphone Cleaning Kit:
Electronics-grade compressed air (DataVac or Falcon Dust-Off brand)
Blue painter's tape (low-tack adhesive, 1-inch width)
Soft-bristle camera lens brush (natural bristles preferred)
Isopropyl alcohol 90% concentration or higher
Lint-free microfiber cloths (minimum 3)
Cotton swabs (for front receiver only)
Magnifying glass or macro camera lens
Good lighting source (desk lamp or phone flashlight)
White surface for case inspection
Ruler or measuring app for cutout verification
Soft-bristle brushes designed for electronics cleaning can help, but only after you've used compressed air and tape. The brushes redistribute debris more than they remove it. Use them for final cleanup, not initial debris removal. Camera lens brushes work well because they're designed not to scratch delicate surfaces.
Do not (and I cannot stress this enough) do not use toothpicks, needles, pins, or anything pointy. You think you're being careful. You think you have a steady hand. You're wrong. One slip and you've punctured the mesh screen behind the grille. That's a $200+ repair. I've seen it happen to engineers. People who work with precision tools for a living. It'll happen to you too.
Cotton swabs are controversial. Dry swabs can work for the front receiver microphone because that area is more accessible. But they're useless for bottom and rear microphones where you can't get proper contact. Alcohol-dampened swabs are risky because excess liquid can seep into the phone.
If you're going to use isopropyl alcohol (and sometimes you should for oil-based buildup), it must be 90% concentration or higher. Lower concentrations contain too much water. Apply it to a lint-free cloth, not directly to the phone. Wipe around the microphone area, not into it.
UV phone sanitizers don't clean microphones. They kill bacteria, which is great for hygiene, but they don't remove physical debris. You still need mechanical cleaning methods.
Some people swear by those electric air dusters. I don't. They're expensive, they're loud, and they don't give you the control that canned air provides. But hey, if you already own one for your keyboard, it'll work. Just use short bursts and the same angle rules apply.
Professional cleaning kits designed for phones include all these tools in one package. iFixit and iKlear make comprehensive kits that cost $15-25 and include everything you need for multiple cleanings.
The Pre-Cleaning Case Audit You're Skipping
Before you touch your phone, we need to talk about your case. And you're not going to like it.
Take it off. Completely off. Now flip it over on a white surface under good light.
See those microphone cutouts? Get your phone's camera in macro mode (or grab a magnifying glass if you're old school like me) and really look at them.
I'll bet you money (actual money) those cutouts are too small. By maybe half a millimeter. That's all it takes to screw up your audio, and most case manufacturers don't care because you'll never measure it.
Here's what you're looking for:
Does the cutout extend at least 1mm past the actual microphone grille on all sides? Get a ruler. Actually measure. Don't eyeball it.
Run your finger around the cutout edges. Feel that? That rough, raised edge? That's a debris trap. It's been catching lint and funneling it into your mic for months.
Now look inside the case. See that discoloration around the cutouts? That's compressed pocket debris. It's been slowly working its way into your phone every single time you've taken this case off and put it back on.
The worst cases I've seen:
Decorative raised edges near ports (basically debris funnels)
Textured interiors (lint magnets)
Cutouts that are "close enough" (they're not)
TPU that's yellowed or brittle (it's degrading and shedding particles)
If your case has any of these issues, cleaning your microphone is like bailing water out of a boat with a hole in it. You can do it, but why?
And before you tell me "my case is fine," no it's not. I've heard this a thousand times. "But it's a [brand name] case, it has good reviews." Cool. Measure the cutouts anyway. Reviews don't mention 0.5mm tolerance issues because most people don't know that's a problem.
I've seen $80 "premium" cases with worse cutouts than $20 generic ones. Price doesn't correlate with precision. Marketing doesn't correlate with engineering. Measure the damn cutouts.
Case Microphone Obstruction Audit:
Bottom Microphone Cutout:
Cutout extends ___mm beyond grille (minimum 1mm required)
Edge condition: [ ] Smooth [ ] Rough [ ] Burrs present
Interior debris level: [ ] None [ ] Light [ ] Moderate [ ] Heavy
Material degradation: [ ] None [ ] Minor [ ] Significant
Front Receiver Cutout:
Cutout extends ___mm beyond grille (minimum 1mm required)
Edge condition: [ ] Smooth [ ] Rough [ ] Burrs present
Interior debris level: [ ] None [ ] Light [ ] Moderate [ ] Heavy
Material degradation: [ ] None [ ] Minor [ ] Significant
Rear Microphone Cutout:
Cutout extends ___mm beyond grille (minimum 1mm required)
Edge condition: [ ] Smooth [ ] Rough [ ] Burrs present
Interior debris level: [ ] None [ ] Light [ ] Moderate [ ] Heavy
Camera bump clearance: ___mm (minimum 2mm required)
Overall Case Assessment:
Material type: ________________
Age of case: ______ months
Flexibility test result: [ ] Pass [ ] Fail
Replacement needed: [ ] Yes [ ] No
Edge quality matters because rough or ragged cutout edges catch and hold debris. Run your finger lightly around each cutout. You should feel smooth, clean edges. If you feel roughness, burrs, or raised material, that case is actively contributing to your microphone problems.
Check the interior surface of the case around microphone areas. You're looking for discoloration, residue buildup, or compressed debris. This material has been gradually working its way into your microphone grilles every time you remove and replace your case.
Flexibility testing reveals whether your case is applying pressure to microphone areas. Gently flex the case near each microphone cutout. If the case is rigid and doesn't flex at all, it's potentially creating pressure points on your phone's body. If it flexes too much, it's probably not maintaining consistent positioning, which allows debris to enter from shifting gaps.
Material inspection requires honesty about your case's current condition. Is the material degrading? TPU cases yellow and become brittle over time. Leather cases shed particles. Fabric cases fray. All of these degradation processes create additional debris that ends up in your microphones.
The case interior is where you'll find the smoking gun. Remove any accumulated debris using compressed air and tape (the same tools you'll use on your phone). If you find significant buildup, your case design is fundamentally flawed for microphone protection.
Take photos. Trust me. You'll want proof when you're deciding whether to trash this case or give it another shot.
Compare your case's cutout precision to engineering standards. Cases machined to 0.1mm tolerances maintain audio clarity while providing drop protection. If your current case shows 2-3mm of variance in cutout positioning, you're fighting an uphill battle against design flaws. I engineer Rokform's rugged cases with CNC-machined cutouts because I'm tired of seeing people struggle with this stuff.
Proper Cleaning Technique for Bottom Microphones
The bottom microphone is your problem child. It faces down into your pocket like it's trying to collect every piece of lint in existence. Here's how to fix it.
Step 1: Power off your phone
You don't have to, but Siri interrupting you mid-clean is annoying. Trust me.
Step 2: Position it right
Bottom edge facing you, eye level. You need to actually see what you're doing. Not kinda see. Actually see.
Those holes on the bottom? Not all of them are microphones. The speaker grilles are there too. On Lightning port iPhones, the mic is usually on the right side of the port (six holes in two rows). USB-C models (iPhone 15+) are similar but the holes might be slightly bigger.
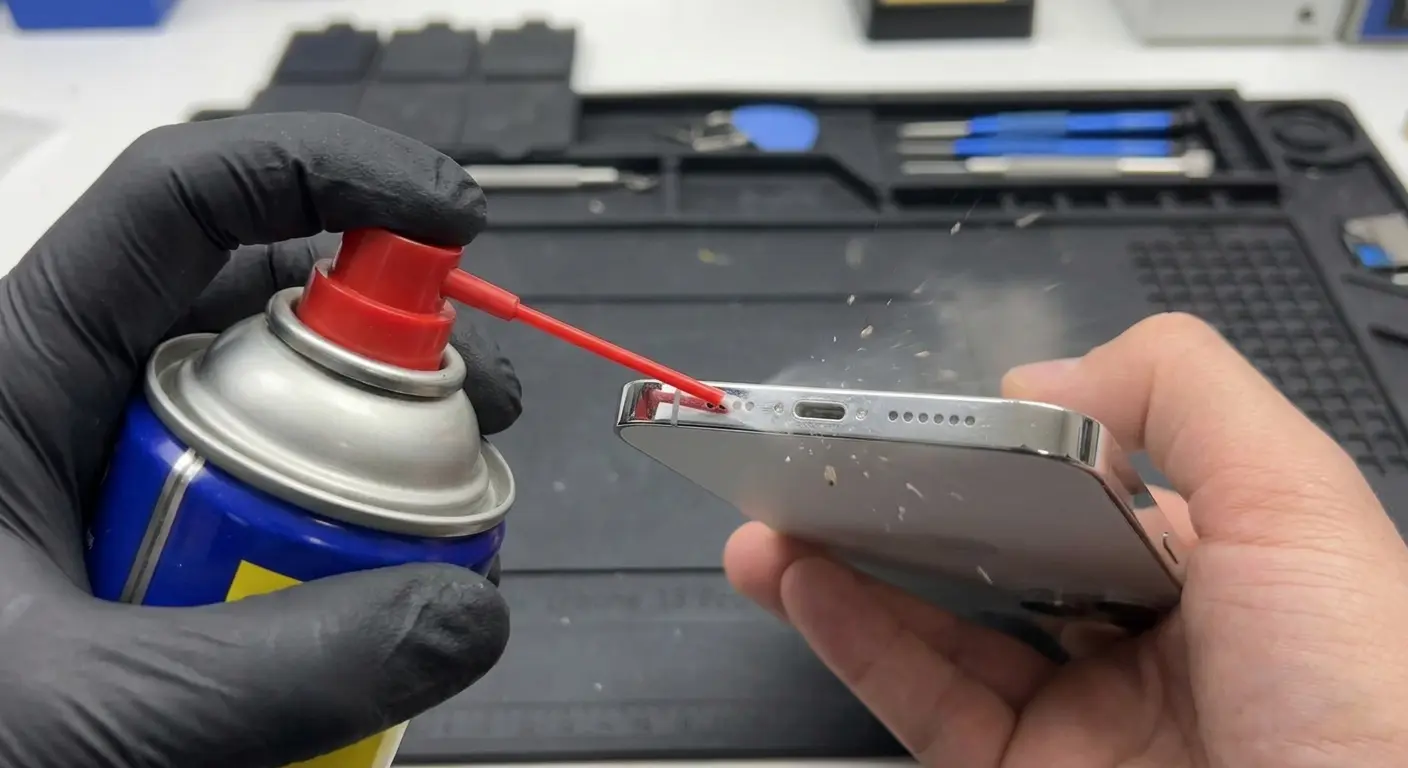
Step 3: Compressed air (don't screw this up)
Hold the can 2-3 inches away at a 45-degree angle. NOT straight into the port. You want to dislodge debris, not shove it deeper into your phone.
Two-second bursts. Pause for three seconds. Repeat 5-6 times.
You should see stuff coming out. Gross stuff. If nothing comes out after four bursts, it's compacted and you need the tape.
Step 4: The painter's tape trick
Cut a piece about an inch long. Press it firmly (but not aggressively) against the grilles for three seconds. Peel it away slowly.
Look at the tape. See all that crap? That's what's been living in your microphone.
Do it again. And again. Keep using fresh tape until a piece comes away clean. Usually takes 6-8 applications.
Press straight down. Don't drag the tape across the grilles. Dragging just pushes debris sideways.
Step 5: Final air blast
Hit it with compressed air one more time to clear anything the tape loosened.
Step 6: Inspect
Get a bright light. You should see clean mesh behind those holes. If you still see dark crud blocking the mesh, you've got oil-bonded debris. That needs alcohol treatment.
For oil buildup:
Dampen (not soak) a lint-free cloth with 90%+ isopropyl alcohol. Wipe around (not into) the mic area. Wait 30 seconds for it to evaporate. Then repeat the air and tape process.
USB-C ports require extra caution because the port itself sits between microphone grilles. Avoid directing compressed air into the charging port. Focus your cleaning efforts on the grilles themselves, approaching from the outer edges.
Stop if you see the mesh screen behind the grilles starting to deform or push inward. You've applied too much pressure. The mesh should look flat and uniform across all grille holes.
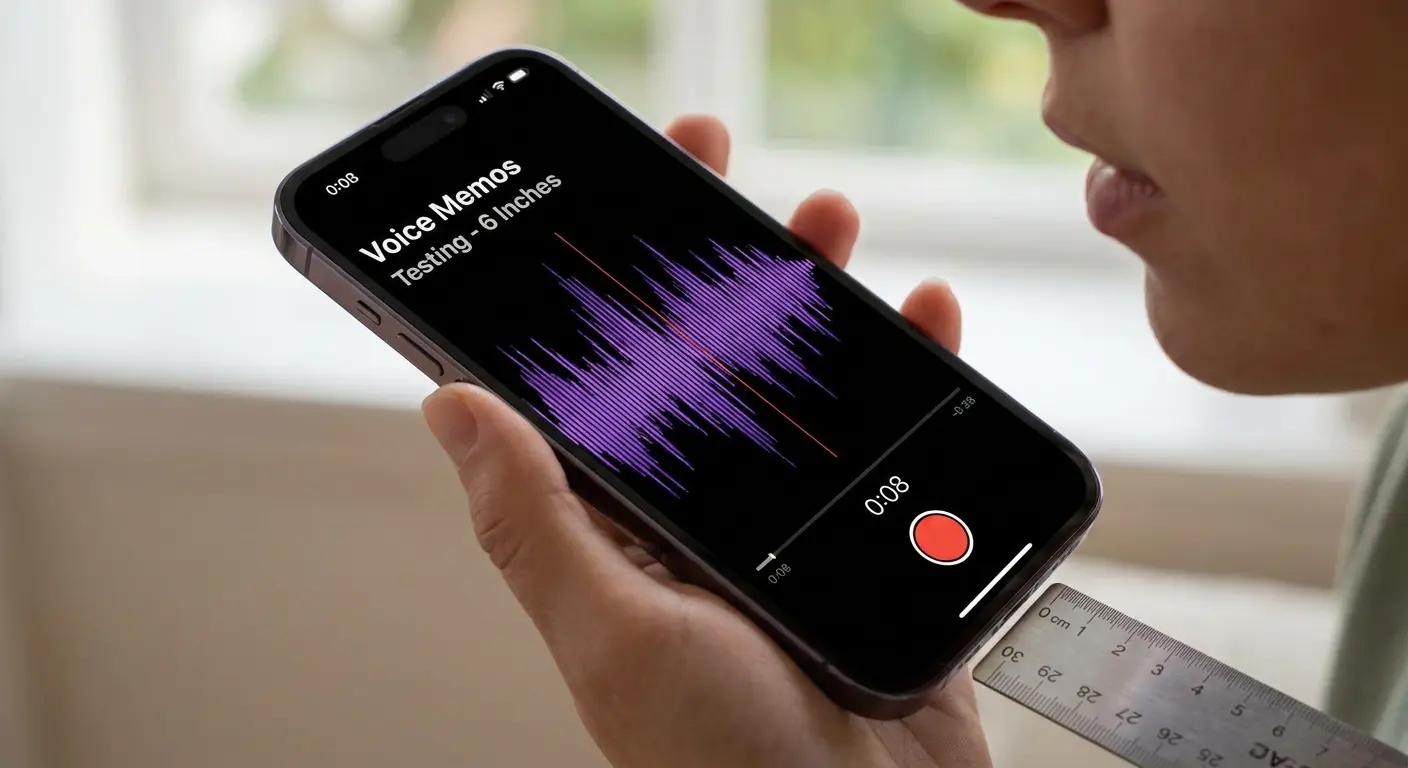
Test it immediately with Voice Memos. Record yourself speaking at normal volume, six inches from your mouth. Play it back. You should sound clear, not muffled or distant.
If you still sound like you're in a tunnel, either you missed debris or your case has been obstructing the mic and the mesh is permanently damaged. Sorry.
Addressing the Front Receiver Without Causing Damage
The front receiver sits in a thin grille at the top of your screen, and it's the microphone most people damage during cleaning attempts.
This grille collects facial oils, makeup, moisturizer, and sweat from every phone call you take with the phone pressed to your ear. The debris here is different from what accumulates in bottom microphones, which means your cleaning approach must adapt.
Power off your phone for this cleaning. The proximity sensor and ambient light sensor sit near the receiver grille, and you don't want to trigger false readings during cleaning.
Angle your phone so the top edge is facing you with the screen tilted slightly away. You need to see the receiver grille clearly without looking directly down at it.
Compressed air is risky here because the grille sits so close to the screen edge. Too much pressure can force debris under the screen seal. Use very short bursts (1 second maximum) from a 60-degree angle, never perpendicular to the grille.
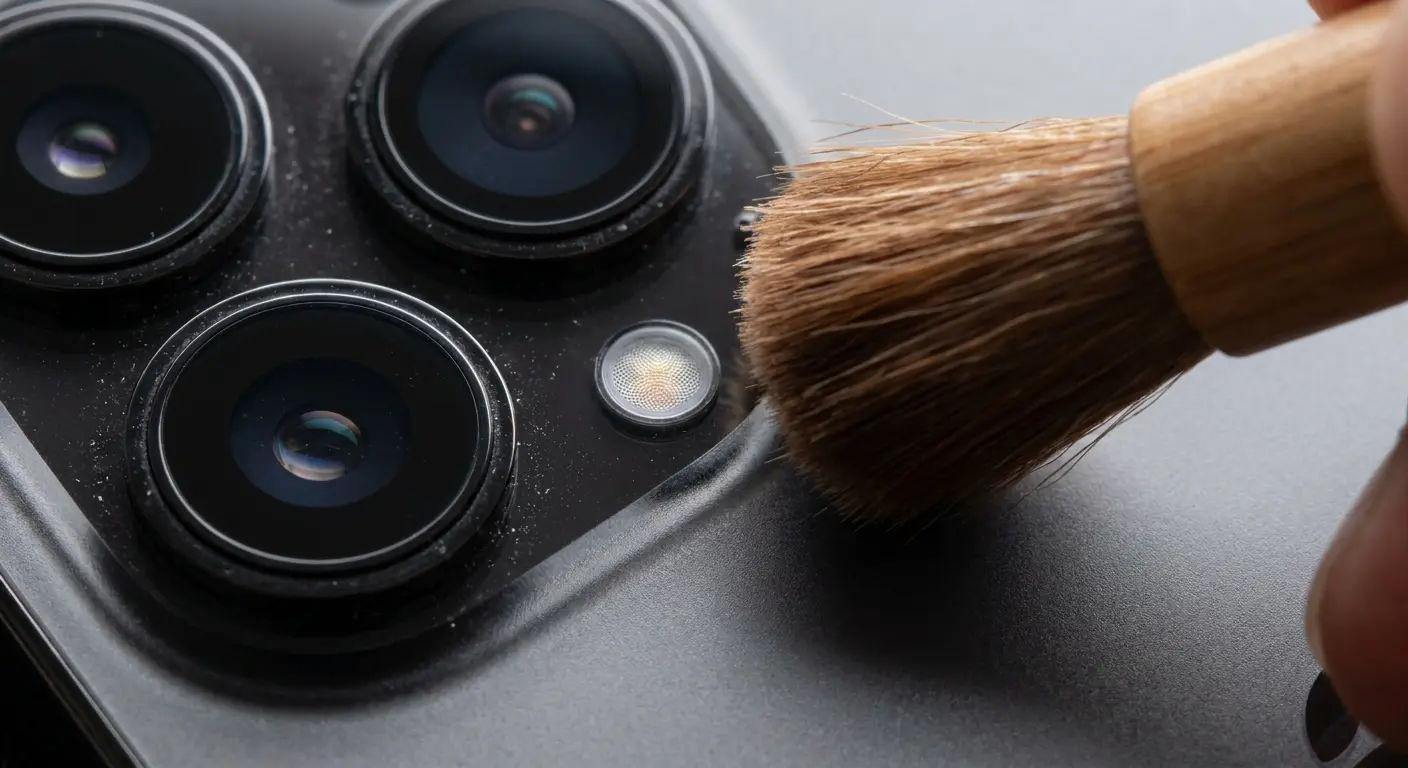
A soft-bristle brush works better for the front receiver than for other microphones. Use a camera lens brush with natural bristles. Brush gently along the length of the grille, not across it. You're trying to pull debris out toward the edges, not push it deeper into the channel.
Painter's tape is your most effective tool here. Cut a thin strip (about 1/4 inch wide) and press it along the entire length of the receiver grille. The narrow strip makes sure you're only contacting the grille area, not the screen or surrounding surfaces.
Apply the tape, press for 2 seconds, then peel away slowly starting from one end. You'll see a surprising amount of skin oils and particles on the tape. Repeat until the tape comes away clean.
For stubborn buildup (makeup or moisturizer residue), you need isopropyl alcohol. Dampen a cotton swab with 90%+ alcohol, squeeze out excess liquid until the swab is barely damp, then gently run it along the grille. The alcohol dissolves oils that mechanical cleaning can't remove.
Wait 60 seconds after alcohol application for complete evaporation. The receiver grille has less ventilation than bottom microphones, so liquid takes longer to dissipate.
Avoid dental tools , needles, or any pointed objects near the front receiver. The screen seal is right there, and puncturing it creates water resistance problems that are expensive to repair.
Some iPhone models have the receiver grille recessed slightly below the screen surface. If yours does, you can use a clean, dry toothbrush (soft bristles only) to gently brush debris toward the edges. Use light pressure and brush in one direction only.
Test the front receiver by making a call to voicemail or a friend. Hold the phone to your ear in your normal calling position. The person on the other end should hear you clearly without asking you to repeat yourself.
Rear Microphone Maintenance That Preserves Video Quality
The rear microphone determines whether your videos sound professional or muffled. It sits near your camera lenses, which makes cleaning it more complicated than other microphone locations.
This microphone faces outward when you're recording video, which means it's exposed to environmental conditions: wind, rain, dust, pollen, and anything else in the air. It accumulates debris differently than microphones that face your body or downward into pockets.
Camera lens proximity is the main risk during cleaning. You cannot let cleaning tools contact your lenses. Even soft materials can leave micro-scratches that degrade photo quality.
Remove your case and identify the rear microphone location. On most iPhones, it's a small hole between or near the camera lenses. On Pro models with three lenses, there may be two microphone holes in the camera array area.
Use compressed air with extreme caution here. The camera lenses are right next to your target, and you cannot risk blowing debris onto the lenses. Hold the compressed air can at a sharp angle (60+ degrees) and aim at the microphone hole, not the general camera area.
Short, controlled bursts are critical. One-second bursts maximum, with full pauses between them. You need precision, not volume.
Painter's tape works well for the rear microphone if you're careful. Cut a small piece (1/4 inch square) and apply it only to the microphone hole. Press gently, hold for 2 seconds, then peel away. Keep the tape away from camera lenses entirely.
A lens cleaning brush designed for cameras can help remove loose debris around the microphone area without risking lens contact. Use it to brush debris away from both the microphone and lenses before using compressed air.
The rear microphone often sits in a slight depression or channel, especially on newer iPhone models. This design protects it from direct impact damage but creates a debris trap. You may need to angle your compressed air from multiple directions to fully clear the channel.
Wedding videographer I worked with (shoots every weekend, outdoor ceremonies mostly) kept blaming her equipment. Bought a new shotgun mic, still sounded muddy. Three months of this before she brought me the phone. The rear microphone channel was packed solid with pollen and plant fibers. I mean packed. After we cleaned it out, she watched back some of her recent videos and just went quiet. All that money on new equipment when the problem was a $0.50 cleaning job.
Cases with raised camera bumpers create additional complications. The bumper protects your lenses but also creates a sealed chamber around the entire camera array. Debris that gets inside that chamber has nowhere to go except into the microphone or onto your lenses. iPhone 14 cases I design feature camera cutouts with adequate clearance to prevent this sealed chamber effect.
Clean the interior of your case's camera cutout thoroughly before reinstalling it. Use compressed air and a lint-free cloth dampened with isopropyl alcohol. Any debris left in the case cutout will immediately recontaminate your rear microphone.
Test the rear microphone by recording a video in a quiet environment. Speak at normal volume while holding the phone at arm's length (typical video recording position). Play back the video. Your voice should sound clear and natural, not muffled or distant.
Record a second test video outdoors or with background noise. The rear microphone includes noise cancellation features, and you need to verify they're working properly. Background noise should be present but not overwhelming.
Testing Audio Quality After Cleaning
Cleaning means nothing if you don't verify it worked. You need systematic testing for each microphone location.
Open Voice Memos. Hit record. Hold your phone six inches from your face (not pressed against it, not across the room, six inches) and say something with varied sounds. I usually go with "Testing bottom microphone with different sounds including S, F, and TH" because those sounds show problems fast.
Record for ten seconds. Play it back.
You should sound like you. Not muffled-you. Not distant-you. Just you.
If you sound like you're calling from inside a tunnel, the bottom mic is still blocked.
Your voice should sound natural and clear. Sibilant sounds (S, F, TH) should be crisp, not muffled or distorted. If your voice sounds compressed or distant, the bottom microphone is still obstructed.
Test the front receiver microphone with a phone call. Call your voicemail or a friend who can give you honest feedback. Hold the phone to your ear in normal calling position. Speak at your usual volume. The person on the other end should hear you clearly without asking you to repeat yourself or saying you sound far away.
Record a video to test the rear microphone. Open the Camera app, switch to video mode, and record yourself speaking while holding the phone at arm's length. This mimics how you'd use the rear microphone during video recording. Play back the video with the volume at 75%. Your voice should be clear and present, not distant or echo-y.
Test the noise cancellation features by making a call in a moderately noisy environment (not silent, but not extremely loud). The person you're calling should hear your voice clearly with background noise reduced but not eliminated. If they hear overwhelming background noise, your microphones aren't working together properly for noise cancellation.
Siri provides another testing method. Activate Siri and give a complex command: "Set a timer for 7 minutes and 30 seconds." Siri should understand you on the first attempt. If Siri consistently asks you to repeat yourself, your microphones aren't capturing voice input clearly.
Video call testing reveals front receiver performance. Start a FaceTime or Zoom call. The other person should hear you clearly when you're looking at the screen in normal video call position. If they report muffled or unclear audio, the front receiver needs more attention.
Document your results. If cleaning improved audio quality but problems persist, you're dealing with either hardware damage or case obstruction issues that cleaning can't resolve.
Compare before and after. If you didn't record audio samples before cleaning, you won't have objective comparison data. For future reference, record baseline audio samples before cleaning so you can measure improvement accurately.
Some audio problems aren't debris-related. If your microphones sound clear during recordings but people complain about call quality, you might have a cellular signal issue rather than a microphone problem. Test in different locations to rule out network factors.
When Software Issues Masquerade as Hardware Problems
You've cleaned every microphone thoroughly and audio quality is still terrible. The problem might not be hardware at all.
iOS includes audio routing settings that can make clean microphones sound muffled or distant. Check these settings before assuming you need more aggressive cleaning or professional repair.
Bluetooth is the sneakiest culprit
Your phone might be routing audio through a Bluetooth device you forgot exists. That car stereo you paired with six months ago? Your phone still thinks it's connected, even though you're inside your house.
Open Control Center. Long-press the audio card. Check which output is selected. If it's anything except "iPhone," disconnect it and test again.
I once spent an hour troubleshooting a "broken" microphone before I realized the guy's phone was paired to his car stereo. In his garage. While he was in his house. I'm still annoyed about it.
Noise Cancellation can backfire
Settings > Accessibility > Audio/Visual > Phone Noise Cancellation
This feature is supposed to reduce background noise. Sometimes it makes you sound like a robot instead. Toggle it off and make a test call.
The "Mono Audio" setting affects how sound is processed. If it's enabled, audio might sound different than you expect. Check Settings > Accessibility > Audio/Visual > Mono Audio and make sure it's disabled unless you need it for accessibility reasons.
Force restart fixes weird glitches
Press and release Volume Up. Press and release Volume Down. Hold the Side button until you see the Apple logo.
This clears temporary software garbage that affects audio processing. It's the tech support equivalent of "have you tried turning it off and on again," but it works more often than it should.
Check app permissions
If Zoom can't hear you but phone calls work fine, the app might not have microphone access.
Settings > Privacy & Security > Microphone
Find the app. Make sure it's toggled on. If it is, toggle it off then back on to reset the connection.
iOS updates matter
Apple releases updates that fix audio bugs. Check Settings > General > Software Update. If there's an update, install it. Back up your data first because I'm not responsible if something goes wrong.
Carrier settings updates sometimes resolve call quality problems. Open Settings > General > About. If a carrier settings update is available, you'll see a popup. Install it and test call quality again.
Last resort: Reset network settings
Settings > General > Transfer or Reset iPhone > Reset > Reset Network Settings
This nukes all your network configurations. You'll have to re-enter WiFi passwords. But it can fix audio routing issues that nothing else touches.
Only do this if you've tried everything else. It's annoying.
Some apps have their own audio settings that override system settings. Video recording apps, voice memo apps, and communication apps often include audio quality settings. Check the app's settings menu for audio input options.
Screen protectors can be villains too
Some cheap screen protectors extend too far and partially cover the front receiver grille. Peel back the top edge and check. If it's covering the grille, trim it or replace it.
Case Selection Criteria That Prevent Future Buildup
Your next case determines whether you're cleaning microphones monthly or yearly. Choose wrong and you're back here in three weeks.
Precision cutouts are everything
Measure them before you buy if possible. Each cutout should extend at least 1mm beyond the microphone grille on all sides. Not "close enough." At least 1mm or more.
Cases with cutouts that exactly match the grille size will cause problems within weeks. I've tested this on hundreds of cases. The manufacturers who get it right are rare.
Material matters more than you think
Rigid polycarbonate with smooth interiors equals less debris accumulation.
TPU (that flexible rubber-ish stuff) equals lint magnet. It builds up static charge and attracts every piece of pocket debris within range. I replace TPU cases every six months and I design these things for a living.
Leather equals looks premium, sheds particles as it ages.
Fabric equals why would you do this to yourself.
Avoid raised edges near microphones
Any decorative border or protective ridge around a microphone cutout is a debris trap. The case should have clean, flush cutouts with no fancy elements nearby.
Interior surface finish matters more than exterior appearance. The surface that contacts your phone should be smooth and non-porous. Textured interiors, fabric linings, or soft-touch coatings all increase debris accumulation.
Camera bump design affects rear microphone performance. The case should have adequate clearance around the entire camera array, not just the lenses. A 2-3mm gap between the case edge and microphone hole prevents obstruction while maintaining protection.
Test the fit before committing
It should snap on firmly without requiring excessive force. If you're pushing hard to install it, you're compressing the material. That deforms cutouts and creates pressure points on microphone areas.
Read reviews for audio complaints
If multiple people mention muffled calls or poor speaker performance, the case design is flawed. Don't assume you'll have better luck with the same product.
Hybrid cases with multiple material layers (hard exterior, soft interior) can work well if designed properly. The key is making sure the interior layer doesn't extend into microphone cutout areas. The cutout should go completely through all layers with clean edges. I design motorcycle phone mounts and cases together to make sure mounting systems don't interfere with microphone performance.
Transparent cases reveal debris accumulation, which is an advantage. You can see when cleaning is needed instead of waiting for audio quality to tank. Opaque cases hide problems until they're severe.
My personal rule: If a case costs less than $20, the cutouts probably aren't precise enough. There are exceptions, but not many. You get what you pay for.
Maintenance Schedules Based on Usage Patterns
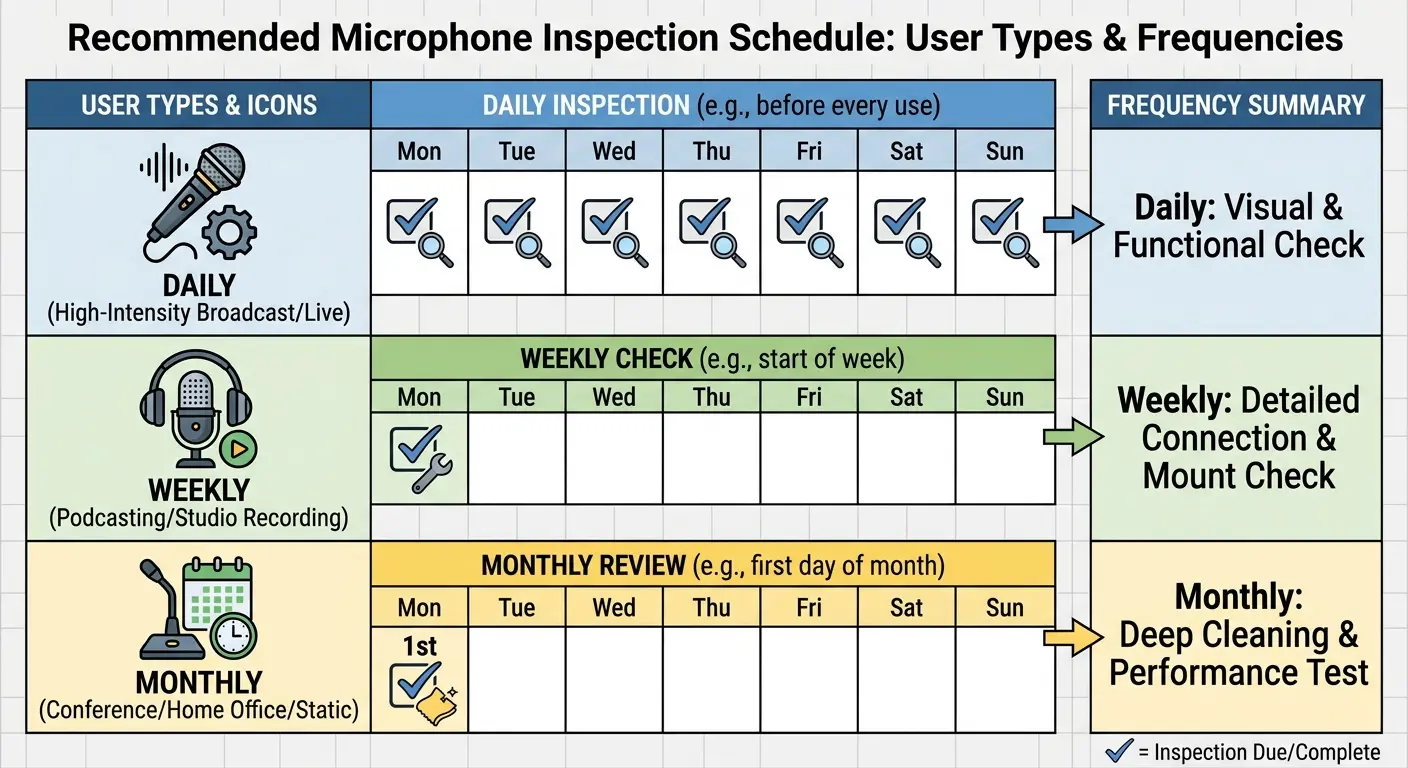
Cleaning schedules aren't one-size-fits-all. How often you need to clean depends entirely on how you use your phone.
Heavy pocket carriers: Weekly inspections
If your phone lives in your jeans or jacket pocket, check the microphone grilles every week. You don't need to clean weekly, but you need to look before debris gets compacted and impossible to remove.
Desk workers: Every two weeks
Phones that sit on desks or in bags accumulate debris slower. But environmental dust still settles. Check every couple weeks.
Outdoor workers or athletes: Every 3-4 days
Sweat, moisture, dust, dirt. They bond together fast. If you work construction, landscaping, or you're at the gym daily, inspect your mics every few days. Waiting a week means you'll need aggressive cleaning.
Makeup wearers: Weekly front receiver cleaning
Foundation and powder build up in that top grille with every call. Wipe it with a barely-damp alcohol cloth weekly, even if it looks clean. Prevention is easier than excavation.
Parents with young children: Daily quick checks
Kids touch phones with sticky hands, drop food on them, and expose them to environments you'd normally avoid. Daily inspections prevent disaster.
Seasonal adjustments
Spring pollen season equals more frequent cleaning. Winter indoor heating equals static attracts dust faster. Summer humidity equals debris sticks quicker. Fall outdoor activities equal new particle types.
Create a simple routine
Once per week (or whatever matches your usage), remove your case completely and look at each microphone grille under good light. See visible debris? Clean it then. Grilles look clear? Skip cleaning that week.
Use your calendar app to set inspection reminders. Schedule them for times when you actually have 10 minutes. Skipping inspections because you're busy just means longer cleaning sessions later.
Real talk: most people won't follow a maintenance schedule. I get it. Life happens. But here's the minimum. Once a month, take your case off and actually look at your microphone grilles. That's it. Thirty seconds. If you see visible debris, clean it then. If not, you're good for another month.
This isn't like flossing where your dentist judges you. This is practical maintenance that prevents actual problems.
Track patterns
If you're cleaning the bottom mic weekly but the rear mic stays clean for months, your usage patterns are causing specific accumulation. Adjust your case choice or how you carry your phone.
Post-cleaning maintenance extends the time between deep cleans. After a thorough cleaning session, apply a tiny amount of compressed air to each microphone daily for the first week. This prevents new debris from settling and compacting.
Replace your case every 6-12 months
Even if it looks fine. Case materials degrade in ways that increase debris accumulation. The interior surface gets rougher, cutouts lose precision, materials start shedding particles.
You can't see this degradation, but it's happening.
Track your audio quality subjectively. If you notice you're asking people to repeat themselves more often, or people are asking you to speak up during calls, don't wait for your scheduled inspection. Clean immediately and adjust your maintenance schedule to prevent recurrence.
Professional environments demand higher standards. If you take business calls regularly, your audio quality affects your professional image. Inspect before important calls and maintain a zero-tolerance policy for any audio degradation.
When to Stop Cleaning and Admit Defeat
If you've cleaned your microphones three times using proper technique and audio quality is still terrible, you probably have hardware damage. The mesh screen might be punctured, the microphone element itself might be damaged, or there's internal debris you can't reach.
At that point, you need professional repair or Apple service. It'll cost $50-150 depending on the damage and whether you have AppleCare.
Or (and I hate saying this) it might be time for a new phone if the repair cost approaches your phone's current value.
But before you spend that money, try one more thing: borrow a friend's case (or go caseless for a day) and test your audio. If it suddenly sounds perfect, your case was the entire problem and you don't need repairs at all. You need a better case.
I've saved people hundreds of dollars with this test.
Mistakes I see constantly:
Blasting compressed air straight into ports (pushes debris deeper)
Using too much isopropyl alcohol (liquid damage)
Cleaning with the case still on (pointless)
Not testing after cleaning (how do you know it worked?)
Buying the same poorly designed case again (definition of insanity)
Ignoring the front receiver (then wondering why calls sound bad)
Using sharp objects (enjoy your repair bill)
Don't do these things. Learn from other people's expensive mistakes.
Final Thoughts
Look, I've been designing phone cases for eight years. I've seen every possible way a case can screw up your microphone, and I've watched hundreds of people clean their phones religiously while using cases that guarantee the problem will come back in days.
You can have the cleanest microphones in the world, but if your case is funneling debris into them, you're fighting a losing battle.
This matters more than you think. I've seen people lose freelance gigs because clients couldn't understand them on calls. Relationships strained because someone sounds disinterested or distant when they're just dealing with a clogged microphone. Your audio quality affects how people perceive you, and most people never connect their muffled voice to a $30 case with imprecise cutouts.
Here's what you do next:
Today: Clean your microphones using the techniques I've outlined. Test each one individually. Be honest about whether it worked.
This week: Evaluate your case. Actually measure the cutouts. Check the interior for debris buildup. If it's contributing to the problem, accept that no amount of cleaning will give you lasting results.
Going forward: Choose protection that doesn't compromise the features you actually use your phone for. Precision cutouts aren't a luxury feature. They're the difference between monthly frustration and forgetting your microphones exist.
One more thing, because this drives me crazy:
Case manufacturers know about this problem. They know imprecise cutouts cause audio issues. They don't care because most people never figure out the case is the culprit. They blame their phone, or their carrier, or they just live with it.
Don't be that person.
Your iPhone's microphones are engineered to extremely tight tolerances. Apple spent millions getting the acoustic properties right. Then you slap a $15 Amazon case on it with cutouts that are "close enough" and wonder why you sound terrible on calls.
I'm not saying you need to spend $100 on a case. I'm saying you need to spend five minutes actually looking at the cutouts before you buy. Measure them if you can. Read reviews that mention audio quality. Ask questions.
And if you're in the market for a case that won't create these problems, well, I happen to design those. Rokform cases have CNC-machined cutouts with proper clearance because I'm tired of seeing people struggle with this stuff.
But even if you buy someone else's case, at least now you know what to look for.
Clean your phone. Fix your case situation. Stop having people ask you to repeat yourself on calls.
You're welcome.

