


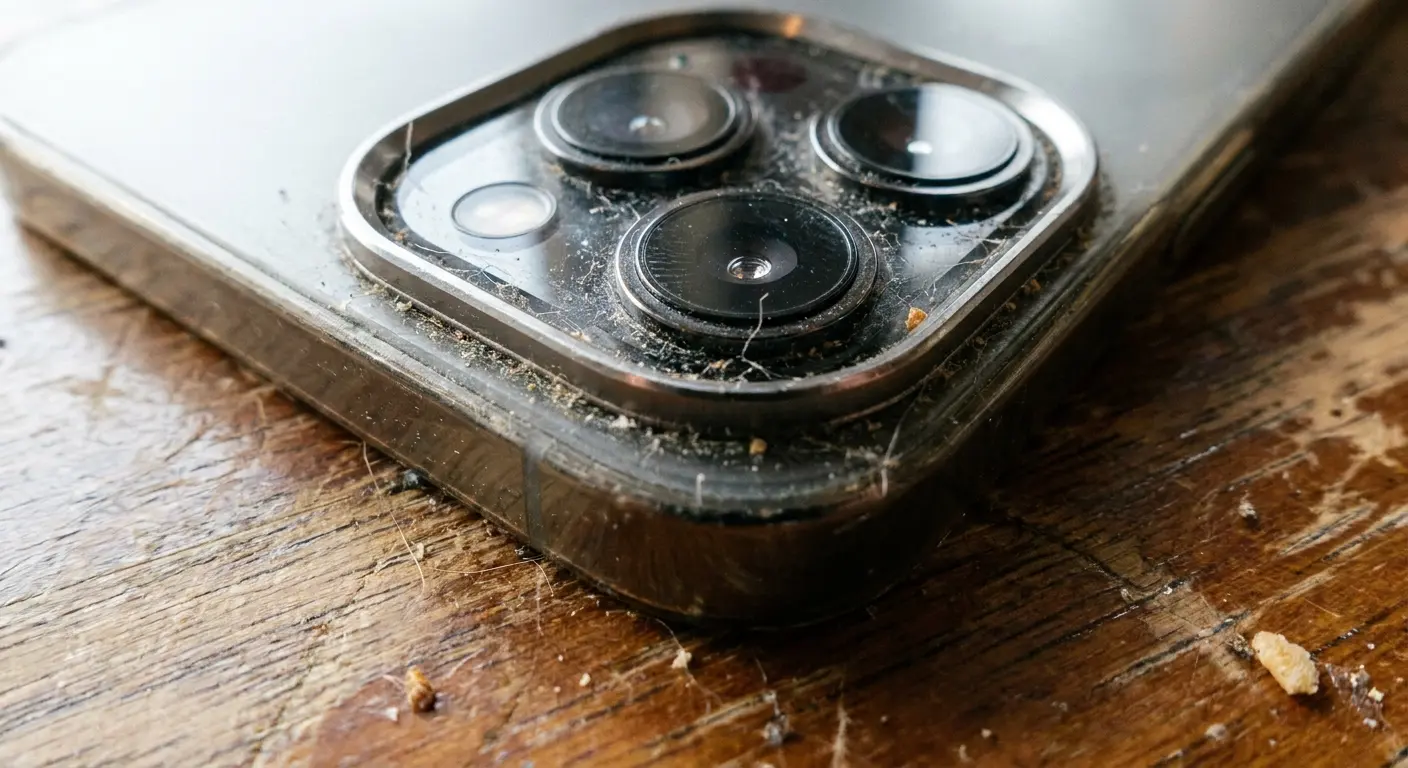
You're scratching your phone's camera lens every time you clean it. Not might be. You are.
That microfiber cloth you've used twenty times without washing? It's full of particles from the last twenty surfaces you cleaned. Those "electronics-safe" wipes from the checkout aisle? They're soaked in alcohol that strips the coating off your lens. Even the way you wipe, those circular motions that feel so thorough, you're grinding microscopic sand particles across the glass.
Your photos look hazier than they did six months ago, and you blame the phone. But it's not the phone. It's what you've been doing to it.
Table of Contents
Why Your Lens Gets Filthy So Fast
The Invisible Coatings You're Destroying
What Actually Scratches Glass (And What Doesn't)
Tools That Work vs. Tools That Wreck Your Lens
How to Clean Without Causing Damage
When Your Case Is Sabotaging You
Emergency Cleaning Without Proper Tools
Final Thoughts
TL;DR
Your lens has three nano-coatings that degrade every time you clean wrong. Even when the lens looks fine, your photo quality suffers
Alcohol wipes (yes, even the "safe" ones) strip protective coatings. Microfiber cloths trap sand and dust that scratch your lens on the next cleaning
Your case design determines how fast your lens gets dirty and whether you can clean it safely
Wipe in straight lines, never circles. Use solution, not spit. Check for particles before you touch the lens, or you'll grind them across the glass
Why Your Lens Gets Filthy So Fast
Modern phone design created a problem that didn't exist before: that camera bump everyone hates? It's a dirt magnet.
Every time you set your phone down, the camera touches the surface first. Restaurant tables with food grease. Your car's dashboard releasing plastic fumes in the heat. The bathroom counter with soap spray dried on it. Your desk with dust from that bag of chips you ate while scrolling.
And that metal ring around your lens? It's a particle trap. Dust settles in the gap between the ring and the glass. Pocket lint gets stuck there. Each time you pick up your phone, you drag that debris across the lens.
The worst surfaces? Gym equipment (sweat plus disinfectant spray plus body oils), restaurant tables (cooking oil you can't even see), and bathrooms (soap residue that never fully dries). If your phone touched any of these today, your lens is contaminated right now, whether you can see it or not.
The raised module design means your camera lens is constantly exposed to surface contamination that the rest of your phone never touches. Most flagship phones have camera bumps that protrude between 1.5 to 3 millimeters from the phone body. That's enough to make first contact with surfaces 100% of the time.
The Oil Transfer You Don't See
Your fingers transfer oil to everything you touch. Not gross oil, just sebum, the natural oil your skin produces. But it's sticky enough to trap particles.
You scroll Instagram for twenty minutes holding your phone by the edges. Set it down. Touch your face to adjust your glasses. Pick up the phone. Now the oil from your face is on your fingers, and your fingers transfer it to the phone body. You do this fifty times a day.
By evening, there's oil on your lens despite you never touching it directly. And that oil is covered in dust from your pocket, creating a film that wrecks your photos. The oil isn't the problem. It's what sticks to the oil.
The oil itself attracts and holds airborne particles, making the contamination problem compound over time. Dry wiping just spreads the oil around and grinds the particles across your lens.
Where Your Phone Lives Matters
Where you carry your phone determines what contaminants you're dealing with. Gym bags expose your lens to protein residue from workout supplements, fabric fibers from towels, and moisture from sweat. Purses with cosmetics introduce talc particles from powder makeup, aerosol propellants from hairspray, and oil from skincare products. Pockets accumulate lint, dust, and whatever particles your clothing picked up throughout the day.
Each environment introduces specific debris types that require different cleaning approaches. You can't treat gym bag contamination the same way you'd handle office desk exposure. The particle size, composition, and adhesion properties vary significantly.
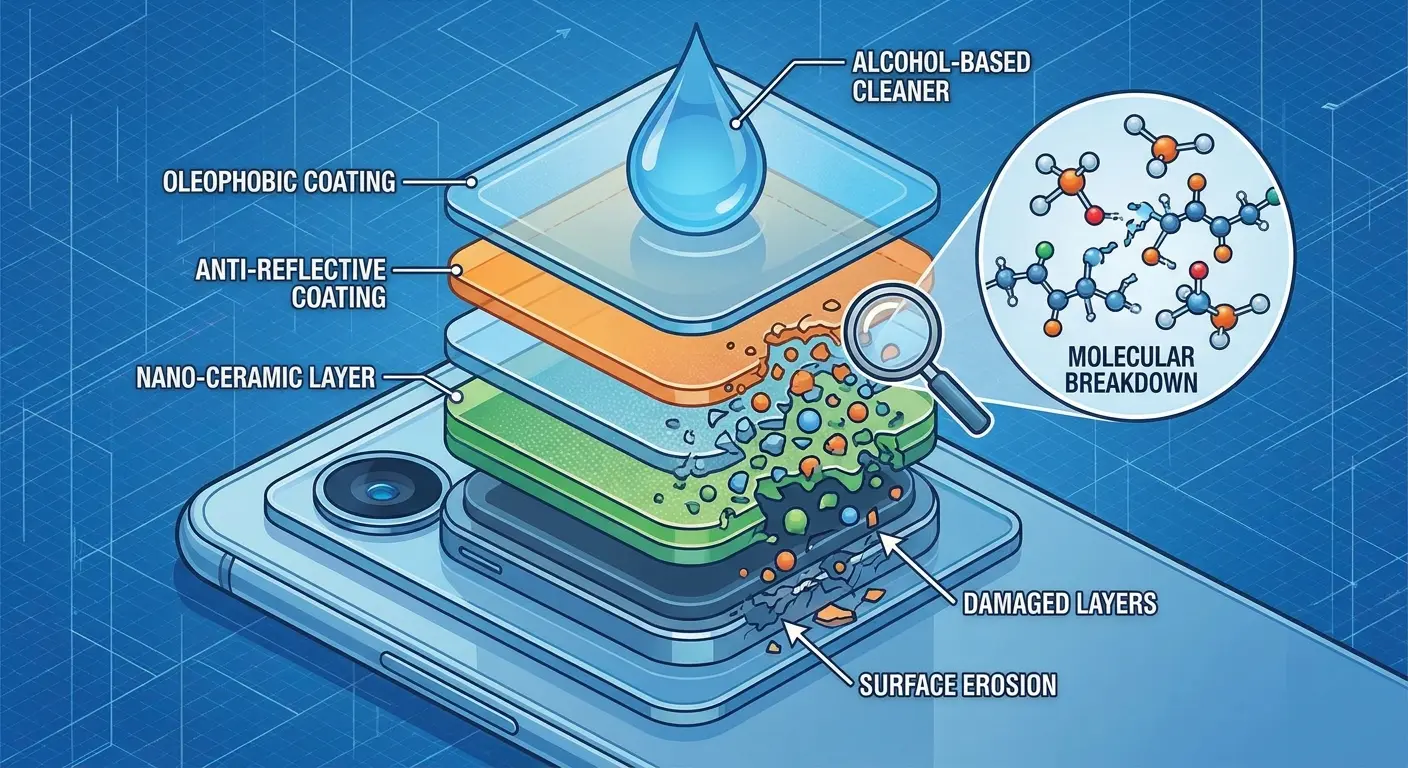
The Invisible Coatings You're Destroying
Your phone's camera lens has three invisible coatings, each thinner than a hair, each more fragile than the glass underneath. When you clean your lens, you're not wiping glass. You're wiping precision coatings that cost millions to develop.
And most people destroy them without knowing it.
Coating Type |
Thickness |
Primary Function |
Failure Symptoms |
Average Lifespan with Proper Care |
Average Lifespan with Improper Care |
|---|---|---|---|---|---|
Oleophobic (outer layer) |
10-20 nanometers |
Repels oils and fingerprints |
Water no longer beads, oils spread wider |
18-24 months |
6-12 months |
Anti-reflective |
100-150 nanometers |
Reduces lens flare, improves light transmission |
Increased flare in photos, reduced contrast |
3-5 years |
12-18 months |
Scratch-resistant |
50-100 nanometers |
Protects against minor abrasions |
Visible micro-scratches, hazy appearance |
4-6 years |
18-24 months |
These coatings work together, which means when one fails, the others follow. The oleophobic coating (outermost layer) goes first, usually within a year if you're cleaning with alcohol wipes. Once it's gone, oils penetrate deeper and become impossible to remove without aggressive wiping. That aggressive wiping kills the anti-reflective coating underneath. Now your photos have lens flare even with a clean lens.
You won't see it happening. The lens looks fine. But six months of alcohol-based cleaning and your oleophobic coating is gone. Your photo quality has degraded permanently, and you think it's just because your phone is getting old.
How Cleaning Destroys Coatings
Alcohol-based cleaners are killing your lens coating. Every. Single. Time.
Those pre-moistened wipes at the phone store checkout? The ones that say "safe for electronics" right on the package? They're 70-90% isopropyl alcohol. The alcohol breaks down the fluoropolymer chains in your oleophobic coating. You won't notice it happening. The lens still looks fine. But after six months of those "safe" wipes, your coating is gone.
And here's the thing that pisses me off: they're marketed as the right tool for the job. Phone stores sell them. People trust them. And they're systematically destroying lens coatings on millions of phones.
The damage is cumulative. Each wipe strips a microscopic amount of coating. After months of use, you're wiping bare glass, which means oils spread wider, fingerprints stick harder, and you have to clean more often. Which strips more coating. It's a cycle that ends with permanently degraded photo quality.
Abrasion from improper wiping techniques creates different damage. When you wipe in circular motions with moderate pressure, you're creating microscopic scratches in the coating surface. These scratches scatter light, reducing image sharpness and creating that hazy appearance that cleaning can't fix. The damage accumulates over time. Each cleaning session adds more micro-scratches until the coating's optical properties degrade noticeably.
Recognizing Coating Damage in Your Photos
Your photos will show coating problems before your eyes can see them on the lens itself. You're photographing your friend standing in front of a window on a sunny afternoon. The image shows pronounced lens flare radiating from the window, and your friend's face appears slightly washed out with reduced color saturation. You clean your lens thoroughly, but the next photo shows the same issues. This indicates anti-reflective coating degradation, not dirt. The coating damage is scattering light internally, creating flare and reducing contrast. Your lens may look perfectly clean, but the optical performance has permanently declined. This type of damage typically results from months of cleaning with alcohol-based wipes.
Test your lens coating health by taking a photo of a bright, uniform surface. A white wall works well. Review the image at 100% zoom. If you see uneven brightness, haze that doesn't correspond to visible smudges, or color fringing around high-contrast edges, your coatings are degrading.
Water beading provides another diagnostic test. Put a small drop of water on your lens. If the water beads up into a tight sphere, your oleophobic coating is intact. If it spreads into a wider puddle, the coating has failed. This test works because oleophobic coatings increase surface tension, causing water to bead rather than spread.
What Actually Scratches Glass (And What Doesn't)
Keys won't scratch your lens. Neither will coins. Sand will absolutely destroy it.
The difference is hardness. Your lens is sapphire or hardened glass, about 6-7 on the Mohs scale. Steel keys? Maybe 4-5. Too soft to scratch. But sand is quartz, and quartz is a 7. Hard enough to carve permanent scratches with basically zero pressure.
Which means every time you've cleaned your lens with a cloth that was in your pocket with beach sand, or sat on a dusty table, or touched your car's dashboard, you've potentially been grinding quartz across your camera lens.
Beach trips, construction sites, even your backyard on a windy day. All of these expose your phone to quartz particles. Urban dust contains quartz from concrete. Household dust has it from drywall. It's everywhere, it's harder than your lens, and it's probably on your cleaning cloth right now.
Your Cleaning Cloth as a Scratch Weapon
Your microfiber cloth is probably full of particles right now. Particles harder than your lens. Particles that will scratch the glass the next time you "clean" it.
Microfiber works by trapping debris in its split fibers, thousands of tiny pockets that grab and hold particles. That's what makes it effective. It's also what makes it dangerous after a few uses.
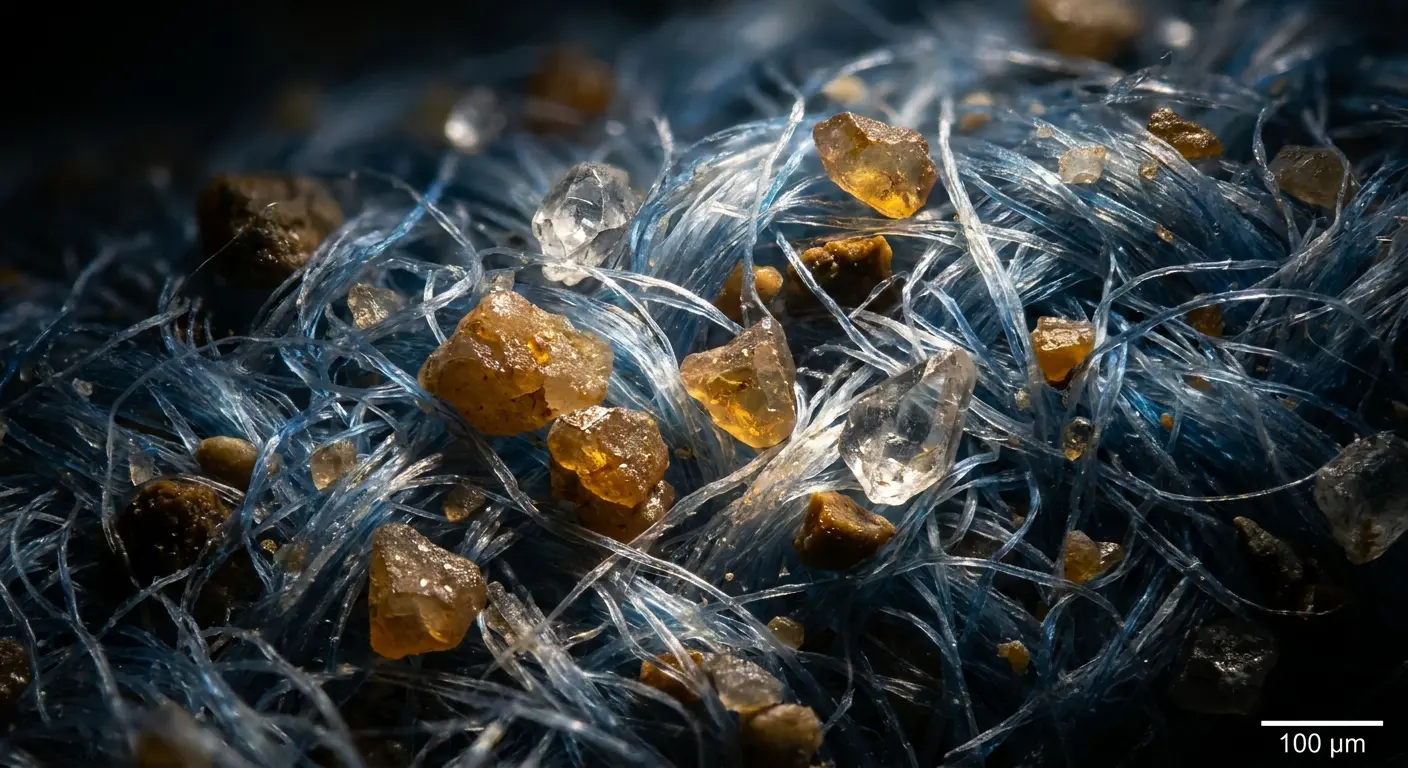
I tested this. Took a microfiber cloth, wiped a dusty table once, then shook it out hard. Under magnification, it still had 200-300 particles embedded in the fibers. Those particles stayed there through vigorous shaking. The next time I used that cloth? I was dragging all 200+ particles across the lens.
Wash your microfiber cloths after every 2-3 uses. Not when they look dirty. By then it's too late. Hand wash with mild soap, rinse until the water runs clear, air dry in a clean spot. Store them in a sealed bag between uses.
Or keep using the same cloth for months and wonder why your lens looks hazier every time you clean it.
Case Design and Particle Concentration
Raised bezels around your camera module create a particle trap. Dust and debris settle into the gap between the bezel and the lens. When you attempt to clean your lens, your cloth or finger pushes against the bezel edge, dragging accumulated particles across the lens surface.
Case designs with high bezels (2mm or more) protect your lens from direct contact with surfaces. They also create deeper particle traps that are harder to clean. Cases with shallow bezels (1mm or less) reduce particle accumulation but provide less impact protection. You're trading one risk for another.
The material matters too. Smooth plastic bezels allow particles to slide away more easily. Textured rubber bezels grip particles and hold them in place. Metal bezels can scratch if they come into contact with the lens during cleaning.
Just as with protecting your mobile phone lens, case selection requires balancing multiple factors. The best protection against surface scratches might create the worst environment for cleaning-related damage.
Tools That Work vs. Tools That Wreck Your Lens
Most phone camera cleaning tools are designed to be convenient, not effective. The pre-moistened wipes at checkout? Convenient. The microfiber cloth that came free with your sunglasses? Convenient. Your shirt? Extremely convenient.
All of them are wrong.
What actually works: camera lens cleaning cloths (not phone-marketed ones), distilled water or proper lens solution (not alcohol), and a bulb blower (that rubber squeeze thing photographers use).
Why camera equipment instead of phone accessories? Because camera manufacturers have been solving this exact problem for decades. Their cloths are made for optical glass with precision coatings, which is exactly what your phone lens is. Phone accessories are just rebranded general products with phone pictures on the package.
Microfiber Cloth Quality Markers
Thread density determines cleaning effectiveness and scratch risk. Quality microfiber cloths have a minimum of 200,000 fibers per square inch. Budget cloths often have 50,000-100,000 fibers per square inch. That difference affects both cleaning performance and safety.
The weave pattern matters as much as thread count. Waffle-weave microfiber creates more surface area for particle capture but also creates more particle traps that require frequent washing. Flat-weave microfiber releases particles more easily during washing but provides less initial cleaning power.
Split-fiber construction is non-negotiable. The manufacturing process splits each fiber into multiple strands, creating the wedge-shaped cross-section that lifts and traps particles. Non-split microfiber just pushes debris around rather than capturing it. Check the product specifications. If it doesn't explicitly state "split-fiber construction," assume it's not.
Camera lens cleaning cloths outperform phone-specific products because camera manufacturers have been solving lens cleaning problems for decades. Their cloths are engineered for optical glass with precision coatings, which is exactly what your phone camera lens is. Phone-marketed cleaning cloths are often rebranded general-purpose microfiber with minimal quality control.
Cleaning Solutions That Won't Strip Coatings
Distilled water is the safest cleaning solution. It contains no minerals that leave deposits, no alcohol that strips coatings, and no surfactants that create residue. For most oil-based contamination, distilled water applied to a quality microfiber cloth works perfectly.
Camera lens cleaning solutions outperform phone-specific cleaners because they're formulated for delicate optical coatings. These solutions use gentle surfactants that break down oils without affecting fluoropolymer coatings. They evaporate cleanly without leaving residue that attracts new contamination.
Avoid anything containing isopropyl alcohol, ammonia, or acetone. These solvents dissolve the molecular bonds in your lens coatings. The damage is cumulative and irreversible. Each application strips away coating material that can never be replaced without factory equipment.
Alcohol-free lens wipes designed for eyeglasses work in a pinch, but verify the ingredient list. Many brands have switched to alcohol-based formulas without changing their marketing. If the package says "quick-drying" or "no-rinse formula," it probably contains alcohol.
The Compressed Air Problem
Compressed air seems perfect for blowing dust off your lens without touching it. It's not. It's dangerous.
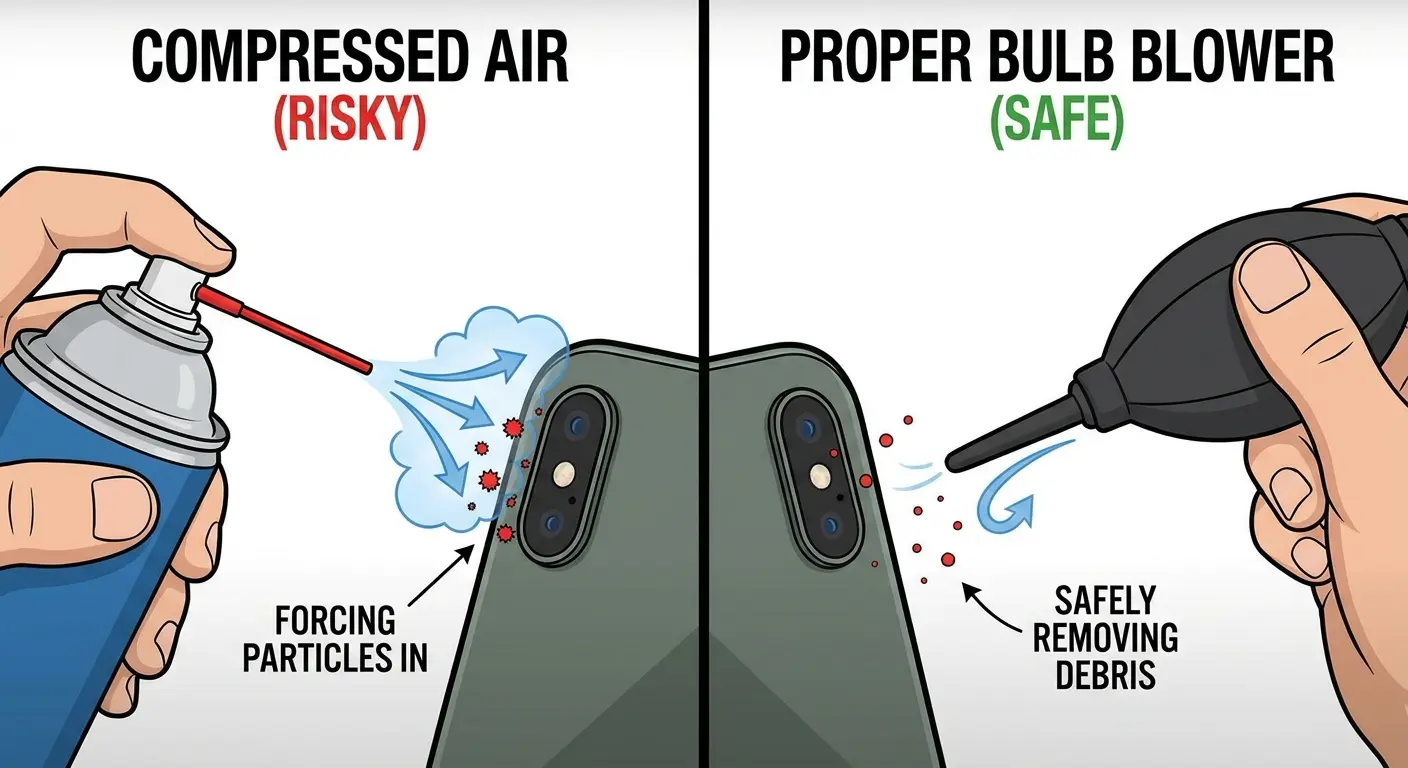
The propellant in canned air leaves residue on your lens. Worse, the pressure can force particles past the seal between your lens and the housing. Once particles get inside the camera module, they're trapped. You'll see them as dark spots in every photo, especially against bright backgrounds like blue sky.
You can't fix this yourself. The only solution is professional disassembly or full lens replacement, $150-300 depending on your phone.
Use a bulb blower instead. It's a rubber squeeze bulb that generates gentle airflow without propellant or dangerous pressure. Eight bucks. Lasts forever. Won't destroy your camera.
Cost Analysis of Proper Tools
Quality microfiber cloths cost $3-8 each. Camera lens cleaning solution runs $8-12 for a bottle that lasts six months. A bulb blower is $8-15. Total investment: $20-35.
Lens replacement costs vary by phone model, but average $150-300 for flagship devices. That's if you can even get just the lens replaced. Many repair shops replace the entire camera module, pushing costs to $200-400.
Proper cleaning tools pay for themselves by preventing a single lens replacement. Spend $30 now or spend $200 later.
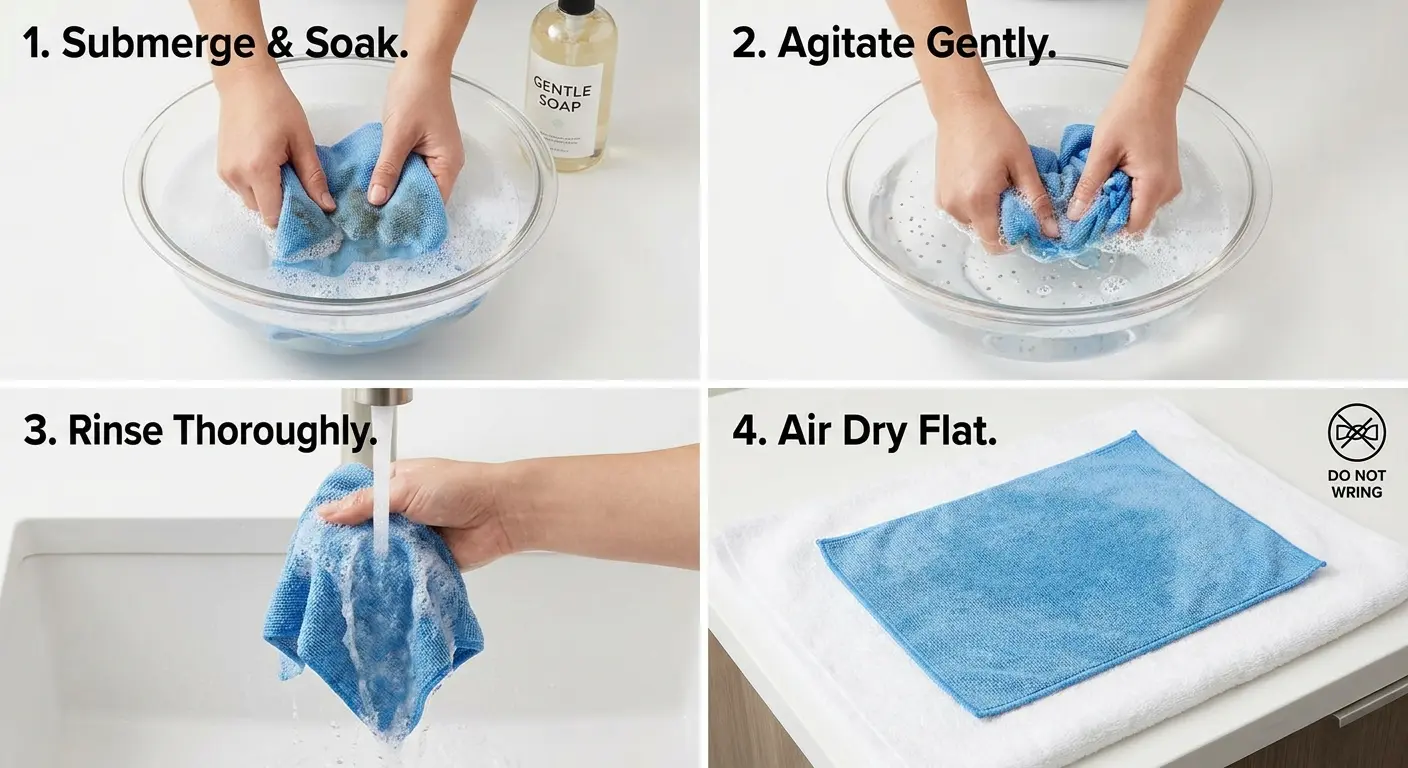
How to Clean Without Causing Damage
Cleaning your lens right means doing things in order. Skip steps and you'll grind particles across the glass.
First: Look at the lens
Hold your phone at a 45-degree angle under bright light. You're checking for three things:
Loose dust (individual specks that cast shadows)
Oil smudges (cloudy areas with no defined edges)
Water spots (circular marks with crusty rings)
The angle matters because contamination you can't see straight-on becomes obvious when light hits it at an angle.
Second: Remove particles without touching
See dust? Don't wipe it. Use a bulb blower. Hold your phone lens-down so gravity helps. Particles fall away instead of resettling. Squeeze the bulb 3-4 times from different angles.
Still see particles? They're stuck to the lens with oil or dried water. You'll need solution. Don't keep blowing. More air won't help.
Third: Apply solution (only if needed)
Put 2-3 drops of lens solution on your cloth. Never directly on the lens. It can seep into the housing. The cloth should be damp, not wet. If you can squeeze water out, you've used too much.
For stuck particles, place the damp cloth on top and wait 10-15 seconds. The solution needs time to dissolve whatever's holding the particle. Then lift the cloth gently. The particle should come with it.
Fourth: Wipe in straight lines
This is where most people screw up. No circular motions. Circular wiping spreads contamination around the lens. Straight-line wiping pushes it off the edge.
Start at one side of the lens. Wipe straight across to the other side. Lift the cloth completely off. Return to the starting edge. Repeat 2-3 times maximum.
Pressure should be barely-touching-the-lens light. The solution and cloth do the work, not your arm strength.
Fifth: Check your work
Hold the lens at an angle under light again. Still see smudges? Don't just wipe more. Figure out why:
Streaks = too much solution or dirty cloth
Haze = coating damage, not dirt
Spots in the same place = might be inside the lens (unfixable)
Take a photo of a white wall or bright uniform surface. Review at full zoom. Any spots or haze that don't match visible smudges mean either you missed something or the coating is damaged.
If it's still not clean after three wipes, stop. You need a fresh cloth section and more solution, not more pressure on the same dirty spot.
Verification and Final Polish
After cleaning, inspect the lens again under angled light. You're checking for two things: remaining contamination and cleaning residue.
The photo-based verification catches problems that visual inspection misses. If you see issues in the test photo that don't match visible contamination, you're dealing with coating damage or internal problems, not dirt.
The final polish uses a completely dry section of your cloth. One or two gentle passes remove any solution residue and bring the lens to maximum clarity. More polishing doesn't improve results and risks reintroducing contamination from your cloth.
Understanding iPhone photography tips can help you determine when lens contamination is affecting your photos versus when it's a technique issue. Sometimes what looks like a dirty lens is actually a focus or exposure problem.
When Your Case Is Sabotaging You
Your protective case might be protecting your phone while destroying your camera. Case design determines how fast your lens gets dirty and whether you can clean it safely.
Bezel height: Pick your poison
Cases with tall bezels (2mm+) protect your lens from touching surfaces. They also create a well around your camera that traps dust, lint, and debris. Every particle that falls in stays there, sitting right next to your lens.
Shallow bezels (1mm or less) let particles escape more easily. They also let your lens get closer to dirty surfaces when you set your phone down.
There's no perfect answer. You're trading contamination risk for impact protection. If you're constantly setting your phone on restaurant tables and bar tops, go with the tall bezel and commit to cleaning the well regularly. If you're careful about where you put your phone, shallow bezels mean less particle buildup.
Material matters more than you think
Smooth plastic bezels let particles slide away. Low friction means dust doesn't stick. Textured rubber grips particles and holds them against your lens. That grippy texture that prevents drops also creates hundreds of tiny pockets where debris lodges.
I've tested this. Same phone, same carrying conditions, one week. Textured rubber case accumulated 3-4 times more particles in the bezel area than smooth plastic.
Magnetic cases and metal dust
If you use a magnetic phone mount, pay attention to your work environment. Magnets attract metallic particles.
A contractor I know used a magnetic car mount and carried his phone to job sites daily. After three weeks, his photos looked like someone smeared Vaseline on the lens. Under magnification: dozens of metal shavings clustered around the camera, all magnetized to the case.
Every cleaning session dragged those hard metal particles across his lens, creating hundreds of micro-scratches. His lens looked clean but his photos were permanently degraded.
If your work involves metal dust (workshops, construction, machining), either skip magnetic cases or choose designs with magnets far from the camera module.
Clean your case, not just your lens
Particles accumulate inside your case between the phone body and case material. Every time you remove your phone to clean the lens, you risk transferring those trapped particles to the camera area.

Once a month: Remove your phone, clean the case interior with a damp cloth, let it dry completely. Pay attention to the camera cutout area. Check for cracks or separation around the cutout. Damaged areas trap particles and create sharp edges that can scratch your lens during installation.
Where You Live Changes How You Clean
Generic cleaning advice fails because it doesn't account for your specific environment. What works in an office doesn't work at the beach.
Salt air (coastal areas)
Salt spray creates a sticky film on your lens that attracts moisture from the air. It stays damp and traps particles more aggressively than normal contamination.
Standard lens solution won't fully dissolve salt deposits. Use distilled water instead. Apply it to your cloth, wait 15-20 seconds (salt needs time to dissolve), then wipe. The extended wait time is critical.
Coastal living requires daily lens cleaning during humid periods. Salt buildup is continuous. Wait a week and you'll have deposits that are much harder to remove.
Urban environments and oily films
Car exhaust and industrial emissions create oil-particle combinations that resist dry cleaning. The oil comes from unburned hydrocarbons, the particles from tire dust and brake residue.
This contamination feels slightly tacky. Dry wiping just spreads it around. You need solution-based cleaning every time in cities. Clean 2-3 times weekly even if your lens doesn't look obviously dirty. The film builds gradually and degrades photos before you can see it.
Kitchens and workshops
Cooking aerosolizes oils that settle on everything, including your phone. These oils attract flour, spice particles, and other cooking debris. Standard lens solution struggles with cooking oils.

Mix one drop of mild dish soap with 30ml distilled water. Dish soap is formulated to break down cooking oils. Apply to your cloth, clean the lens, then rinse with plain distilled water to remove soap residue. Dry with a clean cloth section.
Clean immediately after cooking. Cooking oils oxidize over time and become harder to remove.
For workshops with metal shavings or sawdust: use disposable lens tissues, not reusable cloths. Those particles are harder than your lens and will embed in microfiber. Clean before entering the workshop and immediately after leaving.
How Often Should You Actually Clean This Thing?
Clean when your lens is actually dirty, not on a schedule.
Spend 10 seconds each morning looking at your lens under angled light. See smudges or particles? Clean them. Lens looks clear? Leave it alone.
This daily check prevents buildup while avoiding unnecessary cleaning that wears down coatings. You're responding to actual contamination, not following some arbitrary twice-weekly routine.
When to clean:
You see visible contamination during your morning check
Your photos show haze or reduced sharpness
After exposure to high-contamination environments (beach, workshop, cooking)
Before important photos (weddings, events, travel)
When NOT to clean:
"It's been three days so I should probably clean it"
The lens looks fine but you're bored
You cleaned it yesterday and it still looks clean
Cloth maintenance matters more than you think
Wash your microfiber cloths after every 2-3 uses. Not when they look dirty. By then they're already full of embedded particles. Hand wash with mild soap and warm water, rub the cloth against itself to dislodge trapped particles, rinse until water runs clear.
Air dry in a clean spot away from dust. Don't use a dryer. Heat melts the synthetic fibers. Store dried cloths in sealed plastic bags to prevent contamination.
Replace cloths every 6-12 months even with proper maintenance. The fiber structure degrades over time.
Signs you're cleaning too much:
Your oleophobic coating fails within a year (water stops beading on the lens)
Photos show increased lens flare despite regular cleaning
The lens looks clean but photos are hazier than they used to be
Signs you're not cleaning enough:
Smudges return immediately after wiping
Photos show persistent haze even after thorough cleaning
The lens feels tacky or sticky to the touch
Most people in normal environments need 1-2 cleanings per week. High-contamination environments require daily cleaning. Low-contamination might only need weekly attention.
Emergency Cleaning Without Proper Tools
You're about to photograph something important and your lens is smudged. You don't have your cleaning cloth or solution. What now?
Use these in emergencies:
Your cotton t-shirt works if it's clean and you're careful. Use the inside of the shirt (less contaminated than the outside). Stretch the fabric tight to create a smooth surface. Gentle pressure, straight-line wipes.
Coffee filters are surprisingly effective. They're designed to trap particles without releasing them, and the paper is soft enough not to scratch. Same technique as microfiber: fold for a clean surface, minimal pressure, straight lines.
Eyeglass cleaning cloths work if they're recently washed. Ask the owner when it was last cleaned. If they can't remember or say "a few weeks ago," pass. A contaminated eyeglass cloth will scratch your lens just as fast as anything else.
Never use these (seriously, don't):
Paper towels contain wood fibers that scratch lens coatings. That rough texture you feel? It's hard enough to damage the nano-coatings on your lens. Even in emergencies.
Tissues are softer but still have wood fibers, plus many contain lotion additives that leave residue. That residue attracts new contamination faster than you can take your photo.
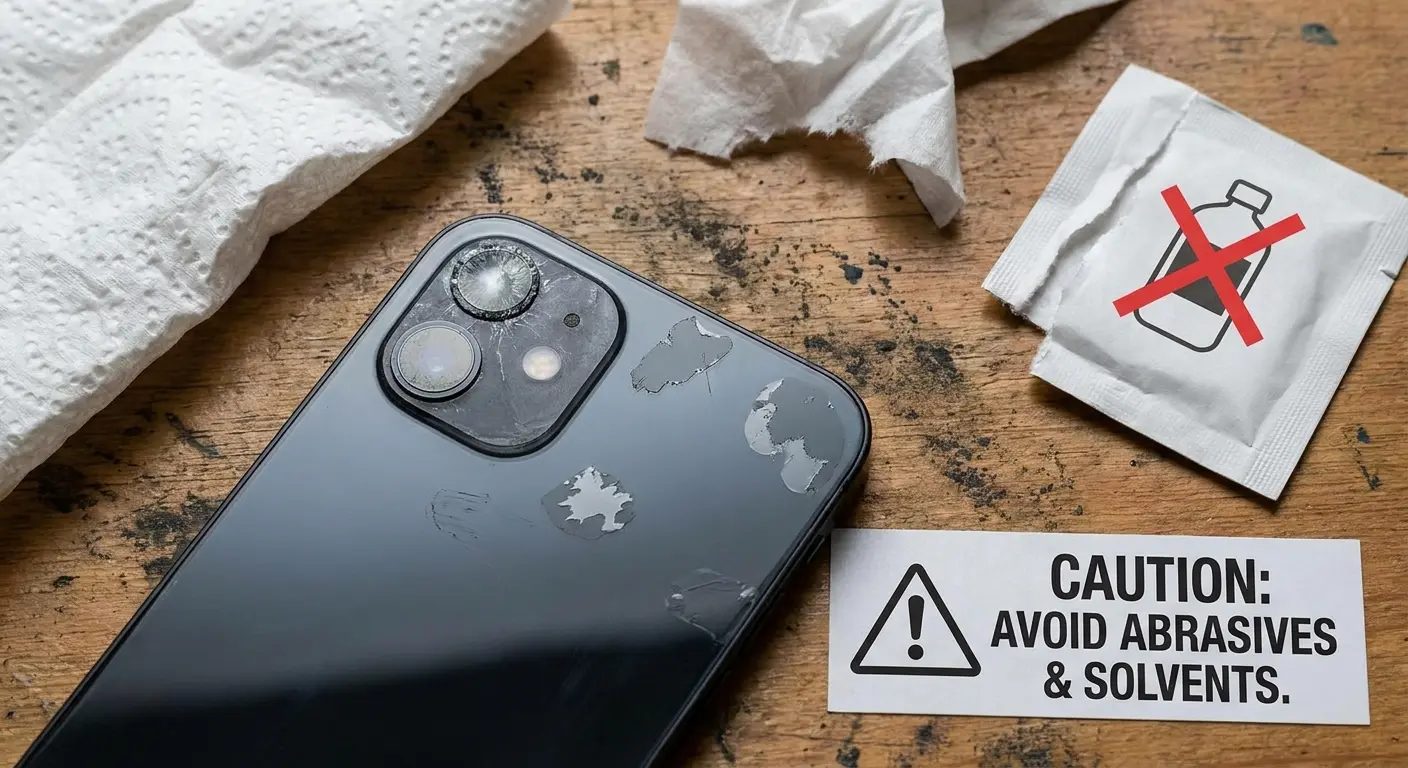
Hand sanitizer and wet wipes are alcohol-based. They'll strip your oleophobic coating. A single use won't destroy your lens, but it'll remove measurable coating material. Multiple emergency cleanings with these will permanently degrade your lens.
Your jeans trap sand, metal dust, and other hard particles in the denim weave. Using jeans to clean your lens is basically using sandpaper. The fabric itself won't scratch . The embedded particles will.
Before you do anything:
Is the contamination actually affecting your photos? Oil smudges in the center of the lens impact image quality. A dust particle at the edge might not even show up in your shot.
Take a test photo first. You might not need to clean at all.
If you see visible particles on the lens, blow them off first. Your breath works as emergency compressed air. Hold the phone at arm's length, blow firmly across the lens surface (not directly at it), check if particles dislodged. Only wipe if no particles remain.
Decide if it's worth the risk:
Once-in-a-lifetime moment? Use your shirt and accept the small risk.
Casual snapshot you'll probably delete? Wait until you have proper tools.
Important photo but lens has visible particles? Don't wipe. Particles will scratch. Either blow them off first or skip the photo.
After emergency cleaning:
Within 24 hours, do a proper cleaning with correct tools. Emergency methods often leave residue or incomplete contamination removal. Proper follow-up removes emergency residue before it bonds with your lens coatings.
Final Thoughts
Your phone's camera lens is precision optical equipment with coatings engineered at the molecular level. Treat it like that, not like a window.
The techniques in this guide work because they're based on how lens coatings actually function and fail, not generic cleaning advice recycled from other contexts. Check your lens before cleaning it. Remove particles before wiping. Use the gentlest method that handles your specific contamination.
Most lens damage happens from people trying to help. Cleaning when they don't need to, using convenient tools instead of correct ones, wiping harder when gentle didn't work. Do less, but do it right. Your lens coatings will last years instead of months, and your photos will show the difference.
We design our phone cases with camera protection as a primary consideration, because protecting your lens means protecting your ability to capture the moments that matter. The right case design minimizes contamination while maximizing protection, giving you the best foundation for maintaining lens clarity over years of use.

