


Look, I know you've wiped your phone screen at least five times today. Maybe more if you've been scrolling through Instagram while eating lunch. And I'm also gonna guess it looked perfect for about 45 seconds before the fingerprints came back.
Here's what nobody tells you: you're probably making it worse. Not because you're doing it wrong, exactly, but because every cleaning guide treats your phone like it's fresh out of the box. It's not. That slippery coating that made fingerprints disappear with one swipe? Yeah, that's been slowly dying since day one. Your case is creating dirt traps. Your screen protector needs different treatment than bare glass. And that "one size fits all" advice? Useless.
So let's talk about what works for YOUR setup, not some generic phone in a stock photo.
What's In This Guide
This is long. I'm not gonna pretend it's not. But you don't need to read all of it, just the parts that match your situation.
Why your current cleaning method isn't working (and why it used to)
The coating problem everyone ignores until it's too late
How your case is secretly making everything worse
Glass vs. film protectors (they're NOT the same)
Building a cleaning kit that makes sense
When to clean vs. when to just replace stuff
Edge cleaning (this is where most people fail)
Skip to whatever section matches your problem. I won't be offended.
The Short Version
Don't have 20 minutes? Here's what you need to know:
Your screen's protective coating wears off over time. Like, it's probably half-gone already. That changes everything about how you should clean it. Your case is creating grime traps along the edges that recontaminate your screen within hours. Glass and film screen protectors need completely different approaches. And you're probably cleaning too aggressively and not often enough (yeah, that's a thing).
Also? Sometimes the answer is "stop cleaning and just replace the screen protector." I know, revolutionary.
Now let's get into the details.
Why Standard Cleaning Methods Fail With Modern Screen Technology
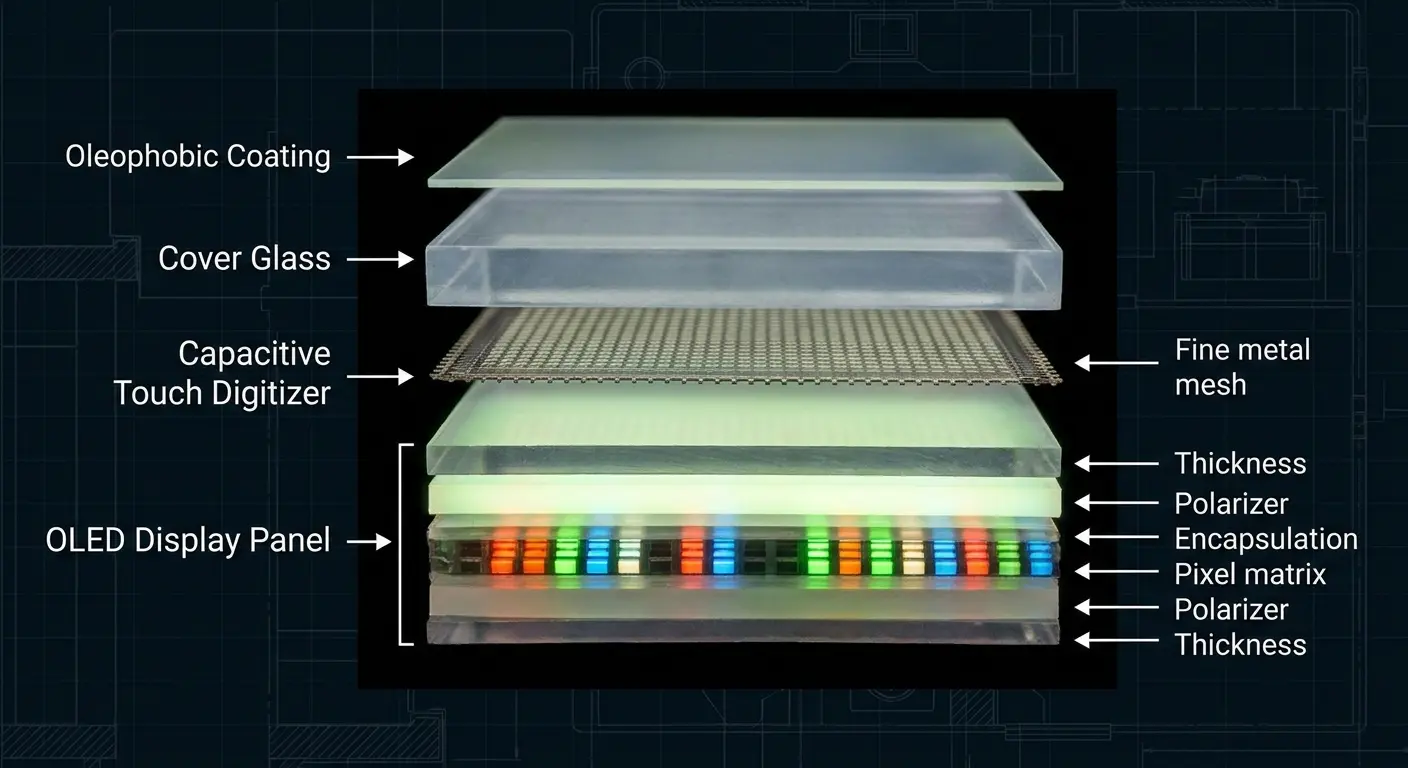
Here's the thing: most cleaning advice is stuck in 2010. Back then, your screen was just glass. Simple. Now? It's like five different layers pretending to be one surface, and each layer hates different things.
That super-thin coating on top? Hates alcohol and pressure. The glass underneath? Doesn't care. Your screen protector (if you have one)? Might be glass, might be plastic film, might be some weird TPU material, and they all need different treatment. It's a mess.
And that "one wipe with a microfiber cloth" advice that worked when your phone was new? Doesn't work anymore because that coating is half-gone. You're cleaning a different surface than what the instructions assume.
(This is why your phone cleaned perfectly for the first two months and then suddenly became a fingerprint magnet. The surface literally changed.)
The standard microfiber-and-spray approach assumes you're working with a pristine factory coating. Most phones older than six months have already lost 30-40% of their oleophobic layer through normal use. Understanding how to clean phone screen properly means recognizing these changes and adapting your technique accordingly.
Take a phone used for social media browsing. The center of the screen where you scroll through feeds receives hundreds of swipes daily, concentrating wear in one zone. After three months, this high-traffic area shows visible differences in how it responds to cleaning compared to the edges. A single wipe no longer removes fingerprints from the center, while the edges still clean easily. This isn't dirt resistance, it's coating degradation creating an uneven surface that requires zone-based cleaning approaches.
Case integration complicates this further. When you snap a case onto your phone, you create pressure points and micro-gaps where oils, dust, and moisture accumulate. These edge zones become contamination reservoirs that redeposit grime onto your freshly cleaned screen within hours. We've tested this with UV light inspection (because apparently I have too much free time), and oh man. The center of the screen showed some oil. The edges? Looked like a crime scene. A naked phone shows relatively even contamination across the screen. A cased phone shows heavy buildup along all edges, especially around the camera cutout and charging port. If you're using a rugged phone case, these edge zones can be even more pronounced due to the deeper bezel design.
Screen protectors add another variable. Tempered glass protectors often have their own oleophobic coating (usually lower quality than factory coatings). Film protectors lack this coating entirely, making them grippier and more prone to showing fingerprints. You can't clean these materials the same way and expect similar results. The adhesive layer between protector and screen also creates opportunities for moisture infiltration if you're too aggressive with liquid cleaners.
The Oleophobic Coating Problem Nobody Talks About
What Oleophobic Coating Does
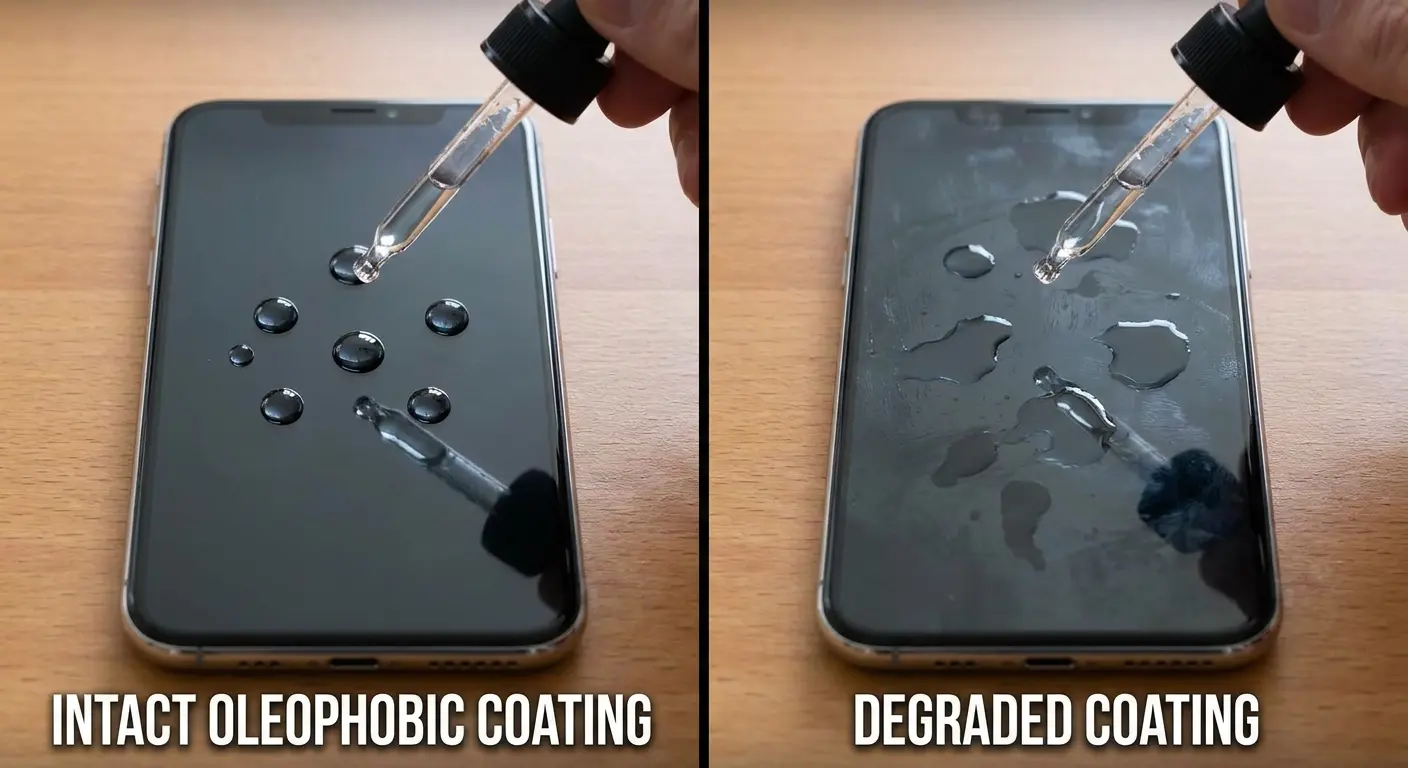
Okay, science time, but I'll keep it simple. That coating on your screen is a super-thin layer of slippery stuff (fluoropolymer, if you want the technical term) that makes finger oils bead up instead of smearing everywhere. When it's working, you can wipe away a fingerprint with one swipe. When it's dying? You're smearing oils around like you're buttering toast.
This matters because once the coating degrades past a certain threshold, aggressive cleaning makes things worse instead of better. You're grinding oils into microscopic surface irregularities rather than lifting them away. The screen feels tackier, attracts more fingerprints, and develops that rainbow sheen under certain lighting angles.
Recognizing Coating Degradation Stages
Early stage degradation shows up as small areas (usually in the center of the screen where you swipe most) that require an extra pass to clean. The coating is thinning but still functional. You'll notice fingerprints in these zones look different, less defined and more smudgy. When you clean your phone screen at this stage, paying attention to these early warning signs helps you adjust before the damage accelerates.
Degradation Stage |
Visual Indicators |
Touch Feel |
Cleaning Response |
Action Required |
|---|---|---|---|---|
Intact Coating |
No rainbow effects, uniform appearance |
Smooth, slippery |
Single-pass cleaning effective |
Minimal intervention, dry microfiber only |
Early Degradation |
Small center zones require extra passes |
Slightly less smooth in high-use areas |
1-2 passes needed in worn spots |
Reduce pressure, consider damp cloth |
Mid-Stage Loss |
Visible wear patterns, slight haze |
Noticeably grippier in center |
Multiple passes required, streaking common |
Switch to barely-damp method, avoid alcohol |
Advanced Failure |
Rainbow sheen, permanent cloudiness |
Tacky, fingerprints appear instantly |
Cleaning ineffective or temporary |
Consider coating restoration or protector |
I know this table looks intense, but here's the real-world version: if your screen feels grippier than it used to and fingerprints won't come off easily, your coating is toast. You can keep scrubbing, but you're just accelerating the damage. Ask me how I know. (Spoiler: I learned this the expensive way.)
Mid-stage degradation creates visible wear patterns. The center of your screen cleans differently than the edges. You might see a slight haziness or texture difference even after thorough cleaning. Water droplets will spread slightly instead of beading perfectly.
Late-stage degradation means the coating is gone in high-use areas. The glass feels grippier. Fingerprints appear almost instantly after cleaning. You might notice a permanent rainbow effect or streaking that no amount of cleaning removes. This is when you need to completely change your approach.
Adjusting Technique Based on Coating Condition
For screens with intact coatings, minimal intervention works best. Dry microfiber removes most contamination without stressing the coating. You want to preserve what's there rather than scrub it away.
For partially degraded coatings, you need to reduce friction. Slightly damp (not wet) microfiber gives you cleaning power without the mechanical stress of dry wiping. You're compensating for reduced coating performance without accelerating its loss.
For screens with failed coatings, reapplication or replacement becomes more practical than continued cleaning attempts. Some companies offer coating restoration services, though results vary. Pairing your device with a quality phone mount system can also help reduce the frequency of handling and subsequent coating wear.
How Case Design Creates Hidden Grime Traps
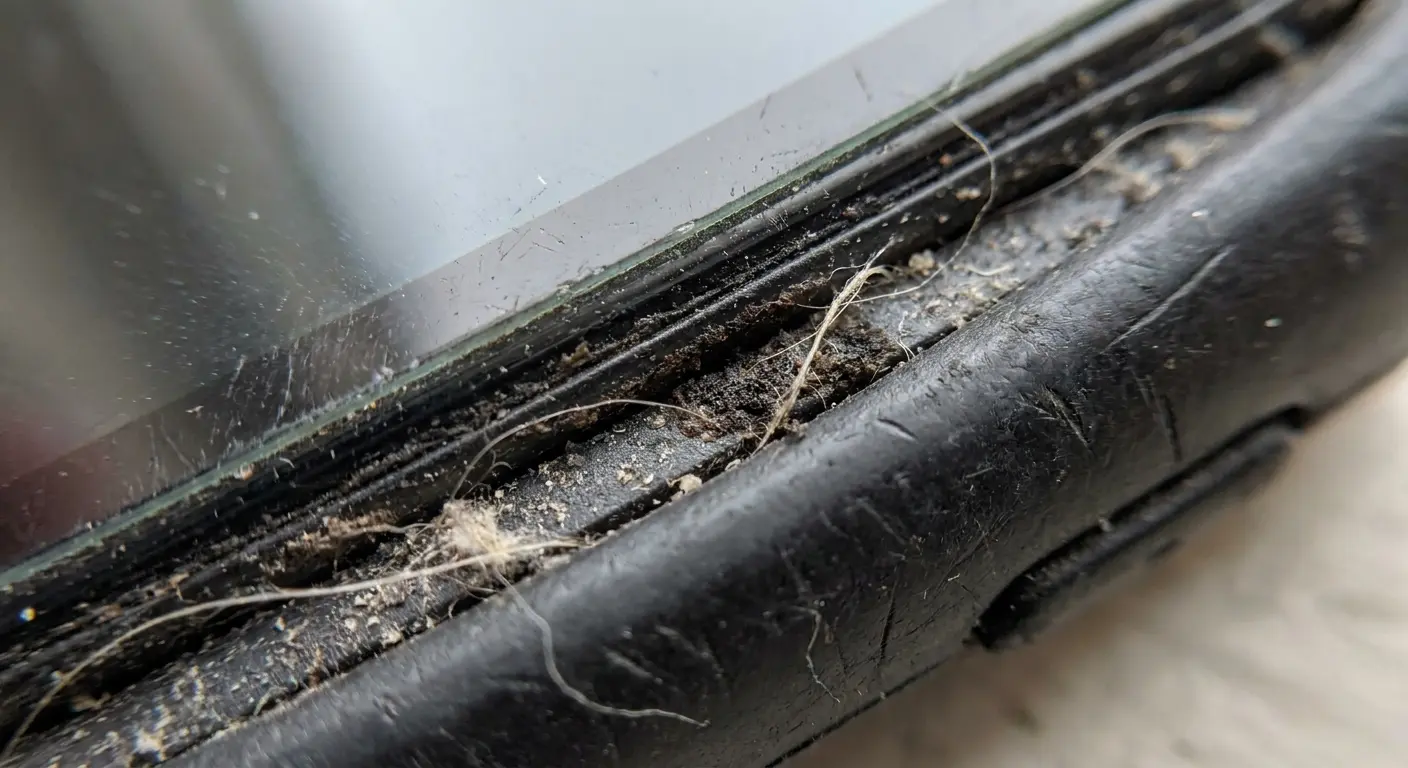
Raised bezels are great for drop protection. They're also perfect little dirt gutters that collect every gross thing you can imagine. Skin oils, pocket lint, whatever mystery dust lives in your bag. It's like your case is working against you.
The ridge sits roughly 0.5-1.5mm above the screen surface, forming a channel that runs the entire perimeter. Every time you wipe your screen, you push contamination into this channel. Every time you pocket your phone, lint collects there. Every time you handle the device, oils migrate from your fingers into these edges.
Cleaning phones with raised bezels requires addressing these edge zones as aggressively as the main screen surface.
Pressure Point Contamination
Cases grip your phone through pressure and friction. This creates points where the case edge presses against the screen's edge. These pressure points trap microscopic particles between the case and screen surface. Over time, this creates visible marks that look like permanent stains but are compressed layers of contamination.
My buddy Jake works construction. After a couple months, his phone had these dark triangular patches at every corner that wouldn't wipe off no matter what he tried. Turns out it wasn't dirt ON the screen, it was concrete dust that had gotten compressed between his case and screen protector, cementing itself in place. He had to take the whole case off and use a damp Q-tip to get it out. Fun times.
You'll find these most commonly at the corners and along the top and bottom edges where case tension is highest. The marks resist normal cleaning because the contamination is partially under the case edge, not on the exposed screen surface. Removing the case reveals the full extent of the buildup.
Cutout Zone Accumulation
Camera cutouts, speaker grills, and charging port openings create turbulence zones where airflow deposits particles. These areas accumulate dust faster than flat surfaces because the case edge creates a small cavity that traps rather than deflects debris. The problem intensifies with rugged cases that have deeper cutouts for enhanced protection.
Cleaning these zones requires different tools than flat surface cleaning. The contamination sits in recessed areas that microfiber cloths can't reach effectively. You need something with enough rigidity to enter the cutout but soft enough not to scratch surrounding surfaces.
Material-Specific Issues
TPU cases flex during use, creating a pumping action that can draw moisture and particles under the case edge. This happens most noticeably in humid environments or if you use your phone with damp hands. The flexibility that protects during drops creates cleaning challenges during normal use.
Hard shell cases don't flex, but they often fit less precisely, creating larger gaps where contamination accumulates. These gaps are visible if you remove the case and inspect the edges. You'll see distinct lines where the case edge sat, marking the boundary between protected and exposed areas.
Metal bumper cases create the cleanest edge condition because they don't cover the back or front surfaces. However, they offer minimal drop protection compared to full coverage options. The trade-off between protection and cleaning convenience is real, and you need to choose based on your priorities. Rokform's magnetic cases strike a balance by providing solid protection while minimizing edge contamination through precision engineering.
Material Compatibility: What Works on Glass Doesn't Work on Film
Here's where people screw up constantly: they think all screen protectors are the same. They're not. Not even close. Glass, plastic film, and TPU might look similar when installed, but cleaning them the same way is like washing your car and your cat with the same soap. Technically possible, but someone's gonna have a bad time.
Tempered glass protectors have a hardness rating between 8-9H on the Mohs scale. They resist scratching from most common materials and can handle moderate pressure during cleaning. PET film protectors sit around 3-4H, scratching easily from debris trapped in your cleaning cloth or excessive pressure. TPU protectors are softer still, showing marks from fingernails and degrading noticeably from alcohol-based cleaners.
You can't tell the difference by looking at an installed protector on most phones. The optical clarity is similar enough that visual inspection doesn't reveal material type. You need to check your purchase records or test the edges (film protectors have a visible seam, glass protectors feel seamless). Understanding how to clean your phone means first identifying what surface you're working with.
This is easier to show you in a table, because otherwise I'll be here all day explaining why your film protector scratches if you look at it wrong:
Protector Type Hardness Rating Pressure Tolerance Alcohol Compatibility Cleaning Frequency Needed Scratch Risk Tempered Glass 8-9H Moderate to high Safe at 70% concentration Low (coating dependent) Low from normal debris PET Film 3-4H Low to moderate Avoid (can cause cloudiness) High (no oleophobic layer) High from trapped particles TPU Film 2-3H Very low Never use (causes degradation) Very high (grippy surface) Very high, shows fingernail marks (seriously, it's embarrassing) Bare Screen 6-7H (varies by glass type) Moderate Safe if coating intact Moderate Moderate,
Moderate, permanent if occurs
Glass Protector Cleaning Protocols
Glass protectors tolerate the same cleaning methods as bare screens. You can use moderate pressure, alcohol-based solutions (in reasonable concentrations), and standard microfiber without risk. The main consideration is the oleophobic coating on the protector, which is usually lower quality than factory phone coatings and wears faster.
These protectors also trap dust under their edges more readily than film options because they don't adhere as completely to the screen surface. You'll see this as small bright spots or dark specks that appear to be under the screen. They're between the protector and phone screen, requiring protector removal to clean properly.

Film Protector Special Handling
PET and TPU films scratch if you apply too much pressure or if your microfiber contains trapped particles from previous cleaning. You need to use fresh, clean microfiber for each cleaning session, or rinse your cloth thoroughly between uses. The surface also shows streaks more readily because it lacks oleophobic coating.
Moisture is both more and less of a concern with film protectors. They're more resistant to edge infiltration because they adhere more completely to the screen surface. However, they can develop bubbles or adhesive degradation if you oversaturate during cleaning. You want your cloth barely damp, not wet.
Film protectors also attract and show dust more than glass options. The slightly grippy surface (due to no oleophobic layer) holds particles rather than letting them slide off. You'll need to clean more frequently, but with lighter pressure and less moisture than you'd use on glass.
Bare Screen Considerations
Phones without protectors give you the best tactile experience and clearest display, but they require the most careful cleaning approach. You're working directly with the factory oleophobic coating, which is non-renewable on most devices. Every cleaning session removes microscopic amounts of coating, so technique matters more than with protectors you can simply replace.
Bare screens also show damage more readily. A scratch on a protector is an inconvenience. A scratch on your actual screen is permanent. This means you need to inspect your cleaning cloth more carefully, avoid cleaning in dusty environments, and use lighter pressure than you would with a protector.
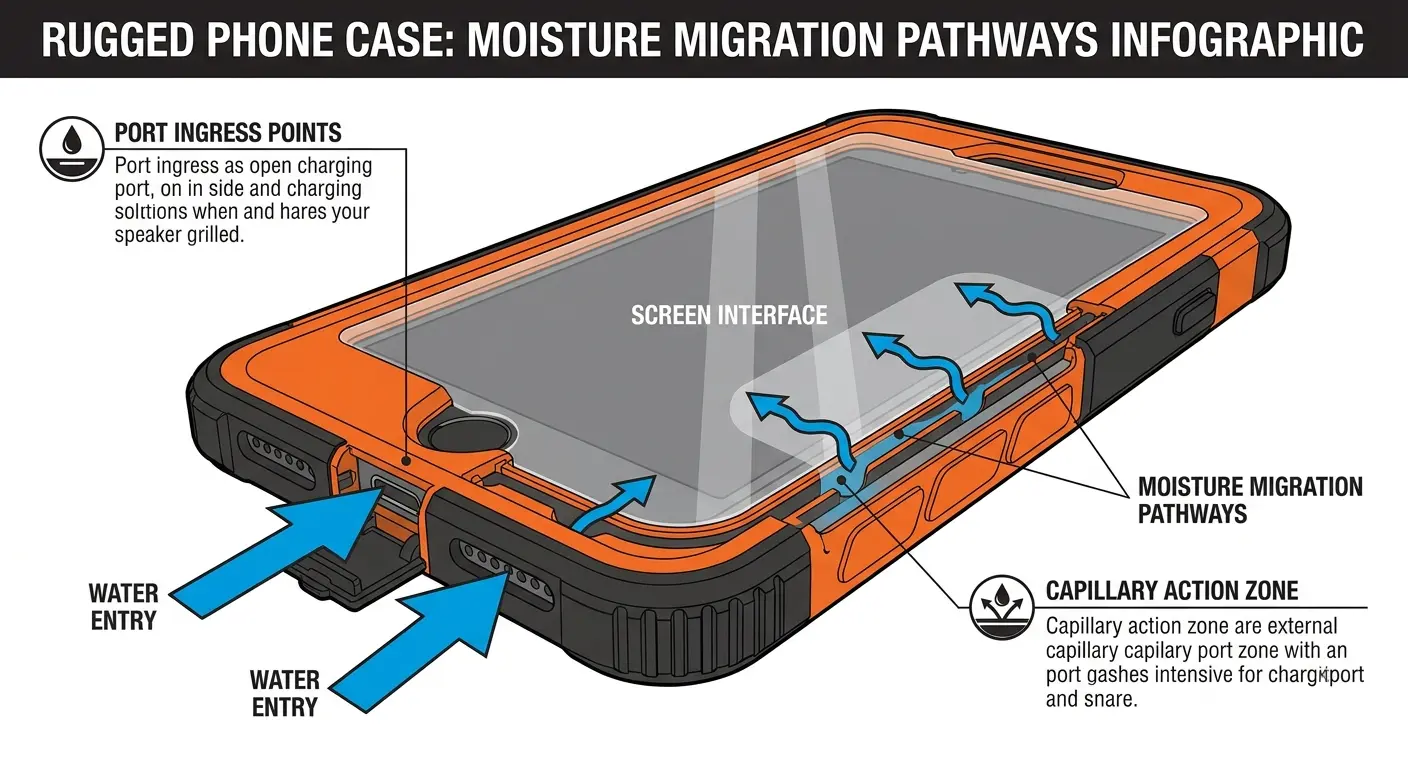
The Moisture Migration Issue in Rugged Cases
Let's talk about something that rugged case manufacturers don't want to mention: that tight seal around your phone? It's not waterproof. It's water-resistant, which is a fancy way of saying "it'll slow down moisture but won't stop it."
So when you clean your screen with a damp cloth, some of that moisture sneaks past the case edge. When you use your phone in the rain, moisture gets in. When you go from your air-conditioned car into summer heat, condensation forms. And all that moisture? It's trapped between your case and phone, throwing a party with whatever dirt and oils are already there.
This trapped moisture causes several problems. It creates an environment where contaminants dissolve and spread rather than sitting as discrete particles. It can interfere with adhesive-based screen protectors, causing bubbles or edge lifting. It leaves mineral deposits as it evaporates, creating spots that resist normal cleaning. Most seriously, it can penetrate into port openings and speaker grills, potentially causing corrosion over time. When you disinfect your phone with liquid cleaners, you need to be mindful of moisture migration into these sealed spaces.
Identifying Moisture Infiltration
You'll see moisture issues as cloudy areas around screen edges, especially after cleaning or environmental exposure. These clouds don't wipe away because they're behind the screen protector or between the case and phone body. Small water spots or mineral rings around the perimeter are another indicator. If your screen protector starts lifting at the edges despite being recently installed, moisture infiltration is often the cause.
Touch sensitivity issues along screen edges can also indicate moisture presence. Water interferes with capacitive touch sensing, creating dead zones or erratic response. This happens most commonly along the bottom edge near the charging port, where moisture entry is easiest.
I know someone who mountain bikes in the Pacific Northwest (so, wet basically always). After a few rides, the bottom third of their screen started acting weird, unresponsive, phantom touches, the works. Screen looked fine, but when they pulled off the case? Moisture droplets everywhere between the case and phone. The water had been sneaking in through the charging port area for weeks, getting drawn upward by capillary action. Gross.
Prevention Strategies
Remove your case weekly and wipe down both the phone body and case interior with a dry microfiber cloth. This prevents moisture accumulation and lets you inspect for early signs of infiltration. You're creating a maintenance window where trapped moisture can evaporate before causing problems.
When cleaning your screen, use minimal liquid. Your cloth should be just barely damp enough to remove oils, not wet enough to leave visible moisture on the screen surface. Excess liquid always finds its way into gaps and channels, regardless of how carefully you wipe.
After cleaning, leave your phone face-up for a few minutes before pocketing or placing face-down. This gives any edge moisture time to evaporate rather than being trapped against a surface. It seems minor, but this habit prevents most moisture-related issues.
Addressing Existing Moisture Problems
If you've already got moisture between your case and screen, you need to disassemble and dry everything thoroughly. Remove the case and screen protector if present. Wipe all surfaces with dry microfiber. Place the phone in a room-temperature, low-humidity environment for several hours. Don't use heat (which can damage adhesives and seals) or desiccant packets (which can over-dry and create static issues).
For moisture that's penetrated into port areas, you need more time and potentially professional help. Corrosion can begin within 24-48 hours in the presence of moisture and contaminants. If you see any discoloration around ports or buttons, consider professional inspection before the damage spreads.
Building a Cleaning Kit That Matches Your Protection Setup
Okay, so you need a cleaning kit. But before you go buy every product Amazon recommends, let me save you some money: you don't need most of that stuff. What you DO need depends entirely on your case and screen protector situation, not what some generic listicle tells you.
Your cleaning kit should address the contamination patterns created by your case and screen protector combination. A naked phone with a glass protector needs different tools than a rugged case with a film protector. Building an effective kit means understanding your challenge areas rather than buying every cleaning product available. When you're asking "how do I clean my phone," the answer starts with understanding what tools match your setup.
Microfiber Selection Criteria
Not all microfiber cloths are created equal, and this is where people waste money. You want cloths with fiber density above 200 GSM (grams per square meter) for effective cleaning without scratching. Just check the label. Cheap cloths have bigger gaps between fibers, which means they trap particles, which means you're sandpapering your screen every time you wipe it.
Also, and this sounds weird, but get white or light-colored cloths. Dark ones hide dirt, so you can't tell when they're gross and need washing. I learned this after using a black cloth for a month that was apparently filthy the entire time. My screen was not happy.
Size affects usability. Small cloths (4x4 inches) work well for quick wipes but don't give you clean surface area for multiple passes. Larger cloths (6x6 or 8x8 inches) let you fold and refold to expose clean sections, extending the time between washes. You want at least three cloths in rotation so you always have a clean option available.
Edge Cleaning Tools
Foam-tipped swabs work better than cotton swabs for edge cleaning because they don't leave fibers behind. The foam compresses to fit into tight spaces between raised bezels and screen surfaces. You can find these marketed for electronics cleaning or camera sensor cleaning.
Soft-bristle brushes (like unused makeup brushes or dedicated electronics brushes) help dislodge particles from cutout areas before you wipe. The key is using them dry first to remove loose contamination, then following with damp microfiber for stuck-on grime. Brushing after moistening just spreads contamination around.
Interdental brushes (yes, the ones for teeth) are surprisingly effective for deep case cutouts and port areas. The small, tapered bristles reach into speaker grills and charging ports where dust compacts over time. Use them gently and always brush outward to avoid pushing debris deeper into openings.
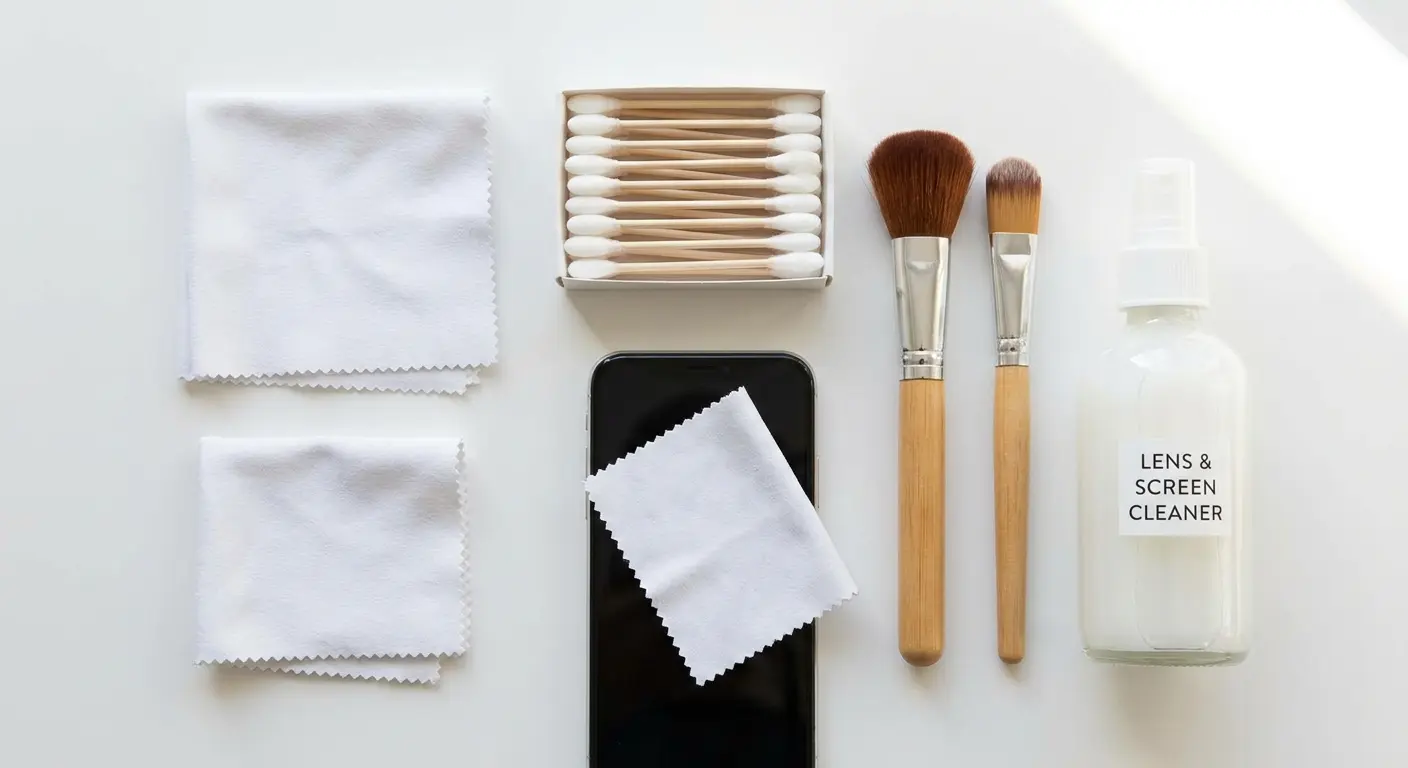
Cleaning Solution Options
Distilled water is your safest liquid option for all screen types. It removes most contamination without chemical risks. The distilled part matters because tap water leaves mineral deposits as it evaporates, creating new spots you'll need to clean later.
Isopropyl alcohol solutions (70% concentration) work for glass protectors and bare screens with intact oleophobic coatings. Higher concentrations (90%+) evaporate too quickly and can damage coatings. Lower concentrations don't clean as effectively. Don't use alcohol on film protectors or degraded coatings.
Screen-specific cleaning solutions exist, but most are just diluted alcohol with surfactants. Read the ingredient list. If it contains ammonia, don't use it on any phone screen (ammonia degrades oleophobic coatings rapidly). If it contains oils or conditioners, it'll leave residue that attracts more fingerprints.
Cleaning Kit Checklist by Protection Setup:
For Glass Protector + Standard Case:
3+ white microfiber cloths (200+ GSM)
Distilled water in small spray bottle
Foam-tipped swabs for edges
Soft-bristle brush for cutouts
For Film Protector + Rugged Case:
5+ white microfiber cloths (replace frequently)
Distilled water only (no alcohol)
Multiple foam swabs (higher consumption)
Interdental brushes for deep cutouts
Extra protectors for quick replacement
For Bare Screen + Minimal Case:
2-3 premium microfiber cloths
Distilled water (primary)
70% isopropyl alcohol (occasional use)
Inspection magnifier for coating assessment
Look, I know these lists seem excessive. You're probably thinking "it's just a phone screen, not a surgical instrument." But trust me, having the right tools for your setup means you spend less time cleaning and get better results. Plus you stop accidentally destroying your screen coating. (Again, ask me how I know.)
Storage and Maintenance
Keep your cleaning tools in a sealed container or bag when not in use. Exposure to air means they're collecting dust and contaminants that'll end up on your screen. A simple ziplock bag works fine. Dedicated electronics cleaning kits often include storage cases.
Wash microfiber cloths weekly if you're cleaning daily, or after every 5-7 uses. Use unscented detergent without fabric softener (which coats the fibers and reduces cleaning effectiveness). Air dry rather than using a dryer, which can melt the synthetic fibers or embed lint from other laundry.
Replace cloths every 2-3 months regardless of washing. The fibers break down over time, losing their ability to trap particles effectively. A worn cloth feels smoother and thinner than a new one. When you notice this change in texture, it's time to replace.
Frequency vs. Intensity: Rethinking Your Cleaning Schedule
Here's my controversial take that's going to annoy some of you: you're cleaning too hard and not often enough.
Most people wait until their screen is visibly gross, then scrub the hell out of it. This is backwards. You're grinding built-up oils into your screen, wearing down the coating faster, which makes it get dirty faster, which makes you scrub harder. It's a death spiral.
The fix? Clean lightly every day instead of aggressively once a week. I know, I know, sounds like more work. It's not. Stay with me.
Frequent light cleaning breaks this cycle. Removing oils and particles before they bond to the surface requires minimal pressure and no chemicals. You're maintaining cleanliness rather than restoring it, which is fundamentally easier on your screen and coating. When you're figuring out how to clean my phone effectively, frequency trumps intensity every time.
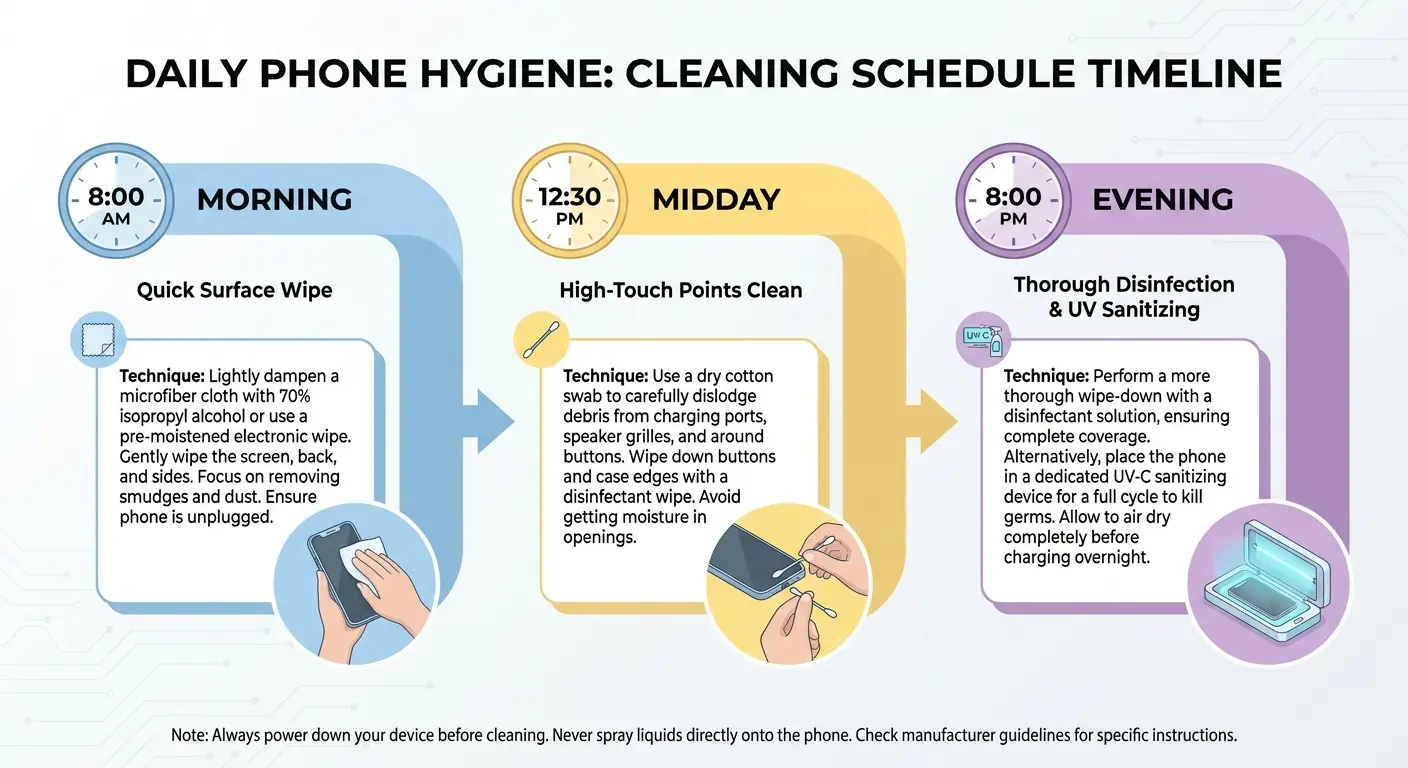
Daily Maintenance Protocol
Morning: One quick wipe with a dry microfiber cloth. Takes 10 seconds. Your screen collects dust overnight even when you're not using it, and the oils from yesterday have oxidized and gotten stickier. Quick wipe, problem solved.
Midday: Spot clean just the center of the screen where you touch it. You don't need to do the whole thing. This is a 5-second task that prevents the buildup that makes evening cleaning suck.
Evening: Okay, now you can be slightly more thorough. Barely damp cloth (and I mean BARELY, if water drips off it, it's too wet), wipe the whole screen, then leave it face-up while you do whatever else. The moisture evaporates, you wake up to a clean screen. Easy.
Does this seem like overkill? Maybe. But you know what's overkill? Spending 5 minutes scrubbing your screen every night because you let it get disgusting. Your choice.
Daily Cleaning Schedule Template:
Morning (30 seconds):
Remove phone from charger/nightstand
Single dry microfiber pass across entire screen
Quick visual inspection for edge buildup
Check for any moisture indicators
Midday (10 seconds):
Spot clean center screen area only
Dry cloth, light pressure
Focus on high-touch zones
Evening (1-2 minutes):
Remove case if visibly dirty
Barely damp cloth for full screen
Dry pass to remove moisture
Inspect edges and cutouts
Place face-up to air dry before charging
Weekly Deep Maintenance
Once weekly, remove your case entirely and clean all edges, cutouts, and the case interior. This addresses the contamination zones that daily cleaning doesn't reach. You're preventing the buildup that migrates back onto your screen between cleanings.
Inspect your screen protector edges during weekly maintenance. Look for lifting, bubbles, or trapped particles. Catching these issues early means you can address them before they spread or require protector replacement.
Clean your microfiber cloths during weekly maintenance so you start each week with fresh tools. This prevents the gradual contamination buildup that
Clean your microfiber cloths during weekly maintenance so you start each week with fresh tools. This prevents the gradual contamination buildup that makes your cleaning tools less effective over time.
Environmental Adjustments
High-dust environments (construction sites, workshops, outdoor activities) need more frequent cleaning but with modified technique. Brush off loose particles before wiping to avoid scratching. You might need twice-daily thorough cleaning rather than once-daily.
High-humidity environments accelerate oil spreading and moisture infiltration. You'll need to focus more on edge drying and case removal to prevent moisture issues. The screen surface itself might need less frequent cleaning because oils don't oxidize as quickly in humid conditions.
Cold environments create condensation issues when you bring your phone indoors. Wait 10-15 minutes before cleaning to let temperature equalize. Cleaning a cold screen with a warm cloth can create thermal stress in screen protectors and trap condensation under cases.
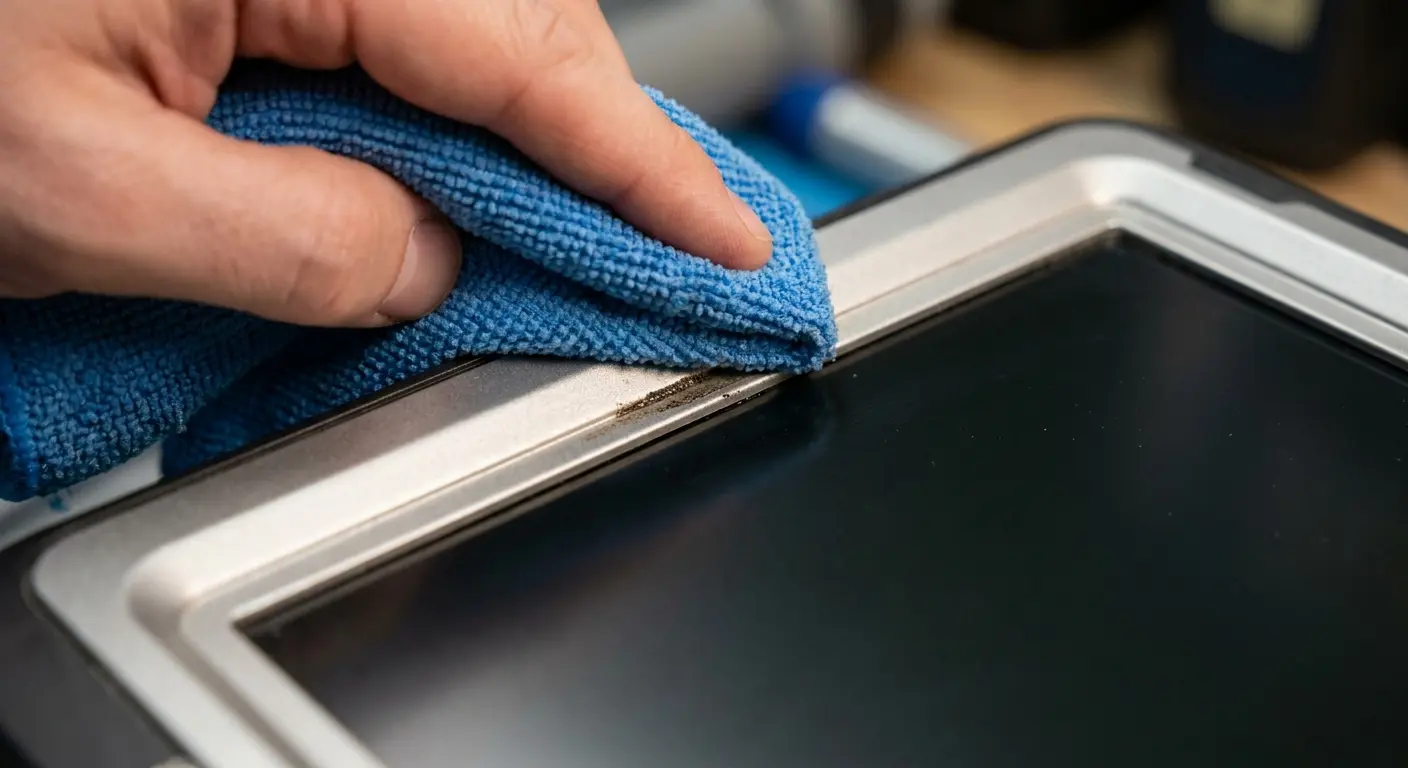
Edge Cleaning Techniques for Raised Bezels
Alright, this is where most people fail. You can clean the main screen perfectly, but if you ignore the edges, you're wasting your time. Those raised bezels are contamination reservoirs that'll recontaminate your screen within hours. Fun!
The raised bezel creates a contamination channel roughly 0.5-2mm deep depending on case design. Standard flat wiping pushes debris into this channel but can't remove it. You need techniques that target this three-dimensional space rather than treating it as an extension of the flat screen surface.
The Fold and Press Method
Here's the technique: fold your microfiber cloth to create a firm edge, about 2-3mm thick, roughly the width of a couple credit cards stacked. Press that edge into the bezel channel at an angle (45 degrees if you want to be precise, but honestly just "angled" works), then drag it along the edge.
You'll need to refold to a clean section every few inches because this stuff gets GROSS. The first time you do this properly, you'll be horrified at how much grime comes out. Don't say I didn't warn you.
This works best on bezels under 1mm high. Taller bezels need more aggressive approaches because the cloth edge can't reach the bottom of the channel effectively. You'll know you're not reaching deep enough if you see a visible line of contamination remaining after multiple passes.
Swab Technique for Deep Bezels
Foam-tipped swabs reach deeper than folded cloth. Slightly dampen the swab (not wet, just barely moist) and run it along the bezel channel with moderate pressure. The foam compresses to fit the space and the moisture helps dissolve stuck-on oils. Follow immediately with a dry swab to remove dissolved contamination and excess moisture.
Work in sections rather than trying to clean the entire perimeter in one pass. The swab picks up contamination quickly and becomes less effective. You'll need 4-6 swabs to clean the full perimeter of most phones. Yeah, using 4-6 swabs for one phone seems wasteful. But you know what's more wasteful? Cleaning your screen three times a day because the edges keep recontaminating it. Economics, people.
Pay attention to corners where the bezel channel changes direction. Contamination compacts in corners and resists straight-line cleaning motions. You need to work the swab into the corner with a slight twisting motion to dislodge buildup.
Preventive Edge Treatment
After cleaning edges thoroughly, you can slow future accumulation by creating a slight barrier. Some users apply a tiny amount of oleophobic coating renewal product to the bezel channel (not the screen surface). This makes the channel less sticky, so contamination doesn't adhere as readily. Results vary by product and case material.
Another approach is using compressed air to blow out loose particles before they compact into the channel. Quick bursts (not sustained pressure, which can force debris deeper) dislodge dust before it mixes with oils and becomes stuck. Do this outdoors or over a trash can because you're literally blowing contamination off your phone.
The most effective prevention is addressing the root cause: reducing how much contamination reaches the edges in the first place. This means cleaning your hands before extended phone use, keeping your phone out of pockets with lint-producing materials, and avoiding phone use in dusty environments when possible. Rokform's mounting solutions help by keeping your phone secure and accessible without constant handling in dirty conditions.
When Professional Restoration Makes More Sense Than DIY
Okay, real talk: sometimes the answer isn't "clean better." Sometimes it's "stop cleaning and replace the thing."
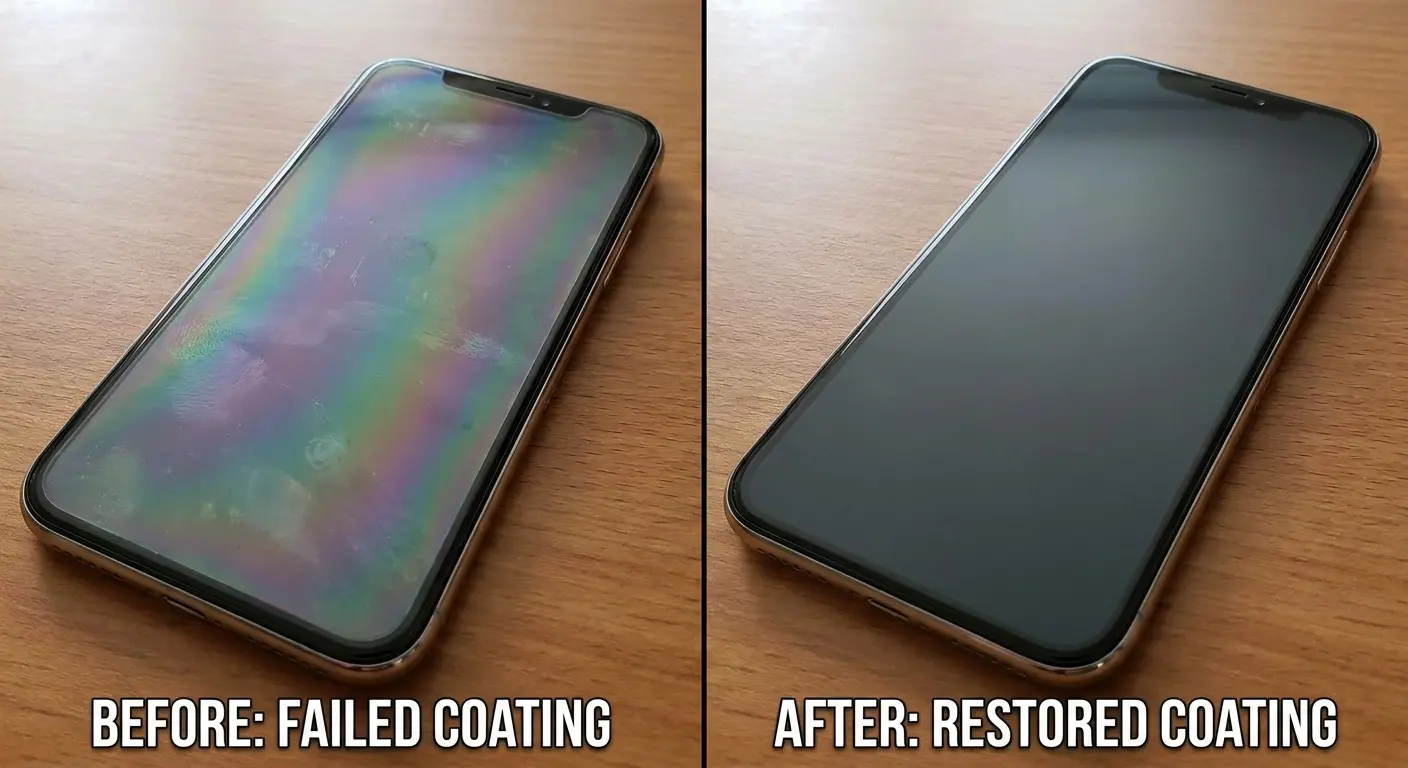
I know that's not what you want to hear. You want me to give you the magic technique that'll restore your scratched, hazy, rainbow-effect screen to factory condition. But that's not how this works. Some damage is permanent, and continuing to clean aggressively just makes it worse.
Some screen conditions look like cleaning problems but are coating failure, protector degradation, or damage that no amount of cleaning will fix. Continuing to clean aggressively when the issue isn't contamination accelerates damage and wastes your time.
Coating Failure Indicators
See rainbow effects on your screen that won't wipe away? That's not dirt. That's your coating breaking down, light refracting through the degraded layer. You can scrub until your arm falls off; it's not going away. The coating is done.
Same with permanent haze or cloudiness. If it looks cloudy even after thorough cleaning, you're seeing coating delamination or chemical damage. This is what happens when someone uses Windex or some other horrible cleaner, or when the coating just gives up after months of wear. Either way, cleaning won't fix it.
Touch sensitivity degradation in certain areas, combined with visual differences in those zones, often indicates coating failure affecting the capacitive touch layer. This is more serious than surface contamination and requires professional assessment.
When Protector Replacement Beats Cleaning
Screen protectors showing scratches, chips, or cracks should be replaced rather than cleaned more aggressively. You're seeing physical damage, not contamination. Continued use risks the damage spreading or the protector failing during an impact.
Bubbles or lifting edges that won't resolve with pressing indicate adhesive failure. The protector has separated from the screen surface and won't re-adhere properly. You can clean around the problem, but you can't clean it away. Replacement is the only solution.
Persistent spots or marks that don't respond to any cleaning method might be trapped between the protector and screen. You'll need to remove the protector to access and clean the actual screen surface. If the marks remain after protector removal, they're on the phone screen itself and might require professional treatment.
And look, I get it, screen protectors cost money. But a $15 protector is cheaper than the 45 minutes you'll spend trying to clean a degraded one back to perfection. It's also cheaper than replacing your actual phone screen when you scratch it trying to clean without a protector. Just replace the thing and move on with your life.
Professional Coating Restoration Services
Some companies offer oleophobic coating reapplication for bare phone screens. They strip the remaining degraded coating and apply a fresh layer. Results depend heavily on the service quality and the condition of the underlying glass. Expect to pay $30-60 for this service.
The coating won't be identical to factory application (which happens in controlled cleanroom environments), but it's noticeably better than a degraded coating. You'll get 6-12 months of improved performance before needing reapplication. Whether this makes economic sense depends on your phone's age and value.
Some services also offer scratch removal through polishing. This works for minor surface scratches but removes glass material in the process. Deep scratches can't be fully removed without creating distortion. Polishing also removes any remaining oleophobic coating, so you'll need coating reapplication afterward.
Knowing When to Accept Replacement
Phones older than two years with failed coatings and multiple screen issues often cost more to restore than they're worth. Factor in the cost of professional services, your time, and the likelihood of other age-related failures soon. Sometimes accepting reduced screen quality until your next upgrade makes more sense than investing in restoration.
Screen protectors are always worth replacing rather than restoring. They're designed as sacrificial layers and cost $10-40 depending on type and quality. Spending time trying to restore a damaged protector doesn't make economic sense when replacement is quick and relatively inexpensive.
Protecting Your Investment Beyond Surface Cleaning
Let's wrap this up with some perspective: screen maintenance isn't about achieving perfection. It's about understanding what you're working with and not accidentally destroying it while trying to keep it clean.
Every time you clean, you're removing microscopic amounts of coating. Every case creates trade-offs between protection and maintenance. Every screen protector eventually needs replacement. These are facts, not problems to solve, just realities to work with.
Screen maintenance isn't just about removing contamination. It's about preserving the protective layers and coatings that make your screen functional and pleasant to use. Every cleaning session is an opportunity to inspect for developing issues and adjust your protection strategy accordingly. When you clean your phone screen regularly, you're also monitoring its overall condition and catching problems early.
Case Selection Impact on Maintenance
Here's the trade-off nobody wants to admit: lower bezels mean less edge grime but worse drop protection. Higher bezels protect better but create cleaning nightmares. There's no perfect solution, just pick which problem you'd rather deal with.
Personally? I'd rather clean edges weekly than replace a shattered screen. But I also don't work construction or drop my phone constantly. Your mileage may vary.
Material choice affects both protection and cleaning. TPU cases flex during impacts but create moisture infiltration risks. Hard shell cases don't flex but can crack under severe impact. Metal bumpers offer minimal contamination issues but limited protection. Understanding these trade-offs helps you choose based on your actual risk profile rather than marketing claims.
If you're dealing with persistent edge contamination issues despite regular cleaning, your case design might be working against you. Rokform's precision-engineered cases are designed with tighter tolerances that minimize the gaps where contamination accumulates while maintaining superior drop protection.
Screen Protector Strategy
Budget screen protectors seem economical until you factor in replacement frequency. Low-quality protectors lose their coatings faster, scratch more easily, and require more frequent cleaning. You'll replace them 3-4 times as often as quality protectors, negating any cost savings.
One more thing: keep spare protectors around. I know it seems excessive, but here's what happens otherwise. You notice your protector is scratched or the coating is shot, but you don't have a replacement handy, so you tell yourself "I'll order one this weekend." Three months later you're still using the degraded protector because you kept forgetting. Just buy a 2-pack and keep the spare in your desk. Future you will be grateful.
Match your protector type to your actual usage. Glass protectors make sense for pocket carry and normal use. Film protectors work better for extreme environments where shattering is a concern. TPU protectors suit flexible or curved screens where glass won't adhere properly. Learning how to clean your phone screen properly extends protector life, but replacement remains more cost-effective than aggressive restoration attempts.
Environmental Considerations
Your environment matters more than any fancy cleaning product. Use your phone in a clean office? You barely need to clean it. Work construction, cook professionally, or mountain bike in the mud? You're gonna be replacing screen protectors every few months no matter what you do.
Accept this reality and budget accordingly instead of trying to make a $10 protector last a year in harsh conditions. It's not happening.
Temperature extremes accelerate coating degradation and can cause screen protector adhesive failure. If you regularly expose your phone to temperature swings (hot cars, cold outdoor activities), inspect your protector edges weekly and be prepared for shorter protector lifespan.
Long-Term Cost Analysis
Calculate the total cost of your protection and maintenance approach annually. Include case cost, protector replacements, cleaning supplies, and any professional services. Compare this to your phone's value and expected lifespan. You might discover you're over-protecting an older device or under-protecting an expensive one.
For high-value devices ($800+), investing in quality protection and regular maintenance makes clear economic sense. The cost of screen replacement or device replacement far exceeds protection costs. For mid-range devices, balance protection level against replacement cost. For budget devices, minimal protection often makes more sense than elaborate maintenance routines.
Final Thoughts
Look, I've thrown a lot of information at you. Tables, techniques, product recommendations, dire warnings about coating degradation. It's a lot. So let me bring this back to earth.
Your screen is not the same as everyone else's screen. Even if you and your friend bought the same phone on the same day, your screens are different now. Different cases, different protectors, different usage patterns, different coating wear. Cookie-cutter cleaning advice doesn't work because there's no such thing as a cookie-cutter phone screen after a few months of use.
The edge contamination thing? That alone explains why you feel like you're constantly cleaning but never winning. You're cleaning the center while ignoring the dirt reservoir that recontaminates it within hours. Start treating edge cleaning as important as surface cleaning, and you'll see lasting results.
Here's what matters: Clean more often but more gently. Your coating is already degrading, don't speed it up by scrubbing like you're trying to remove graffiti. Remove your case weekly and clean the edges properly. Match your technique to your actual screen setup, not generic advice. And when cleaning stops working, replace the protector instead of cleaning harder.
Start by figuring out what you're working with. Take your case off right now (seriously, right now) and look at your screen and protector. Check for coating degradation. Look at the edge buildup. See if you can tell what kind of protector you have. This 2-minute inspection will tell you which parts of this guide apply to you.
Then build a simple cleaning kit based on what you found. If you've got deep bezels, grab some Q-tips or foam swabs. If you've got a film protector, commit to gentler pressure. If your coating is shot, decide whether to restore it or just accept reduced performance until your next phone.
And set a weekly reminder, Sunday night, whenever, to take your case off and do proper edge cleaning. This one habit prevents most of the long-term problems that turn into expensive headaches.
Your screen is how you interact with your phone about 200 times a day. Maintaining it properly isn't perfectionism, it's just understanding what you're working with and not accidentally destroying it while trying to keep it clean. The few minutes you invest in doing this right will make every one of those 200 daily interactions better.
Now go check your screen edges. I bet they're grosser than you think.

