


I'm going to save you $300 and three days of anxiety. Your phone camera is wet. Maybe you dropped it in the sink, maybe you got caught in the rain, or maybe (like me) you didn't realize your bathroom basically turns into a steam room every morning. Whatever happened, you're Googling solutions, and every article is telling you to stick it in rice.
Don't.
Seriously, just don't. I'll explain why in a minute, but first, we need to talk about what actually works and why your camera keeps getting wet in the first place. Most guides jump straight to emergency fixes, but I'm starting upstream because fixing the real problem means you won't need emergency solutions every few months.
Table of Contents
Why Your Phone Camera Keeps Getting Wet (And How to Stop It)
The Rice Myth and Why Desiccants Fail Most People
Vacuum Method: The Overlooked Physics of Water Extraction
Compressed Air Technique Without Damaging Your Lens
Heat Application: Temperature Thresholds That Won't Fry Your Sensor
The Gravity Position Method for Multi-Lens Arrays
Isopropyl Alcohol Displacement (When and Why It Works)
Prevention Through Case Design and Material Selection
What Actually Happens Inside Your Camera Module When Water Enters
Emergency Response Timeline: First 60 Seconds Matter Most
Quick Version for People in a Panic
Rice is garbage. Vacuum extraction and gentle heat actually work. You've got about 24 hours to fix this before permanent damage sets in. The first 60 seconds after water exposure matter more than anything you do later. A good case would've prevented this whole mess.
Why Your Phone Camera Keeps Getting Wet (And How to Stop It)
Your phone's camera lens sits flush with the back panel or slightly recessed, depending on your model. That positioning creates this little pocket where water pools instead of running off. I see people treat water extraction like periodic maintenance instead of asking why their device keeps getting wet.
The usual culprits? They're not what you'd think.
Sure, dropping your phone in water creates obvious problems. But most camera moisture comes from places you wouldn't expect. Condensation forming inside cases during temperature transitions. Steam exposure in bathrooms (your shower creates way more moisture than you realize). Sweat migration during workouts when phones are in pockets or armbands. Humid environments where protective cases trap moisture against the device. Rain exposure during "quick" outdoor phone use.
Here's a scenario I lived through for months before figuring it out: I'd bring my phone into the bathroom while showering, then immediately head outside into cold weather. Phone goes from a 90°F steam-filled environment to 40°F outdoor air in minutes. The temperature drop causes moisture to condense directly on the coldest component, which is always your camera lens assembly.
This happened daily. I never dropped my phone in water, but I still ended up with a foggy camera.
Each scenario introduces water differently. Condensation forms inside your camera housing when warm, humid air meets cold glass. Steam penetrates through speaker grilles and charging ports, then migrates to the camera module. Sweat creates sustained moisture contact that slowly works past weather sealing.
Cases are both solution and problem, and we need to address this head-on. A poorly designed case traps humidity against your phone's body, creating a greenhouse effect. Water vapor has nowhere to go, so it condenses on the coldest surface (your camera lens and the glass covering your sensor array).
Quality cases create barriers without trapping moisture. They allow air circulation while blocking liquid intrusion. The difference comes down to material selection, seal design, and how the case interfaces with your phone's existing water resistance features.
Water Exposure Source |
Entry Method |
Prevention Strategy |
|---|---|---|
Bathroom steam |
Migration through ports and grilles |
Keep phone outside bathroom during showers |
Temperature transitions |
Condensation on cold surfaces |
Allow gradual temperature adjustment, remove from case during transitions |
Workout sweat |
Sustained contact through fabric |
Use waterproof armband or leave phone in locker |
Rain during outdoor use |
Direct contact with unprotected lens |
Use case with raised camera bezel, limit exposure time |
Humid storage environments |
Trapped moisture in sealed cases |
Store with silica gel packets, use ventilated cases |
Phone manufacturers build water resistance into their devices, but that IP rating assumes specific conditions. Your IP68 rating protects against submersion in fresh water up to a certain depth for a limited time.
It doesn't account for pressurized water (like shower spray hitting your phone directly). Salt water or chlorinated water corrode seals faster. Repeated wet/dry cycles degrade adhesive seals. Temperature extremes cause seal materials to contract. Wear over time as gaskets compress and lose elasticity.
Understanding these limitations changes how you use your phone around water. You stop trusting that IP rating as a universal shield and start thinking about specific exposure scenarios. When you know how to get water out of phone camera modules, you also understand why preventing that water intrusion matters more than any extraction technique.
The Rice Myth and Why Desiccants Fail Most People
Rice doesn't work. It never worked. It's not going to suddenly start working because your cousin's friend said it saved their phone once.
Here's why: rice is terrible at absorbing moisture compared to actual desiccants. But even if it weren't, your camera lens is sealed. The water isn't floating around in open air where rice can magically suck it up. It's trapped behind glass and plastic. You're basically trying to dry the inside of a sealed Tupperware container by putting rice on the outside.
See the problem?
Desiccant effectiveness depends on surface area exposure, air circulation, and the concentration gradient between the wet object and the absorbing material. Rice fails on all three counts. The grains create minimal surface area contact with your phone. Air circulation gets blocked by the rice itself. The moisture gradient is too weak to pull water from inside a sealed camera module.
Worse, rice introduces new problems. Dust particles and starch residue get into your speaker grilles, charging port, and yes, your camera housing. You're trading potential water damage for guaranteed contamination.
I actually tried the rice thing on an old phone just to see what would happen. Left it buried for 48 hours. When I dug it out, the camera appeared clear, so I thought I'd won. Three weeks later, the camera started producing hazy images with visible spots. During repair inspection, technicians found starch deposits on the lens elements and a grain of rice lodged in the camera housing gap. The rice method had introduced contamination that caused more damage than the original water exposure.

Silica gel packets perform better than rice but still fall short for camera modules. They create stronger moisture gradients and don't shed particles, but they can't generate enough pull to extract water that's already inside your camera assembly. They work for ambient moisture and surface water. They don't work for trapped liquid.
The real issue with any passive desiccant approach: water inside your camera module sits behind glass, plastic lens elements, and often a secondary seal. That water isn't exposed to air, which means it's not exposed to your desiccant. You're trying to dry something that's sealed off from the very thing supposed to dry it.
Desiccants have a role, but it's preventative. Keeping silica packets in your phone storage area or camera bag reduces ambient humidity. They don't rescue your camera after water intrusion.
Vacuum Method: The Overlooked Physics of Water Extraction
Vacuum extraction sounds fancy, but stay with me because this actually works, and you might already have what you need.
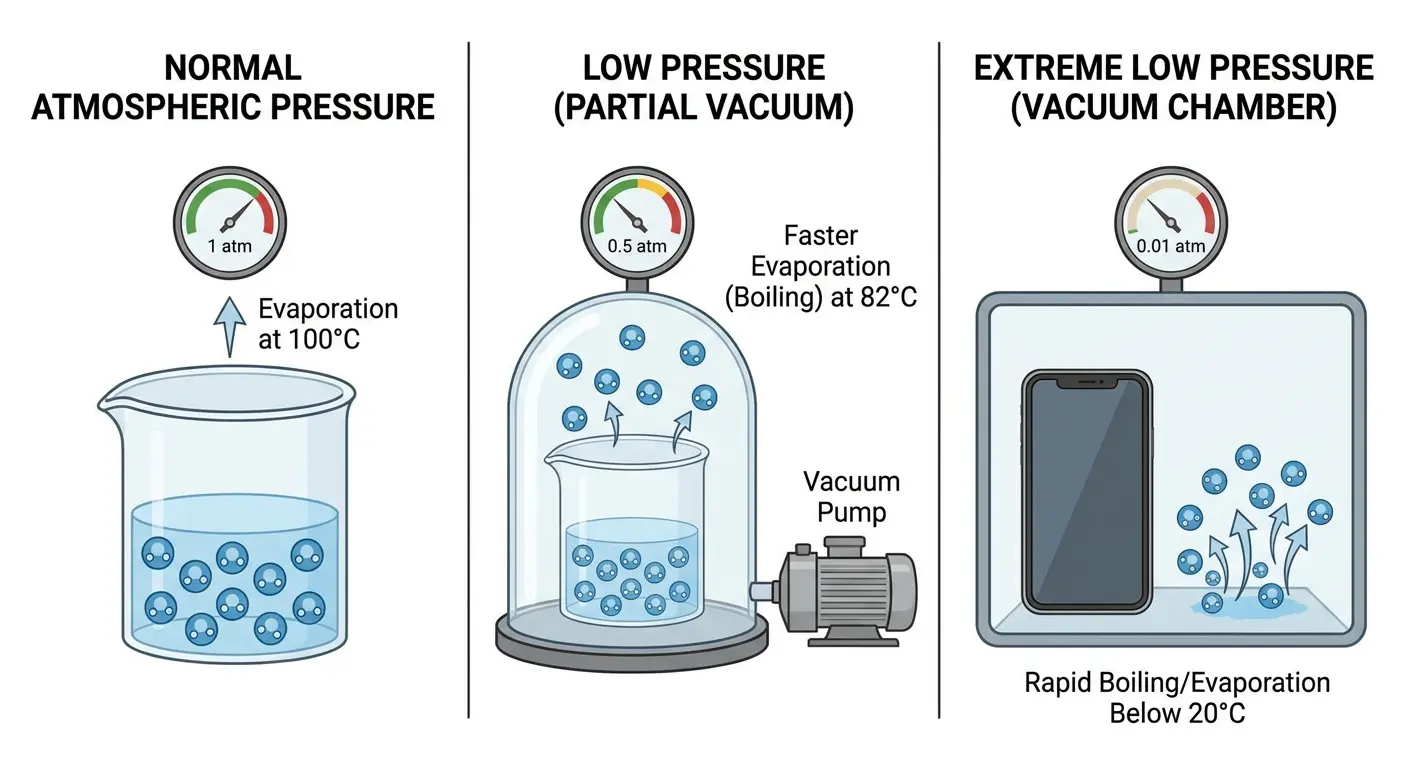
The method works because it changes the physics of evaporation. Water evaporates faster at lower pressures. By creating a partial vacuum around your phone, you're lowering the boiling point of water and accelerating evaporation without adding heat.
You need a vacuum chamber or vacuum bag system. The handheld vacuum sealers people use for food storage can work if they achieve at least 0.5 bar (about 15 inches of mercury). Professional vacuum chambers work better, but I'm talking about practical home solutions here.
The process requires patience. Place your phone in the vacuum bag or chamber. Seal it and run the vacuum for 15-minute intervals with 5-minute rest periods. The intermittent approach prevents component stress from sustained low pressure while giving water vapor time to migrate out of tight spaces.
Vacuum pressure is tricky. Too little (above 0.7 bar) and you're basically just putting your phone in a bag for no reason. Too much (below 0.3 bar) and you risk damaging the seals or doing something weird to the battery.
Sweet spot? 0.5 to 0.7 bar. That's what most food vacuum sealers hit, which is why they work for this. If you've got a professional vacuum chamber, dial it back because more isn't better here.
Pressure Level |
Effect on Water |
Component Safety |
Recommended Use |
|---|---|---|---|
0.9-1.0 bar (normal atmospheric) |
Minimal evaporation improvement |
Completely safe |
Not effective for water removal |
0.5-0.7 bar |
Moderate evaporation acceleration |
Safe for all components |
Optimal range for home use |
0.3-0.5 bar |
Significant evaporation increase |
Risk to adhesive seals |
Professional equipment only |
Below 0.3 bar |
Maximum evaporation |
High risk of seal damage and battery issues |
Not recommended for phones |
Camera modules respond well to vacuum extraction because the pressure differential helps pull moisture through the same pathways it entered. Water that seeped past lens seals will reverse course when the pressure outside drops below the pressure inside the module.
This method has limitations. If water has already caused corrosion or mineral deposits (from tap water or salt water), vacuum extraction won't remove those contaminants. You're dealing with evaporation, not cleaning. The water leaves, but what was dissolved in that water stays behind.
Compressed Air Technique Without Damaging Your Lens
Compressed air gets water out by physically displacing it and accelerating evaporation through increased air circulation. The technique requires more precision than most people apply.
Canned air (difluoroethane) comes out cold. Really cold. That temperature drop can cause additional condensation if you're not careful, and it can make existing water freeze, expanding into spaces it hadn't reached before. Hold the can upright, never inverted, and use short bursts rather than sustained spray.
Distance and angle determine success or damage. Hold the nozzle at least 3 inches from your camera lens. Closer than that and you risk blowing dust particles into the lens housing or damaging the lens coating with excessive pressure. The angle should be oblique (about 45 degrees) rather than perpendicular to the lens surface.
Multi-lens arrays require a systematic approach. Start with the lens furthest from any visible water pooling. Work your way toward the wettest area, giving water somewhere to go as you push it. Spraying randomly just moves moisture around without removing it.
Here's what you actually need to do, and yes, order matters:
First, power off completely. Not sleep mode, OFF. (I skipped this once and fried a connector.)
Remove the case. Even if it's waterproof, it's now trapping moisture.
Hold the compressed air can upright. If you tilt it, you get liquid refrigerant instead of air, and that's somehow worse than water.
Stay 3+ inches away from the camera. I got cocky once and held it too close. Blew dust INTO the lens. Don't be me.
Angle it at 45 degrees, not straight on. You're trying to push water away, not drive it deeper.
Short bursts. 1-2 seconds, then pause. The can gets cold fast, and you don't want to freeze the water you're trying to remove.
Start with the lens that looks driest, work toward the wettest. Give the water somewhere to go.
And for real, if you see rainbow patterns appearing on your lens, STOP. That's the coating coming off. You've gone too far.
Air compressors work differently than canned air. They blow warm, ambient-temperature air, which helps with evaporation. But they also risk blowing oil or moisture from the compressor itself onto your phone. Use a moisture trap in line with your air hose, and make sure your compressor tank is drained of condensation before starting.

The real value of compressed air isn't removing water that's already inside your camera module. It's clearing water from around the lens housing before it has time to seep inside. Speed matters here. The faster you blow away surface water, the less time it has to find entry points into your camera assembly.
Watch for these signs you're using too much pressure: rainbow patterns appearing on your lens (coating damage), lens elements shifting position (visible as focus changes), new dust particles visible inside the lens when you examine it closely, or rattling sounds from inside the camera module.
Any of those mean you've crossed from helpful to harmful. Back off immediately.
Heat Application: Temperature Thresholds That Won't Fry Your Sensor
Heat works. But there's a catch.
Actually, there are several catches, and I learned about all of them by screwing this up in different ways.
Your phone's camera components fail at surprisingly low temperatures. We're talking 40°C (104°F). That's barely above body temperature. It's definitely below "hot coffee" temperature. And it's WAY below what a hair dryer puts out.
I used a hair dryer on low setting once. Thought I was being careful. The phone got warm, the fog cleared, everything seemed great. Two days later, the camera started producing weirdly soft images, like someone had smeared Vaseline on the lens. The heat had partially melted the adhesive holding the lens elements in place. They'd shifted by maybe a fraction of a millimeter, enough to ruin the optical alignment.
So when I say "gentle heat," I mean GENTLE. Heating pad on low. Warm water bottle wrapped in a towel. Sunlight through a window. Not a hair dryer. Not a heat gun. Not your car dashboard in summer (yes, I've seen someone try this).
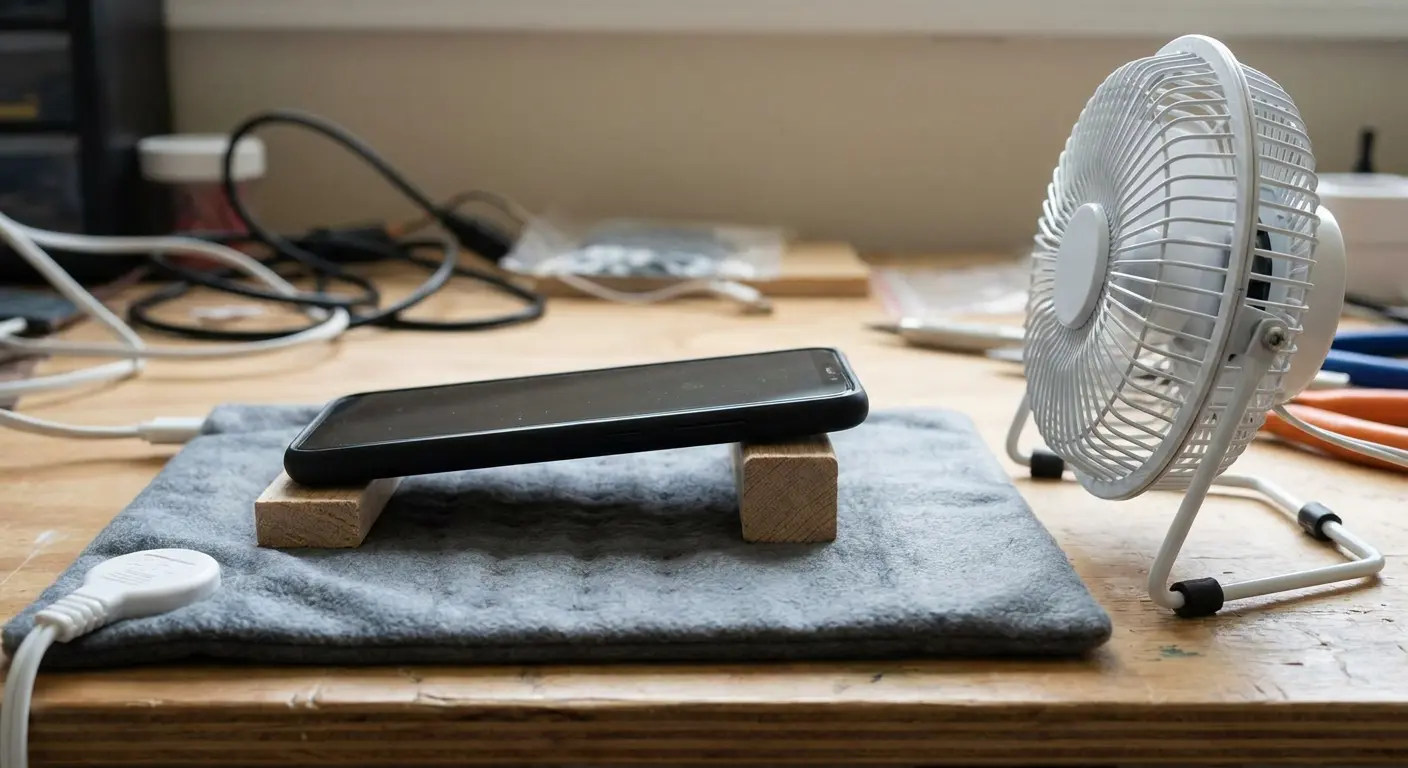
Safe zone: 35-40°C (95-104°F). The goal is to get your phone to about that temperature and hold it there for 30-60 minutes. That's warm enough to speed up evaporation but not hot enough to damage anything. If your phone feels uncomfortably warm to hold, it's too hot.
Better heat sources include a heating pad set to low with your phone placed on top (not underneath), a warm (not hot) water bottle wrapped in a thin towel, sunlight through a window (monitor temperature with an IR thermometer), or a computer monitor or TV screen displaying a white image which generates gentle, even heat.
The approach is sustained, gentle warmth rather than intense, short-duration heat. You're trying to raise your phone's overall temperature into the optimal evaporation zone and hold it there for 30-60 minutes.
Position matters as much as temperature. Place your phone face-down (camera-side up) so water vapor rises away from the camera module instead of potentially condensing on other components. Elevate it slightly on a wire rack or similar surface to allow air circulation underneath.
Combining gentle heat with air circulation creates the best evaporation environment. A small fan moving air across your phone while it sits on a heating pad multiplies effectiveness without increasing risk.
Temperature monitoring is critical. If you don't have an IR thermometer, use the touch test: if your phone feels uncomfortably warm to hold for more than a few seconds, it's too hot. Back off the heat source.
Battery safety intersects with heat application. Lithium-ion batteries become unstable above 45°C. Your phone should have thermal protection that shuts it down before reaching dangerous temperatures, but don't rely on that when you're deliberately applying heat. Remove the phone from the heat source every 15 minutes to check temperature.
The Gravity Position Method for Multi-Lens Arrays
Water follows gravity. That's obvious, but most people don't apply this principle when dealing with wet camera modules. Your phone's internal layout determines which positions help water drain and which trap it.
Modern phones have multiple camera lenses arranged in various patterns: vertical arrays, square grids, triangular arrangements. Each configuration has optimal drainage positions based on where the camera modules sit relative to other components.
Vertical lens arrays (common on many flagship phones) drain best when positioned with the top lens elevated. Water naturally flows toward the bottom lens, then toward the nearest exit point, which is usually the speaker grille or charging port area. You're not trying to get water out through the camera lens itself. You're routing it to designed drainage points.
Square or grid arrangements require rotation through multiple positions. Spend 20-30 minutes with each corner elevated in turn. This ensures water in any lens module has a gravity-assisted path out.
Position Rotation Template for Multi-Lens Arrays:
Session 1 (0-30 minutes): Top-left corner elevated at 45-degree angle
Session 2 (30-60 minutes): Top-right corner elevated at 45-degree angle
Session 3 (60-90 minutes): Bottom-right corner elevated at 45-degree angle
Session 4 (90-120 minutes): Bottom-left corner elevated at 45-degree angle
Session 5 (120-150 minutes): Camera-side down, completely vertical position
The internal camera module sits on a circuit board with other components surrounding it. Water trapped between the lens assembly and the board won't drain without creating a path. Gentle pressure applied to the area around (not directly on) the camera lens while the phone is positioned for drainage can help dislodge trapped water.
Here's what most people miss: your phone's internal layout isn't symmetrical. The battery occupies significant space on one side. Circuit boards, connectors, and structural elements create channels and barriers that affect how water moves internally. Without disassembly, you can't see these pathways, but you can work with them by systematically rotating your phone through different positions.
Combine gravity positioning with other methods for better results. Apply gentle heat while your phone is positioned for drainage. Use compressed air to push surface water toward drainage points while gravity pulls internal water in the same direction. The methods stack.
Time investment matters here. Quick position changes don't work. Water needs 20-30 minutes in each position to fully migrate through internal pathways. Rushing this step means leaving water trapped in pockets that will cause problems later.
Isopropyl Alcohol Displacement (When and Why It Works)
Isopropyl alcohol displaces water because it's miscible with water but evaporates faster. The technique involves introducing alcohol to areas where water is trapped, allowing it to mix with and carry away the water as it evaporates.
This method is controversial, and for good reason. Done wrong, it introduces new contamination and potentially damages components. Done right, in the correct situations, it's the most effective water removal technique available.
When it works: salt water exposure, sugary liquid spills, or situations where water has been sitting long enough to start causing corrosion. The alcohol not only displaces water but also helps dissolve mineral deposits and residues that pure water leaves behind.
When it doesn't work: fresh water exposure caught early, situations where you can't ensure the alcohol reaches the trapped water, or if your phone has already been powered on after water exposure (electrical shorts change the damage profile).
Concentration matters critically. You need 99% isopropyl alcohol, not the 70% solution sold in drugstores. That extra 30% water in the diluted version defeats the entire purpose. The higher the alcohol concentration, the faster it evaporates and the less residual moisture it leaves.
Application method for camera modules:
Power off your phone completely (if it's still on)
Apply 2-3 drops of 99% isopropyl alcohol directly to the camera lens area
Allow it to sit for 30 seconds while the alcohol penetrates
Blot (don't wipe) with a lint-free cloth
Position the phone for gravity drainage
Repeat once more after 10 minutes
The alcohol seeps into the same pathways water used to enter the camera module. It mixes with trapped water, and the resulting solution evaporates faster than water alone would.
A photographer dropped their phone in ocean water during a beach shoot. After retrieving it within seconds, they rinsed it with fresh water to remove salt, then applied the isopropyl alcohol displacement method. Two 99% alcohol applications followed by 24 hours of drying saved the camera module. Without the alcohol treatment, salt residue would have corroded the lens assembly contacts within days, requiring a complete camera replacement.
Risks you need to understand: alcohol can damage certain lens coatings (particularly older phones), it may dissolve adhesives if left in contact too long, contamination risk if you use alcohol that isn't pure enough, and potential for spreading water to new areas if application is too aggressive.
You'll know the alcohol displacement worked when you see no fogging or condensation inside the camera lens after 2-3 hours. Clear glass means the water (and alcohol) have fully evaporated.
This technique pairs well with gentle heat application. The warmth accelerates alcohol evaporation, shortening the time your camera components are exposed to the chemical.
Prevention Through Case Design and Material Selection
Every water extraction technique I've covered is a backup plan. Prevention eliminates the need for any of them.
Cases are where this whole thing starts or stops. A good case prevents this entire nightmare. A bad case makes it worse.
I've tried probably a dozen different "rugged" cases over the years. Most of them are garbage with good marketing. The ones that actually work have a few things in common.
Raised bezels around camera arrays create the first line of defense. When your phone lands face-down or back-down, that raised edge prevents the camera lens from making direct contact with wet surfaces. The bezel height needs to exceed the camera bump height by at least 1mm to be effective.
Material selection matters more than thickness. TPU (thermoplastic polyurethane) flexes and returns to shape, maintaining seal integrity through repeated impacts and temperature changes. Polycarbonate provides rigid protection but can crack under stress, creating water entry points. The best cases combine both: rigid outer shells for impact resistance, TPU inner layers for sealing.
Seal design around the camera cutout is where most cases fail. A simple hole exposing your camera lenses offers zero water protection. Quality cases feature raised lips that channel water away from lens openings, hydrophobic coatings on the inner case surface, precision cutouts that minimize the gap between case material and phone body, and secondary barriers that block water migration even if the primary seal fails.

Cases can trap moisture, creating condensation problems. Ventilation design solves this. Small channels or breathable membranes allow air circulation without permitting water intrusion. The physics here is straightforward: water molecules are larger than water vapor molecules. Materials and designs that let vapor escape while blocking liquid water give you the best of both worlds.
Rokform builds cases with this understanding. Their rugged phone cases feature raised bezels specifically engineered to protect camera arrays, using materials that maintain seal integrity across temperature ranges and impact scenarios. When you're thinking about how to get water out of phone camera modules, the better question is how to keep it from getting in there at all.
Their iPhone cases and Samsung cases incorporate these protective features while maintaining slim profiles that don't add bulk. The motorcycle phone mounts and bike phone mounts they produce work in conjunction with their protective cases, creating systems that keep your phone secure and dry during high-exposure activities.
Case maintenance affects long-term protection. Inspect your case every few months: check for cracks or separation in seams, verify the camera bezel hasn't compressed or deformed, clean debris from seal areas (dirt compromises water resistance), and test the fit (cases loosen over time, creating gaps).
A case that protected your phone perfectly six months ago might have degraded enough to allow water intrusion now. Regular inspection catches these issues before they matter.
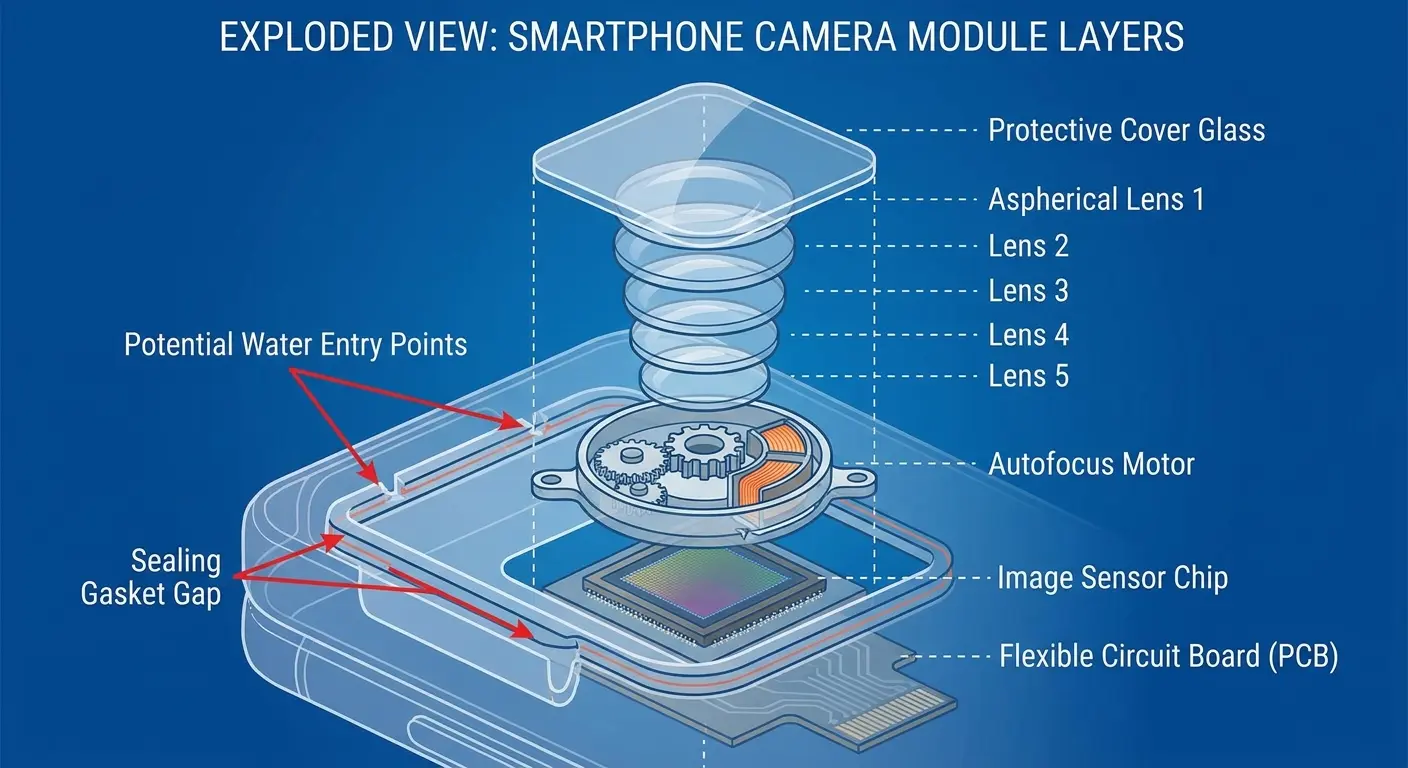
What Actually Happens Inside Your Camera Module When Water Enters
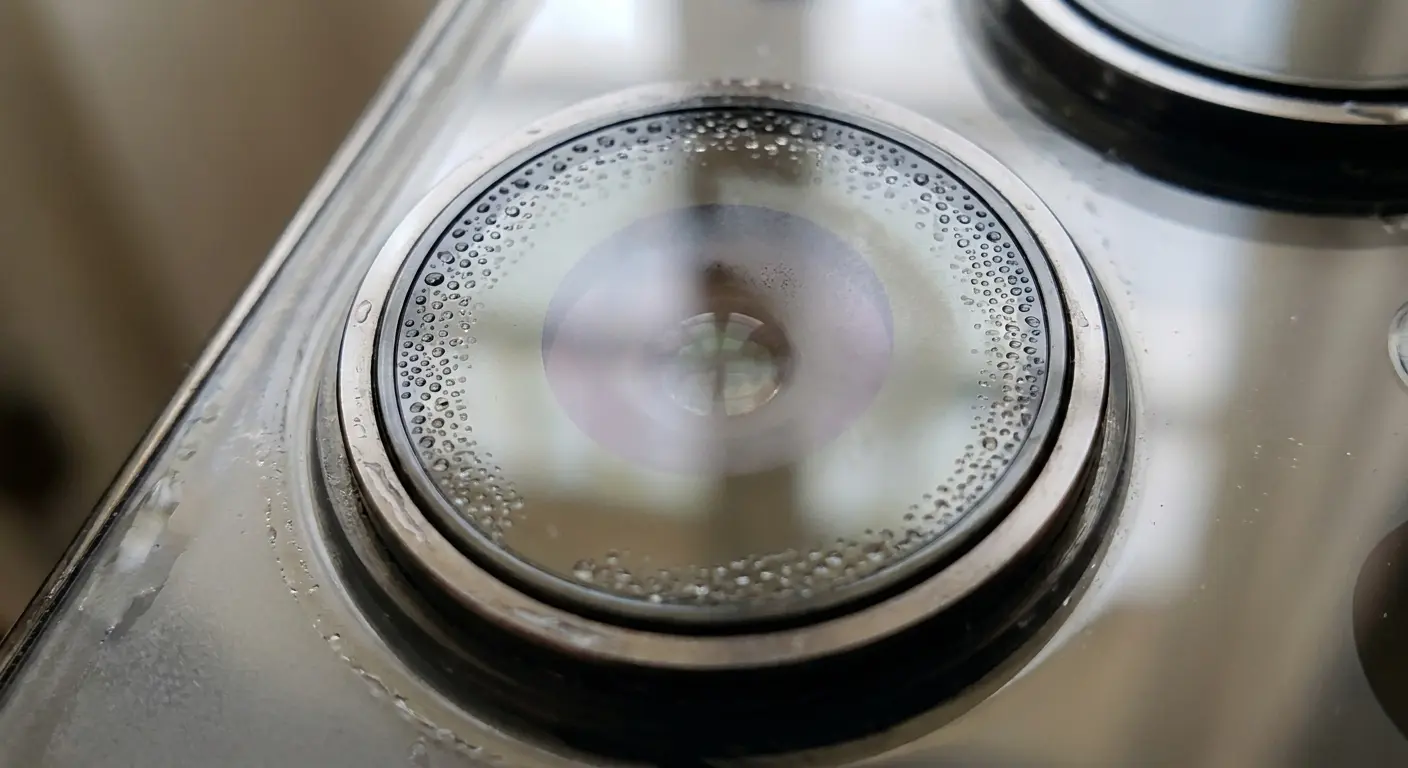
You know what's wild? Your camera module is basically a tiny telescope crammed into a space the size of a Tic Tac. And when water gets in there, it doesn't just make things foggy. It goes on a destruction tour.
Here's what's actually happening when you see that fog:
Water's squeezing between the lens elements (there are usually 5-7 pieces of glass stacked in there). Light bounces off the water droplets instead of going straight through. That's your fog. But the real problem isn't what you see. It's what happens after.
When that water finally evaporates, it leaves behind whatever was dissolved in it. Tap water? You get mineral deposits. Ocean water? Salt crystals. Even "pure" water leaves residue. Those deposits stay on your lens elements forever unless you disassemble the whole thing.
And here's the part that got me: the autofocus motor. It's this tiny electromagnetic coil that moves the lens back and forth. Water corrodes it, and suddenly your camera can focus on infinity but not on anything close. Or vice versa. I dealt with this for three months before I realized it wasn't a software bug.
The lens assembly consists of multiple glass or plastic elements stacked in precise alignment. Water between these elements scatters light, causing the foggy appearance you see. More problematic: water carries minerals and contaminants that deposit on lens surfaces as it evaporates, leaving permanent spots that degrade image quality.
Behind the lens sits the image sensor, a CMOS chip covered by a protective filter. Water reaching this filter creates immediate image quality issues. Water reaching the sensor itself (rare but possible in severe flooding) can cause permanent pixel damage.
That delayed failure thing? That's usually the flex cable connector corroding. Water follows the cable like a highway, reaches the connection point, and sits there slowly eating away at the contacts. Your camera works fine for a week, then one day it just doesn't turn on. That's not bad luck. That's corrosion finishing what the water started.
The camera module connects to your phone's main circuit board through a flex cable. This connection point is vulnerable. Water following the cable path can reach other components, spreading damage beyond the camera system. Corrosion at these connection points causes intermittent failures that appear days or weeks after water exposure.
Autofocus mechanisms vary by phone model. Some use voice coil motors (VCM) that physically move lens elements. Others use phase-detection pixels on the sensor itself. Water affects these differently: VCM systems can seize up as water corrodes the tiny motor components, phase-detection systems fail when water disrupts the sensor's ability to read contrast, and optical image stabilization (OIS) systems have gyroscopes and actuators that fail rapidly when wet.
The camera housing itself has multiple potential entry points. Water doesn't just come through the lens opening. It can enter through the seam where the camera module mounts to the phone's back panel, gaps around the flash LED assembly, microphone openings near the camera array, and adhesive seals that have degraded over time.
Each entry point requires different extraction approaches. Water coming through the lens opening responds to gravity drainage and evaporation. Water entering through mounting seams may pool in areas where it can't easily escape without disassembly.
Mineral deposits from tap water or salt residue from ocean water cause delayed damage. Your camera might work fine immediately after drying, then fail weeks later as corrosion progresses. This delayed failure mode is why professional repair shops often recommend component replacement even when the camera appears to function after water exposure.
The protective coatings on lens elements are nanometers thin. Water exposure, especially with attempted cleaning, can strip these coatings. You'll notice this as increased lens flare, reduced contrast, or a general haziness that cleaning doesn't fix.
Emergency Response Timeline: First 60 Seconds Matter Most
Okay, your phone just hit water. You're panicking. I get it. I've been there, standing in my kitchen staring at my phone in the sink, frozen like an idiot.
Here's what you do RIGHT NOW, not in five minutes, not after you finish freaking out, NOW:
Get it out of the water. Obviously. But I've seen people (okay, fine, I've BEEN the person) who just stares at it for a few seconds processing what happened. Don't. Every second counts.
Turn it off immediately. Don't check if it still works. Don't see if the screen responds. Don't do the "maybe it's fine" test. Hold the power button and volume down (or whatever your phone's force shutdown combo is) and kill it. Power plus water equals short circuits. Short circuits equal dead phone.
Rip the case off. I don't care if it's a nice case. I don't care if it's hard to remove. Get it OFF. Cases trap water against your phone's body, and that water is actively looking for ways inside.
Shake it. Gently. Camera side down. You're trying to get water out before it settles in. Not like a maraca, more like you're trying to get the last bit of ketchup out of the bottle. Firm but not violent.
Blot everything. Don't wipe because that pushes water into ports. Blot. Pat. Dab. Whatever you want to call it. Absorb, don't spread.
All of that should take you maybe 45 seconds. If you do those five things, you've probably saved your phone. If you skip them to "test" whether it still works, you've probably killed it.
And for the love of God, don't:
Press buttons to see if it responds (I did this. It responded by dying.)
Plug it in to check if it charges (why would you do this?)
Blast it with a hair dryer (too hot, you'll cook it)
Stick anything in the ports to "dry them" (congratulations, you just pushed water deeper)
Turn it back on to "see if it's okay" (it's not okay, leave it alone)
After the first 60 seconds, you transition from emergency response to systematic drying. The immediate crisis is contained. Now you're preventing long-term damage.
The next 24 hours determine your outcome. Water that hasn't caused damage yet will if it sits in contact with components for extended periods. Your goal is complete drying within 24 hours of exposure.
Position your phone camera-side down in a location with good air circulation. Room temperature is fine. You don't need heat immediately. Air movement matters more than temperature in the early stages.
Resist the urge to power on your phone to check if it's working. Every hour you wait before powering on reduces the risk of short circuits. Minimum wait time: 24 hours. Optimal wait time: 48 hours.
Signs water has reached your camera module: visible condensation or water droplets inside the lens, foggy or hazy appearance when you look at the lens, water pooling around the camera bump, or moisture visible in the flash LED housing.
If you see any of these signs, water has definitely penetrated the camera assembly. All the extraction methods I've covered apply. If you don't see these signs, you might have caught it early enough that only external drying is needed.
The cost-benefit calculation on professional repair: a $100 inspection and cleaning now might prevent a $500 camera module replacement later. Water damage is progressive. What looks like a successful DIY rescue today can turn into component failure next month.
Final Thoughts
Here's the thing: you're going to get your phone wet again. Maybe not today, maybe not this month, but it'll happen. The difference between a $50 fix and a $500 replacement is knowing what to do in the first 60 seconds and having a case that actually protects your camera module.
I've been through this enough times to know that prevention beats every extraction method I've covered here. But when prevention fails (and it will), at least now you know rice is a waste of time and what actually works.
Water and phone cameras will keep intersecting as long as we use our devices in real-world conditions. Perfect prevention isn't realistic. What is realistic: understanding the actual physics of water intrusion and removal instead of relying on myths that don't work.
Rice doesn't work. Passive desiccants have limited applications. Heat, vacuum, gravity, and strategic alcohol use work when applied correctly within safe parameters. Each method addresses specific aspects of the water removal problem.
The immediate response timeline matters. The extraction methods you choose matter. The quality of your protective case matters.
I've covered the technical details because understanding why methods work (or don't) helps you make better decisions when you're dealing with a wet phone and limited time. You know now that vacuum extraction works because of pressure differentials, not magic. You understand that heat has narrow safe zones. You recognize that gravity positioning needs to account for internal phone architecture.
Take the prevention seriously. Invest in protection that actually works. When water exposure happens anyway, respond systematically using methods based on physics rather than internet folklore.
Your phone's camera is probably the component you use most. It captures moments you can't recreate. Water damage doesn't just cost money in repairs. It costs you the functionality you depend on daily. That makes prevention and proper response worth the attention I've given them here.
Stay dry out there. Or at least keep your phone dry.

