


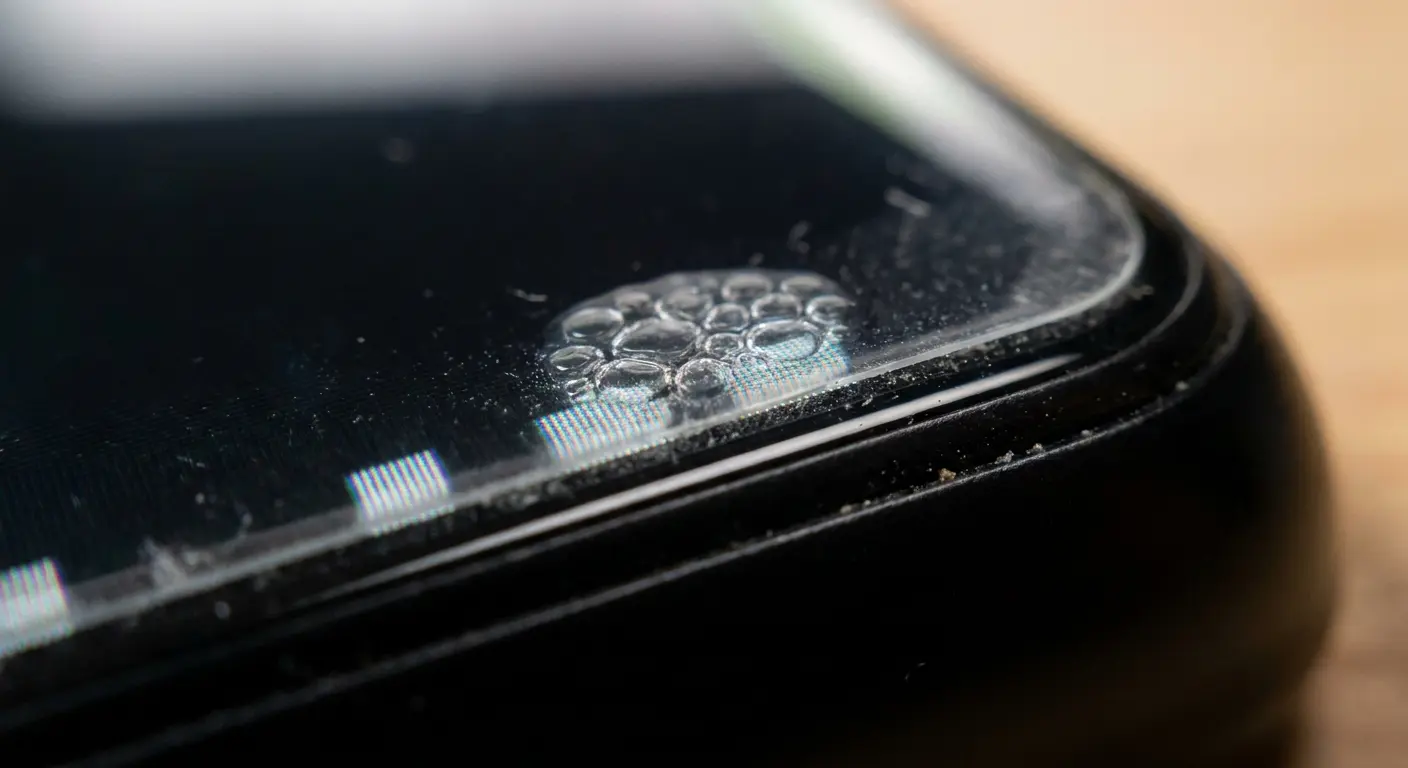
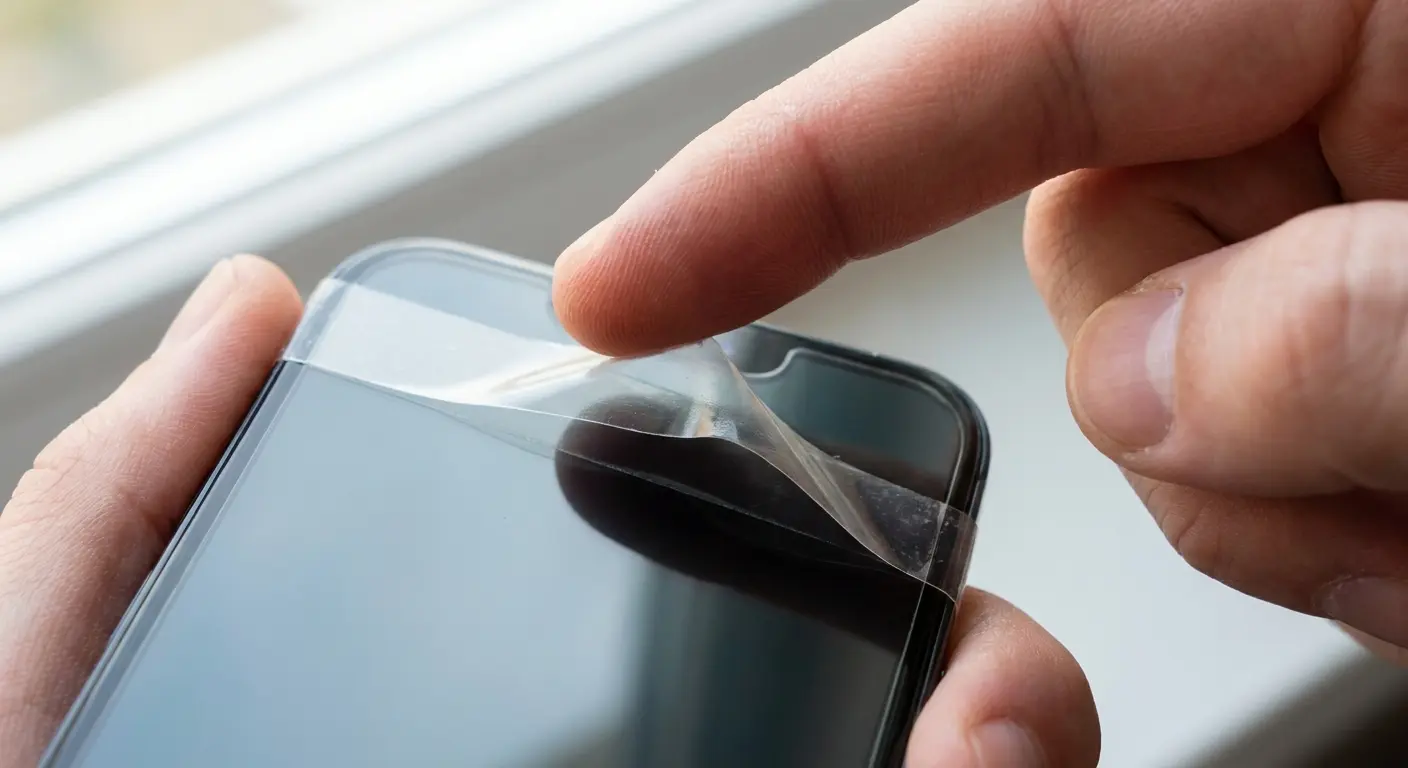
Perfect. You just spent 15 minutes getting your screen protector lined up. Edges? Check. Camera cutout? Nailed it. Then you press down and watch a dozen tiny bubbles spread across your display like you've done this blindfolded.
Most advice stops at prevention. Steamy bathroom, credit card, work slowly, blah blah blah. That's helpful if you're starting fresh, but what about the bubbles already staring at you from under your screen? The ones that sit right where you tap your keyboard and make you want to throw your phone into traffic?
This is about fixing what's already wrong. Not doing it right the first time (though we'll touch on that). This is about salvaging what's on your screen and understanding why those bubbles behave the way they do.
Table of Contents
Why Bubbles Form After You Think You're Done
The 24-Hour Window Most People Waste
Dust Bubbles vs. Air Bubbles: Why the Difference Matters
The Microfiber Method for Stubborn Edge Bubbles
When Heat Actually Helps (And When It Destroys Everything)
Relifting Corners Without Ruining Adhesive
The Hinge Technique for Full Reapplication
Why Your Case Might Be the Problem
Tools That Actually Work vs. Tools That Sound Good
TL;DR
Wait 24 hours before panicking. Most small bubbles disappear on their own. Dust bubbles don't, you'll need to remove and clean for those. Your case might be causing edge bubbles. Heat only works for film protectors, not glass. The microfiber cloth beats any squeegee. And timing matters more than pressure when working out trapped air.
Why Bubbles Form After You Think You're Done
The application looked flawless. You peeled off the final layer, admired your work, and then noticed them. Small bubbles appearing where there were none seconds ago.
Here's the thing: adhesive doesn't just glue down the second you smooth it out. Most screen protectors use a silicone-based adhesive layer that needs time to spread and grip the glass. When you apply pressure during installation, you're temporarily pushing things around. Once you release that pressure, physics takes over.
Air wants to escape. Adhesive wants to flow. The two compete, and sometimes air wins by finding tiny channels between the adhesive and your screen. These channels create the bubbles you see forming post-application.
Picture this: you apply a screen protector in your living room at 8 PM. Installation looks perfect. You set your phone down and walk away. Twenty minutes later when you pick it up to send a text, three small bubbles have appeared near the top edge.
You didn't even touch the phone. Those bubbles formed because the adhesive was still settling, and the slight temperature change as your phone cooled from your hand warmth to room temperature caused minor contraction that created air pockets. This is normal adhesive behavior.
The 24-Hour Window Most People Waste
You see bubbles and immediately want to fix them. That urgency costs you.
Screen protector adhesive needs 24 to 48 hours to fully cure. During this window, small air bubbles will work their way out as the adhesive spreads and bonds with your screen. I've installed these things more times than I'd like to admit, and most of those tiny bubbles (the ones smaller than a pencil eraser) vanish on their own within a day or so.
The key word is small. Large bubbles won't self-resolve. Neither will bubbles at the edges where adhesive coverage is minimal. But those tiny ones scattered across your display? Leave them alone. Do screen protector bubbles go away on their own? Yes, if they're small enough and you give them time.
Your phone generates heat during normal use. This heat slightly softens the adhesive, helping it flow into gaps and push out trapped air. Every time you charge your phone, check your email, or watch a video, you're passively helping those bubbles disappear.
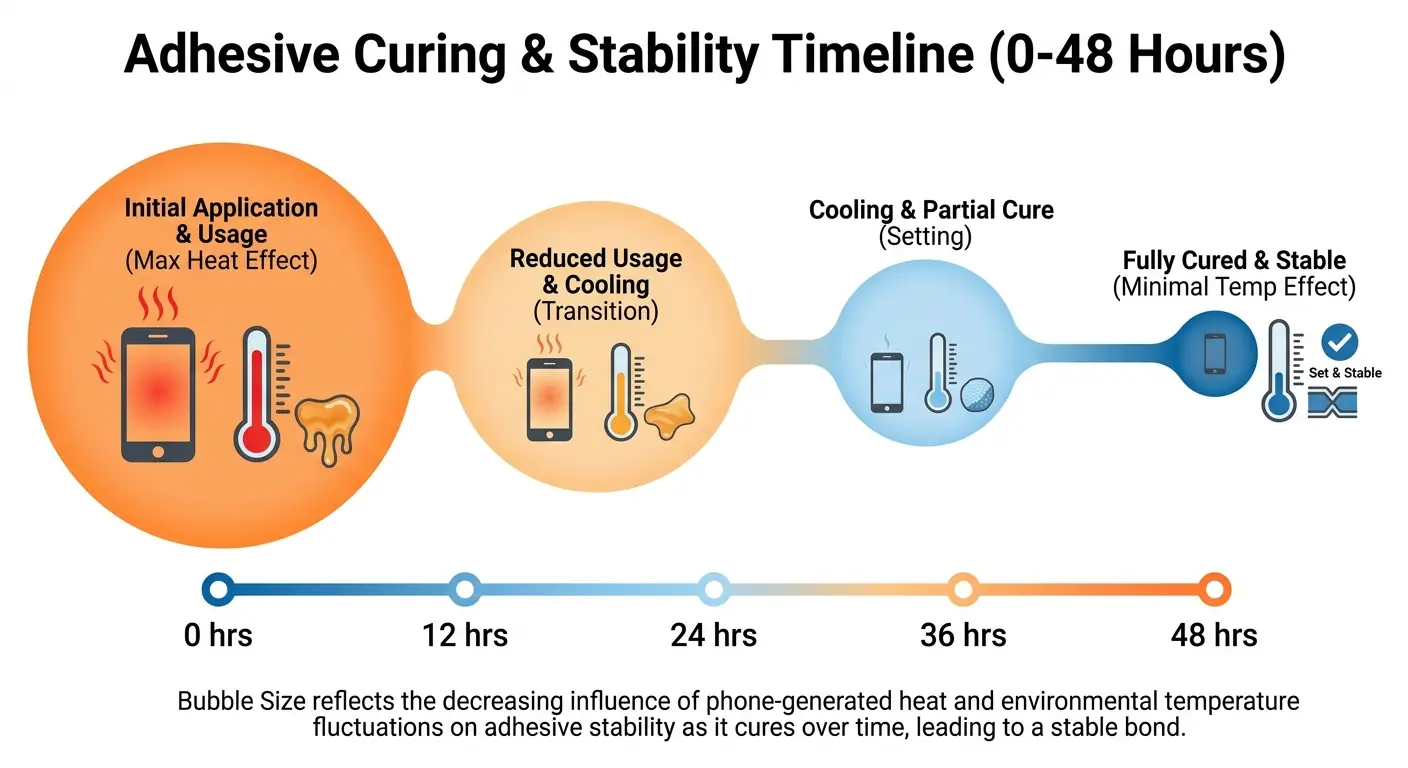
Patience isn't just good advice here. It's the difference between a perfectly clear screen and one you've unnecessarily lifted and reapplied three times, weakening the adhesive with each attempt.
Bubble Size |
Self-Resolution Timeline |
Action Required |
|---|---|---|
Under 2mm |
12-24 hours |
Wait and monitor |
2-3mm |
24-48 hours |
Wait, check after one day |
3-5mm |
Unlikely to resolve |
Intervention needed after 48 hours |
Over 5mm |
Will not resolve |
Immediate attention required |
Edge bubbles (any size) |
Case-dependent |
Check case fit first, then address |
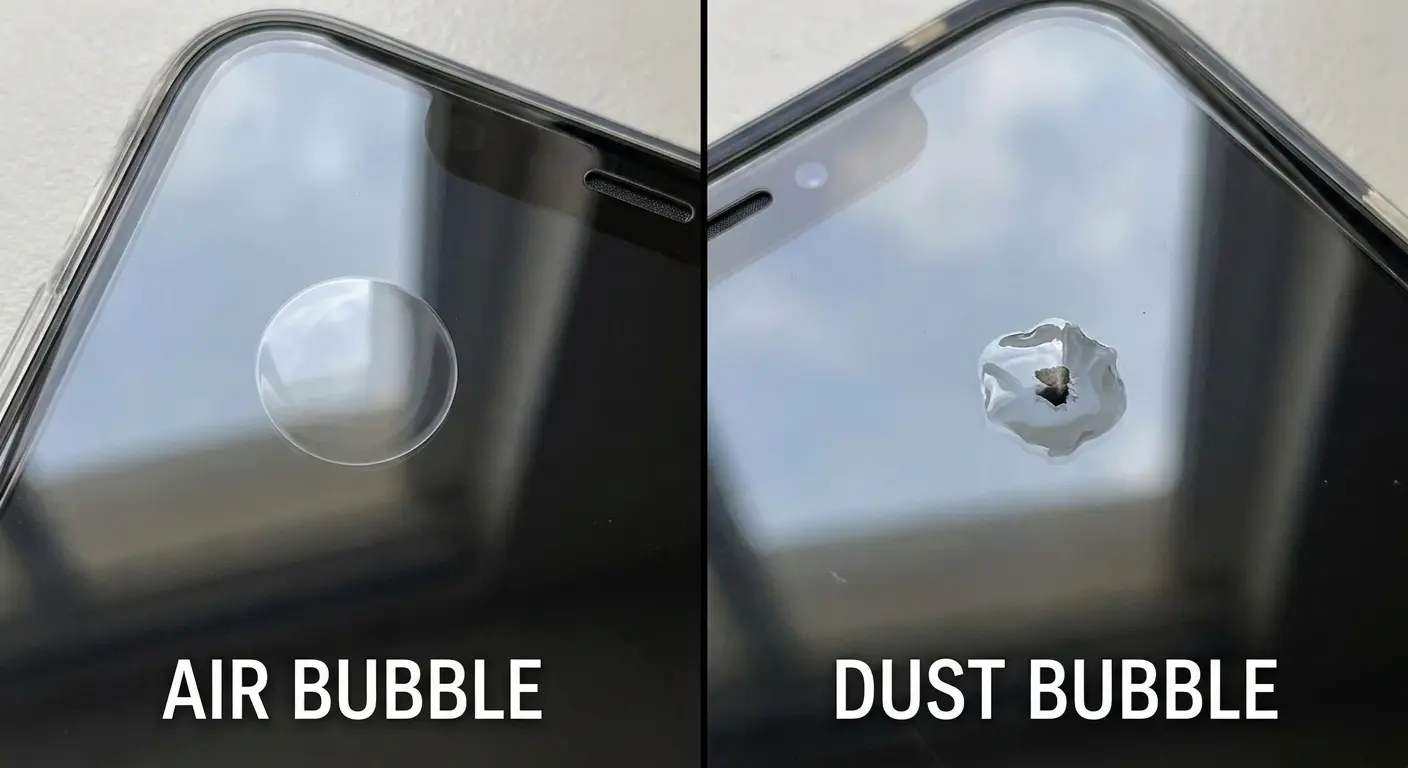
Dust Bubbles vs. Air Bubbles: Why the Difference Matters
Not all bubbles are created equal, and trying to remove a dust bubble using air bubble techniques will waste your time.
Air bubbles look uniform. They have smooth, rounded edges and shift slightly when you press on them. The area around them appears clear because nothing's trapped there except air.
Dust bubbles have a visible particle at the center. They're irregular in shape, and the bubble forms a halo around the contaminant. When you press on a dust bubble, it doesn't move or shrink. The particle prevents the adhesive from making contact with your screen, creating a permanent gap.
You can push air bubbles toward the edge of your screen. You can't push dust bubbles anywhere because the particle stays put.
For air bubbles, you're working with the adhesive's natural properties to guide trapped air out. For dust bubbles, you need to remove the protector, clean the particle, and reapply. There's no middle ground, no clever trick that bypasses this reality.
Yes, I've wasted 20 minutes on a dust bubble that had zero intention of moving. Learn from my mistakes. Check for the particle first.
Bubble Diagnostic Checklist:
Examine the bubble under direct light at multiple angles
Look for a visible particle or dark spot at the center
-
Press gently on the bubble and observe its behavior:
Does it shift position? Air bubble.
Does it compress but stay in place? Air bubble.
Does it remain completely unchanged? Dust bubble.
-
Check the bubble's edges:
Smooth and circular? Air bubble.
Irregular or halo-shaped? Dust bubble.
If uncertain, wait 24 hours and recheck. Air bubbles will shrink or move, dust bubbles won't change.
Characteristic |
Air Bubble |
Dust Bubble |
|---|---|---|
Center appearance |
Clear, uniform |
Visible particle or dark spot |
Edge shape |
Smooth, rounded |
Irregular, halo effect |
Response to pressure |
Shifts, moves, or compresses |
No movement or change |
Self-resolution potential |
High for small bubbles |
Zero, will never resolve |
Treatment approach |
Push toward edges, wait |
Full removal and cleaning required |
Visibility under light |
Translucent, may disappear at angles |
Particle remains visible at all angles |
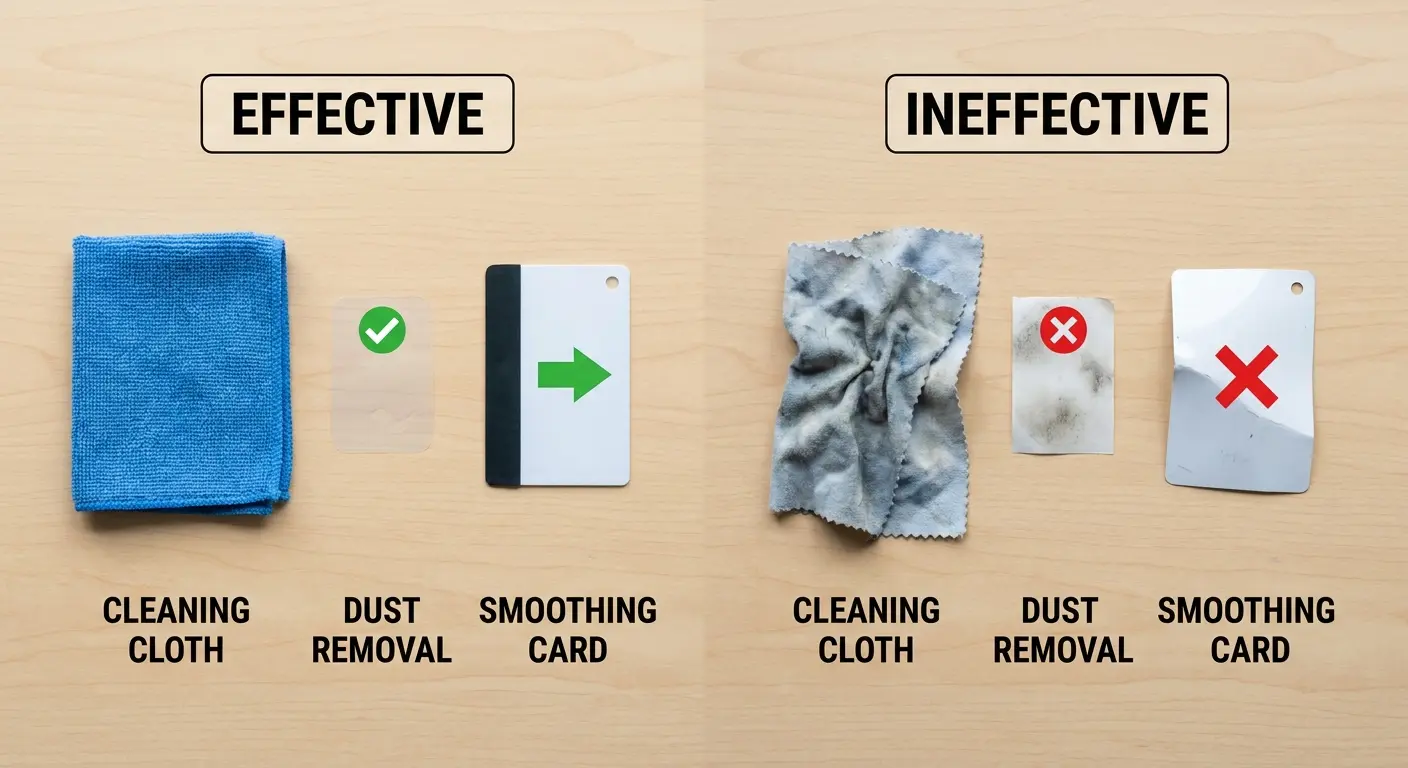
The Microfiber Method for Stubborn Edge Bubbles
Edge bubbles are different. They sit where adhesive coverage is thinnest and where your phone case creates pressure. Standard squeegee techniques push these bubbles into the corner where they get stuck.
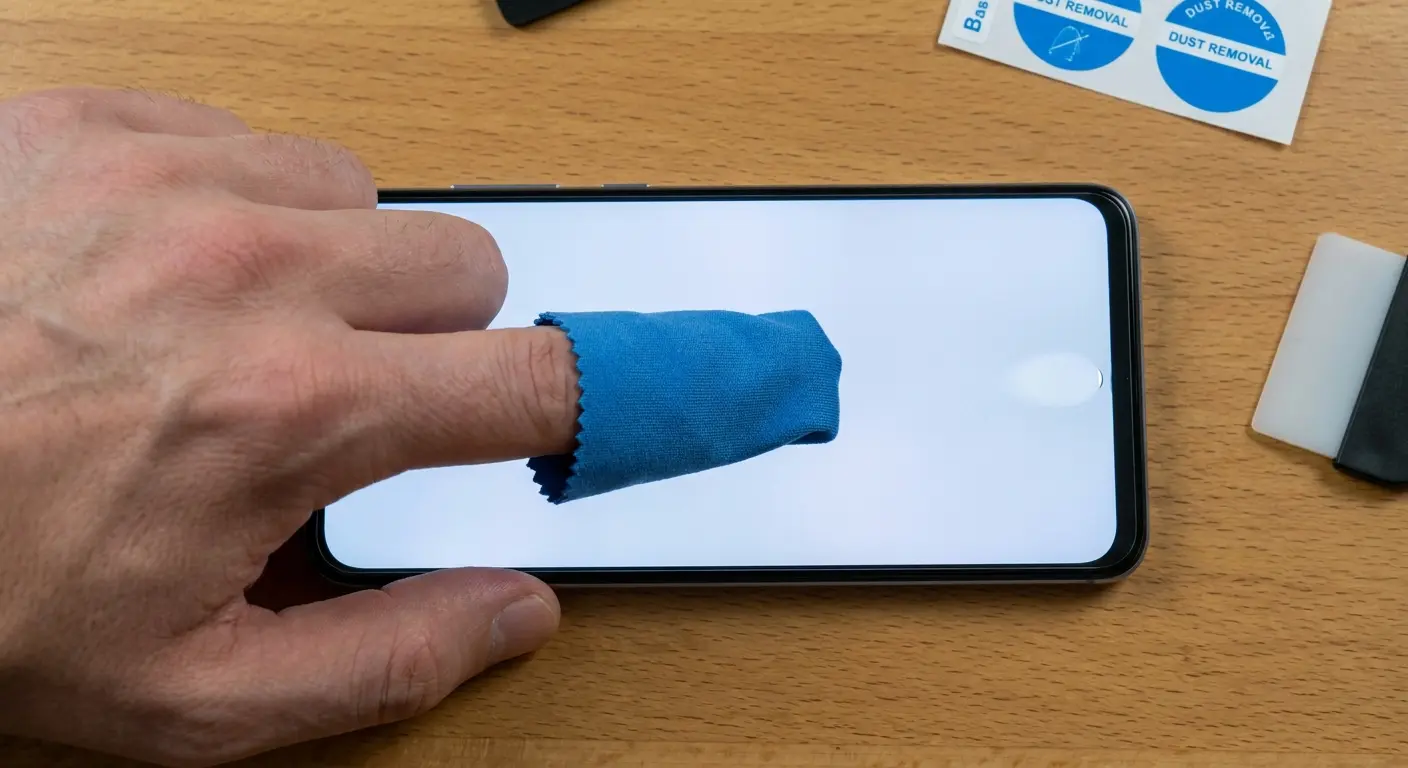
Wrap your microfiber cloth around your index finger. You want a smooth, padded surface without wrinkles or bunching. Start from the center of your screen and use firm, steady pressure to push toward the edge where the bubble sits.
The cloth distributes pressure more evenly than a card or squeegee. It also creates friction that helps guide the adhesive rather than just compressing it. You're not trying to pop the bubble or force it out violently. You're giving the trapped air a clear path to escape.
Work in one direction only. Don't go back and forth. Each pass should start fresh from the center and move outward. If the bubble doesn't budge after three attempts, stop. You're either dealing with a dust particle or the adhesive in that area has already cured too much to shift.
For bubbles right at the screen's edge (within 2mm), try a different angle. Instead of pushing straight out, push diagonally toward the nearest corner. This opens up a channel the air can follow.
I had this exact problem last week. Bubble on the right edge, halfway down my screen, driving me insane every time I swiped up. Tried pushing it straight out five times. Nothing. Switched to diagonal toward the bottom-right corner? Gone in two swipes. Sometimes the angle matters more than the pressure.
Your case might be causing the problem. We'll get to that shortly, but if you keep getting the same edge bubbles after removal, your case is probably the culprit.
When Heat Actually Helps (And When It Destroys Everything)
Everyone recommends heat for this. And yeah, sometimes it works, but sometimes it absolutely destroys your protector.
The difference comes down to protector type and heat source. Tempered glass screen protectors use a different adhesive than TPU film protectors. Glass protectors have a liquid adhesive that's UV-cured or pressure-activated. Film protectors use a silicone-based adhesive that responds to heat.
For TPU film protectors, gentle heat can reactivate the adhesive and help it flow into gaps. Use your phone's natural heat by running a processor-intensive app for a few minutes, then work the bubbles out while the screen is warm. Don't use a hair dryer. Just... don't. The heat is too direct and too intense. You'll warp the film or create new bubbles from rapid adhesive expansion.
For tempered glass protectors, external heat rarely helps and can cause problems. The glass itself doesn't flex, so softening the adhesive doesn't give you any advantage. Worse, uneven heating can create stress points in the glass that lead to cracks.
If you're using one of our tempered glass screen protectors, avoid heat-based methods entirely and stick with pressure techniques instead.
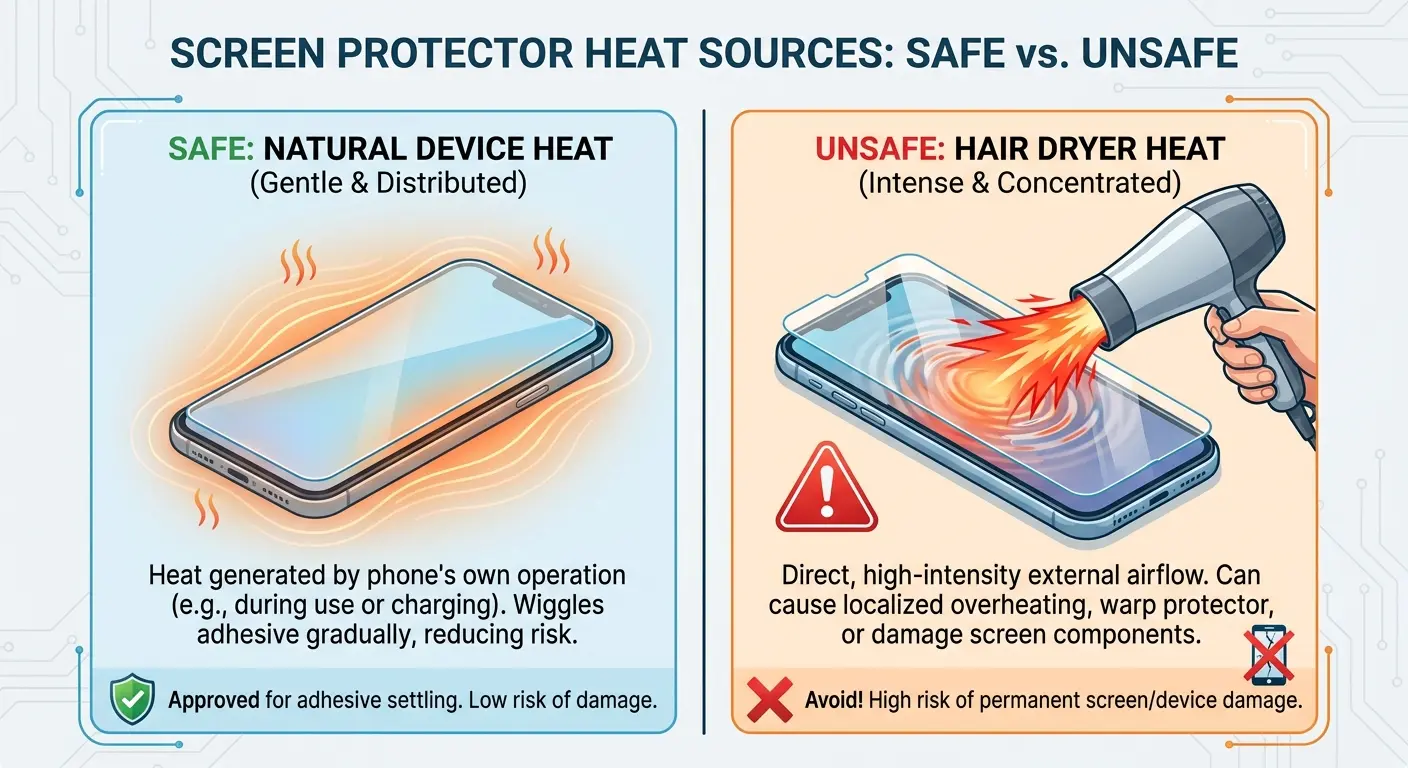
Room temperature matters more than you'd think. If you applied your screen protector in a cold environment (below 65°F), the adhesive was already compromised. It won't flow properly or bond completely. Bringing your phone to room temperature and giving the adhesive time to warm up can resolve bubbles that formed due to cold application.
Safe Heat Application Process for TPU Film Protectors:
If you're going to try heat (and only if you have a TPU film protector), just run a game or something intensive for a few minutes. Feel the screen warm up? Good. Now work fast with your microfiber cloth while it's still warm. You've got maybe two minutes before it cools down. Don't repeat this more than once in a two-hour period, and never heat the phone while it's charging.
Relifting Corners Without Ruining Adhesive
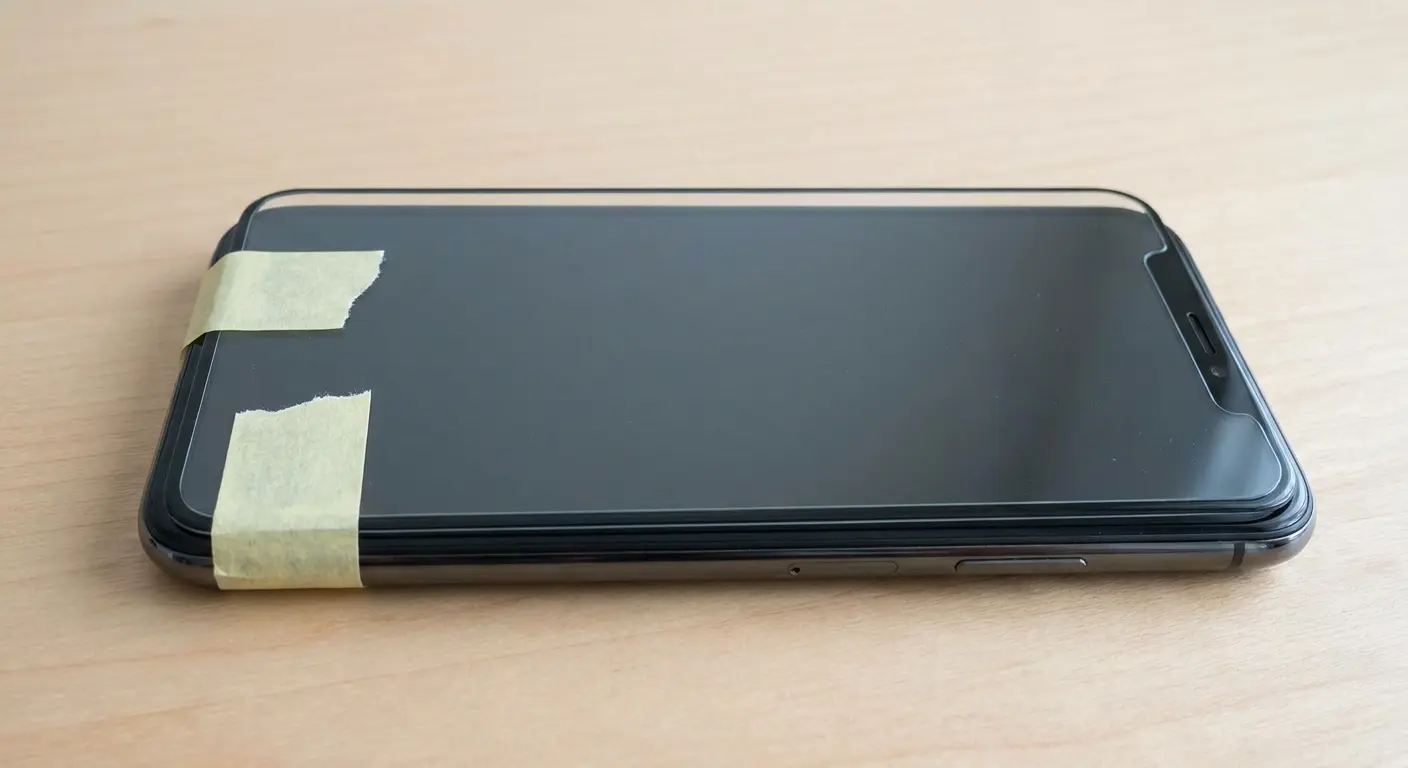
Sometimes you need to get under the protector to remove a dust particle or reposition a badly aligned edge. Lifting the entire protector off risks contaminating the adhesive or stretching the material. Lifting just a corner gives you access without full removal.
Use a piece of tape, not your fingernail. Place the tape at the corner and gently pull upward at a 45-degree angle. The tape grips the protector without leaving residue, and the angle prevents you from bending the material too sharply.
Once you have the corner lifted, you need to keep that area clean. Don't let it touch anything. Hold the lifted section taut while you use compressed air or a dust removal sticker to clean underneath. This is where most people fail. They lift the corner successfully, then let it flop around and pick up new dust.
Work quickly. The longer the adhesive is exposed to air, the more it'll attract particles and lose its stickiness. You have maybe 30 seconds before you start making it less sticky.
When you're ready to re-lay the corner, start from the attached portion and press down gradually. Don't just drop it and hope for the best. Use your microfiber-wrapped finger to press from the still-attached area toward the edge you just cleaned. This pushes any new air out as you seal.
Last month I had a small fiber trapped under the top-left corner of my screen protector, creating a 4mm bubble. Rather than peeling the entire thing off, I placed clear tape on the corner and lifted at a 45-degree angle until I'd exposed about half an inch. Held the lifted section up and away from the screen. Used a dust removal sticker to dab the fiber off the adhesive surface (don't wipe, just dab). Immediately pressed the corner back down starting from where it was still attached, working toward the edge. The entire process took 25 seconds.
This technique works once, maybe twice. After that, you've weakened the adhesive too much. If you're lifting the same corner repeatedly, you need to either accept the imperfection or replace the protector entirely.
The Hinge Technique for Full Reapplication
When you need to remove and reapply the entire screen protector, the hinge technique gives you control and alignment that full removal doesn't.
Before you lift anything, place a piece of tape along one edge of the protector. This tape becomes your hinge. When you peel the protector back, it stays attached at the hinge point, which maintains alignment for the long edge and prevents you from having to realign the entire thing from scratch.
Peel back slowly from the opposite edge. Keep the protector as parallel to the screen as possible to avoid stretching. Once you have it folded back on itself (adhesive side up), you can clean both the screen and the protector's adhesive layer.
For the screen, use a microfiber cloth slightly dampened with distilled water. Don't use tap water (minerals leave residue) or alcohol (it can damage oleophobic coatings). One gentle wipe to remove dust, then let it air dry for 30 seconds.
For the protector's adhesive, use a dust removal sticker. Don't wipe it. You'll smear the adhesive and reduce its effectiveness. Dab the sticker across the surface to lift particles without disturbing the adhesive layer.
When you're ready to reapply, start at the hinge and slowly lower the protector back down. Use a card or your cloth-wrapped finger to press from the hinge outward, pushing air ahead of the protector as it makes contact. This method dramatically reduces bubble formation because you're controlling the adhesive contact point by point rather than all at once. This is the most reliable way for how to remove air bubbles when you need complete access to the adhesive surface.
The hinge stays in place until you're satisfied with the application. Only then do you remove the tape.
Why Your Case Might Be the Problem
You installed the screen protector perfectly. No bubbles. Everything looked great. Then you put your case on and watched bubbles form along the edges.
Cases create pressure. Tight-fitting cases push against the screen protector's edges, lifting them slightly and breaking the adhesive seal. Once that seal breaks, air gets underneath and bubbles form. This is especially common with cases that have raised front bezels designed to protect your screen.
The fix isn't better bubble removal technique. The fix is case compatibility. Look, I'm biased because I work with Rokform, but we design our cases with precise tolerances that account for screen protectors. Our RokLock system and magnetic mounts work with your protector, not against it.
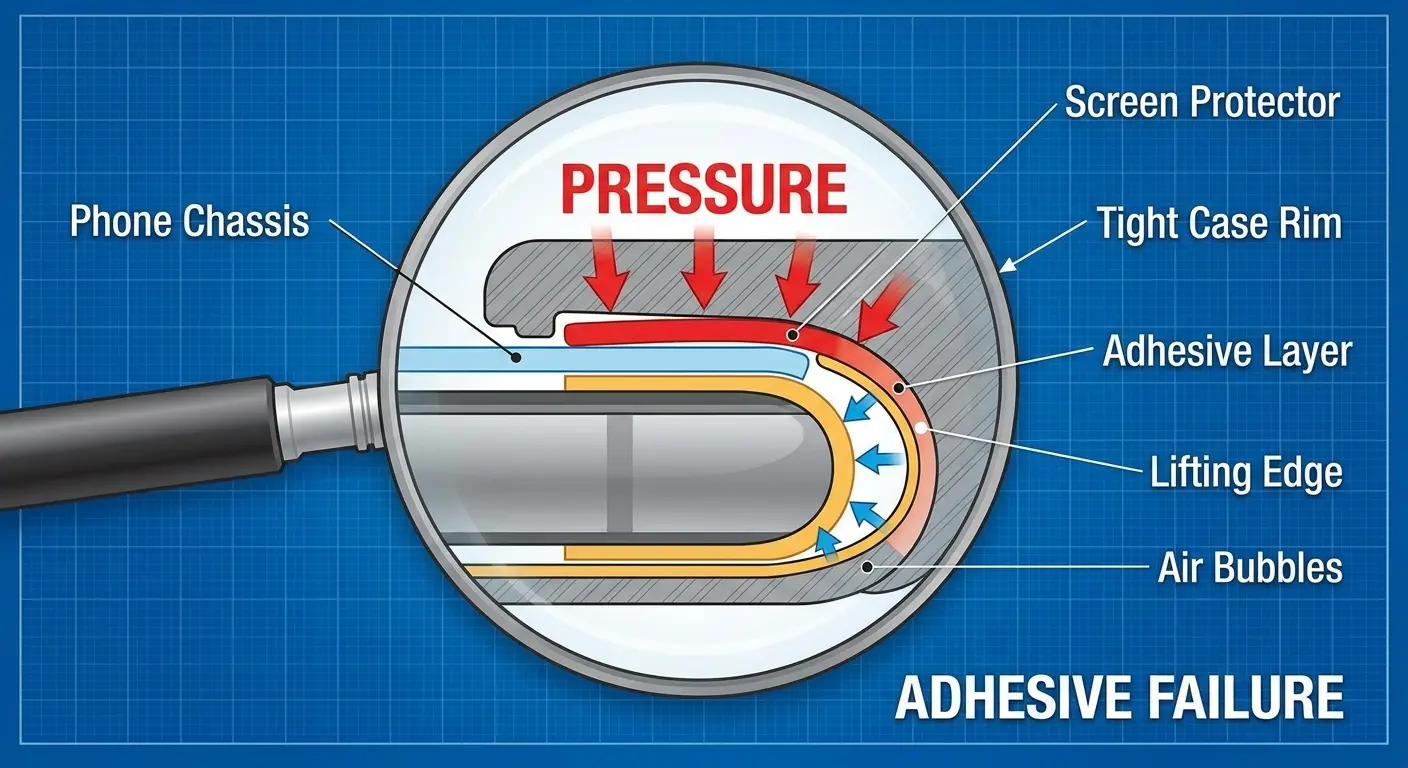
If you're committed to your current case, you have limited options. You can trim your screen protector slightly (not recommended, this leads to peeling). You can switch to a thinner protector. Or you can accept that edge bubbles will be a recurring issue.
Test this by removing your case and checking if the bubbles disappear within a few hours. If they do, your case is the problem. If they don't, you're dealing with adhesive failure or dust contamination.
Some cases are worse than others. Silicone cases tend to grip and pull at screen protector edges. Hard plastic cases with sharp internal edges can cut into protector material. Cases with extremely tight tolerances don't leave room for the protector's thickness.
Our rugged phone cases are engineered with screen protector compatibility in mind, eliminating this common frustration.
Tools That Actually Work vs. Tools That Sound Good
The internet loves recommending specialized tools for screen protector application. Most of them are unnecessary. Some are actively harmful.
Squeegees get recommended constantly. They work for initial application but are too rigid for bubble removal after the adhesive has started to set. The hard edge can scratch softer protectors or create new stress points in the adhesive. Your microfiber cloth does the same job with more control and less risk.
Credit cards are the classic recommendation. They're fine for initial application when the adhesive is still liquid. For bubble removal hours or days later, they're too stiff and don't distribute pressure evenly. You'll end up with pressure marks or pushed adhesive that creates new problems.
Dust removal stickers are essential. These adhesive sheets lift particles without leaving residue. They're the only reliable way to clean the protector's adhesive layer if you need to relift it. Don't substitute with tape. Regular tape leaves adhesive residue that creates more problems than it solves.
I don't know why people recommend compressed air for this, but it's never worked for me. It sounds perfect for blowing dust out from under a lifted corner. In practice, it blows more dust in than it removes. The force is too strong and too unfocused. If you use it, hold the can perfectly upright and use short bursts from at least 6 inches away.
Alignment tools (those plastic frames that came with premium protectors) are genuinely useful. They eliminate the guesswork from positioning and let you focus on bubble-free application. If your protector came with one, use it. If it didn't, you can create a makeshift version with tape strips along your phone's edges as guides.
UV lamps are required for liquid adhesive protectors. You can't substitute with sunlight or skip this step. The adhesive won't cure properly, and you'll have permanent bubbles. This isn't optional equipment for this protector type.
Your hands are the best tool. Clean, dry fingers wrapped in microfiber give you pressure control and tactile feedback that no rigid tool can match. You feel when the adhesive is moving, when you're pushing too hard, or when a bubble is a dust particle that won't budge.
For a complete protection setup, pair your screen protector with camera lens protectors to safeguard every vulnerable surface on your device.
The Real Talk
A couple of tiny bubbles that'll disappear tomorrow? Not worth the stress. A dust particle creating a permanent spot right in the middle of your screen? Yeah, that's worth fifteen minutes to fix. And if you keep getting edge bubbles no matter what you do, your case is probably the problem, not your technique.
I still sometimes rush this and end up with bubbles. Just last week, actually. I know better, but I got impatient and paid for it.
The real skill isn't preventing every bubble during installation. It's knowing which bubbles to fix immediately, which to leave alone, and which signal that you need to start over. That knowledge saves you time, preserves your protector's adhesive, and keeps you from making small problems worse.
Your screen protector exists to take damage so your actual screen doesn't. We've walked through the techniques that work because we've tested them across thousands of installations. You now know how to tell what kind of bubble you're dealing with and the specific methods to address it without damaging your protector or wasting hours on techniques that were never going to work.
Sometimes the fix isn't better bubble removal. It's better gear that actually works together from the start, like our complete phone accessories ecosystem designed for seamless compatibility.

