


Table of Contents
Why Your Phone's Built-In Mic Isn't the Problem (Your Positioning Is)
HVAC Systems Are Ruining Your Audio (And You Don't Even Hear It)
App Selection: What Actually Matters Beyond "Record" Buttons
Physical Placement Strategies That Override Hardware Limitations
The Adapter and Cable Ecosystem Nobody Explains Properly
Monitoring Your Audio in Real Time (Without a Second Device)
Post-Recording Rescue: When Your Setup Falls Short
Making Your Phone Mic Work for Specific Use Cases
Why Your Phone's Built-In Mic Isn't the Problem (Your Positioning Is)
The Proximity Principle Everyone Ignores
You're treating your phone's microphone as defective when the real issue is distance. Every inch you move away from the mic capsule cuts your voice's intensity by roughly 6dB. Half the perceived volume. By the time your phone sits two feet away on a desk, you've lost most of your vocal clarity to room noise and reverb.
Modern phones pack multiple microphones into their chassis. Your iPhone or Android device likely has three or four mics working together to create directional pickup patterns and noise cancellation. Pretty cool tech, honestly. But physics is still physics.
The primary mic (usually bottom-edge, near the charging port) captures the strongest signal. When you're recording yourself, that mic needs a direct path to your mouth without obstacles. Yeah, I know. Duh. Yet most people prop their phone against a water bottle or lay it flat on a table, pointing the mic array at the ceiling or their keyboard instead of their face.
The mobile microphone market has exploded in recent years. As Engadget's mobile microphone testing guide notes, the world of mobile-specific and phone-friendly microphones has expanded dramatically to serve budding creators and professionals alike, with options ranging from wireless lavalier systems to shotgun mics and mobile-friendly desktop solutions, all designed to work seamlessly with modern smartphones.
Position your phone vertically, angled slightly upward, with the bottom edge facing your mouth. Keep it 8-10 inches away (roughly the length of a standard water bottle, if you need a visual reference). This positioning captures your voice before it bounces off walls, desks, or other reflective surfaces that muddy your recording.
I watched someone record a product review with their phone three feet away. The audio sounded like they were in a bathroom. They moved it to 10 inches and suddenly, actual clarity. The equipment didn't change. Only the positioning did.
The Mic Array You Didn't Know You Had
Your phone doesn't just have "a mic." It has a coordinated system of microphones that activate based on what you're doing. Recording a voice memo? The bottom mic takes priority. Shooting video? The rear mics engage to capture environmental sound. Taking a call on speaker? The top mic activates for voice isolation.
You need to know which mic is working when you hit record. Most recording apps default to the primary (bottom) microphone, but video apps pull from multiple sources simultaneously. That's why your Instagram Stories might sound different than your Voice Memos recordings, even in the same room.
The secondary mics aren't just backups. They're actively sampling ambient noise to subtract it from your primary signal (a process called beamforming). When you cover these secondary mics with your hand or a phone case, you're partially disabling your phone's noise cancellation. Some cases are worse offenders than others. Looking at you, Otterbox Defender with your half-inch raised edges.
Microphone access has become a growing privacy concern for smartphone users. According to ExpressVPN's investigation into phone listening practices, voice assistants rely on wake words and passively listen for activation phrases, with false positives occasionally triggering unintended recordings. Modern Android (version 12, released in 2021) and iOS (version 14, released in 2020) now include visual indicators when the microphone is active, helping users understand when apps are accessing their mic. Also helps content creators verify which apps are recording.
Test this yourself: record a 10-second voice memo with your case on, then remove the case and record again in the same spot. Play them back. You'll likely hear a noticeable difference in clarity and background noise levels, especially if your case blocks any of the mic ports.
If you want good phone audio, you need to recognize that you're working with a sophisticated array, not a single component. Each microphone serves a specific purpose, and your recording quality depends on positioning that respects how the system functions.
HVAC Systems Are Ruining Your Audio (And You Don't Even Hear It)
Hard Surfaces Create the Echo Chamber Effect
Recording in your kitchen sounds convenient until you play back the audio and realize you sound like you're speaking from inside a metal can. Hard surfaces bounce sound around instead of soaking it up. Your voice hits the desk, bounces to the wall, reflects off the window. All those delayed copies pile into your mic. Glass, tile, bare walls, wooden desks: they're all terrible. Your recording ends up sounding hollow and muddy.
You don't need foam panels or professional acoustic treatment. You need to break up those reflections before they reach your mic. Soft materials absorb sound instead of bouncing it around. A couch, upholstered chair, curtains, or even a pile of clothes on a bed will dramatically improve your recording space.
Try this quick test: record a 10-second sample at your desk, then record the same script while sitting on your bed or couch with your phone positioned the same distance from your mouth. The difference will be immediately obvious. The soft furnishings absorb the reflections that would otherwise contaminate your recording.
Your environment matters as much as your technique. A mediocre phone in a good room will outperform an excellent phone in a bad room every single time.
HVAC and Ambient Noise: The Invisible Saboteur
Your brain filters out the hum of your air conditioner, but your phone's microphone doesn't. That constant low-frequency drone sits right in the middle of your vocal range, competing with every word you speak. The result? Your voice sounds thin and lacks presence because it's fighting for space in the frequency spectrum.
I once recorded an entire podcast episode before realizing my refrigerator had been running the whole time. Forty minutes of unusable audio because I didn't think about the fridge. Don't be me.
HVAC systems are the worst because they sit right in your vocal frequency range, 100 to 500 Hz. Just turn it off for ten minutes. Refrigerators cycle on and off unpredictably, so either record in another room or time it during the off-cycle. Computer fans get louder when your CPU is working, so move the laptop or switch to battery-saver mode. Traffic rumbles outside your window? Close windows, record early morning or late evening when ambient noise naturally drops.
Constant noise is worse than occasional loud sounds. Your brain can ignore a steady hum, but that doesn't mean it's not there. When you try to boost your voice in post-production, you're also boosting that hum. The ratio between your voice and the background noise (called signal-to-noise ratio) determines how professional your recording sounds.
The fix requires some awareness and planning. Turn off your AC or heater for the duration of your recording. You can survive five minutes of sub-optimal temperature. Move to a room where your computer's fan isn't audible. Close windows if you're near a busy street. Record early in the morning or late evening when ambient noise naturally drops.
Room Size and the Reverb Problem
Large rooms with high ceilings might feel impressive, but they're acoustically problematic for phone recording. Sound waves travel across the room, bounce off the far wall, and return to your microphone hundreds of milliseconds later. That's reverb, and it makes you sound distant and unclear.
Smaller rooms naturally reduce reverb because sound waves have less distance to travel before they hit an absorptive surface. A 10x10 bedroom produces tighter, more intimate recordings than a 20x30 living room with vaulted ceilings, assuming similar furnishings.
The best recording spaces are often the ones you wouldn't expect. Walk-in closets packed with hanging clothes provide excellent sound absorption. Small furnished bedrooms work well. Even recording under a blanket fort (yes, seriously) can produce surprisingly clean audio because you've created a small, heavily dampened space. Does it look ridiculous? Absolutely. Does it work? Unfortunately, yes.
Empty rooms are your enemy. That spare bedroom you're using as an office? If it's just a desk and a chair in an otherwise empty space, you're recording in an echo chamber.
App Selection: What Actually Matters Beyond "Record" Buttons
Manual Gain Control Separates Useful Apps from Toys
Most default recording apps make all the decisions for you, including how loud to capture your voice. That's automatic gain control (AGC), and it's the reason your recordings sound inconsistent. AGC constantly adjusts input levels, boosting quiet moments and pulling back during loud passages. That sounds helpful until you realize it's also boosting every background noise during pauses and creating an unnatural pumping effect.
Manual gain control puts you in charge. You set the input level once, and it stays there for the entire recording. Your voice maintains consistent volume, and background noise stays in the background instead of surging forward every time you stop speaking.
Good recording apps display your input level in real time, usually as a meter showing decibels (dB). You want your voice to peak around -12dB to -6dB during normal speech. That leaves headroom for louder moments without clipping (distortion that occurs when the signal exceeds 0dB).
For iOS, Voice Record Pro is solid. Not fancy, but it works. Ferrite is probably the best mobile audio editor, but the learning curve is steep. If you just need basic editing, it's overkill. Android users should look at RecForge II (the interface is ugly, but who cares) or Easy Voice Recorder Pro. These apps cost a few dollars. Buy them.
Your recording app needs manual gain control with a visible meter, real-time waveform display, and WAV export. That's the non-negotiable stuff. Nice to have: pause/resume without creating separate files, headphone monitoring, and background recording so it doesn't stop when your screen locks. Everything else is bonus features you probably won't use.
File Format and Bitrate: Where Quality Actually Lives
Your recording app probably defaults to compressed audio formats (MP3 or AAC) because they create smaller files. That's fine for voice memos you'll never edit, but it's a poor choice if you plan to process or enhance your recordings.
Compressed formats discard audio information to reduce file size. They use psychoacoustic models to throw away sounds they predict you won't notice. Most of the time, they're right. But when you try to boost volume, reduce background noise, or apply EQ in post-production, you're working with a degraded version of your original recording.
WAV files are uncompressed. They're larger (about 10x the size of a compressed file), but they preserve everything your microphone captured. If you have the storage space and plan to edit your audio, record in WAV format at 44.1kHz sample rate and 16-bit depth. Those specs match CD quality and provide plenty of information for processing.
Format |
Compression |
File Size (10 min) |
Best Use Case |
Post-Production Friendly |
|---|---|---|---|---|
WAV |
None |
~100 MB |
Professional recording, heavy editing, archival |
Yes - preserves all audio data |
AAC 256kbps |
Lossy |
~19 MB |
General content, podcasts, social media |
Moderate - acceptable for light editing |
AAC 128kbps |
Lossy |
~9.4 MB |
Quick notes, casual recording |
Limited - noticeable artifacts when processed |
MP3 320kbps |
Lossy |
~24 MB |
Sharing, distribution, streaming |
Moderate - better than lower bitrates |
MP3 192kbps |
Lossy |
~14 MB |
Basic content, voice memos |
Poor - compression artifacts become obvious |
MP3 128kbps |
Lossy |
~9.4 MB |
Low-priority recordings only |
No - quality degrades significantly in post |
If storage is limited or you're just recording quick notes, AAC at 256kbps offers a good balance. Avoid MP3 below 192kbps. The compression artifacts become noticeable, especially in post-production.
Some people swear by recording in compressed formats to save space. I think that's short-sighted, but if you're never editing your audio, maybe it doesn't matter.
Monitoring and Waveform Display: Seeing What You're Recording
Recording blind (without visual feedback) is guesswork. You're hoping your levels are good, hoping you're not clipping, hoping that noise you think you heard wasn't captured. Apps with real-time waveform display eliminate that uncertainty.
A waveform shows your audio signal as a visual representation. Louder sounds create taller peaks, quieter sounds create smaller waves. When you're recording, watching the waveform tells you immediately if something's wrong. If you see the waveform hitting the top and bottom of the display, you're clipping. If it's barely visible, your gain is too low.
This visual feedback is valuable when you're testing different positions or environments. Record a test phrase, watch the waveform, adjust your phone's position, and record again. You'll see the difference in signal strength and consistency before you commit to a full recording.
Real-time monitoring (hearing your recording through headphones as you record) is rarer in mobile apps, but some offer it. This feature requires wired headphones (Bluetooth introduces too much latency), and it's incredibly useful for catching problems immediately. You'll hear if you're too close (popping P's and harsh sibilance), too far (thin, distant sound), or if background noise is more prominent than you realized.
Physical Placement Strategies That Override Hardware Limitations
The Vertical vs. Horizontal Orientation Decision
You probably hold your phone horizontally when recording video because that's how
you watch videos. That's fine for capturing visuals, but it's often wrong for audio. Horizontal orientation activates different microphones than vertical orientation, and the positioning changes how your voice reaches the primary mic.
When your phone is vertical (portrait mode), the bottom mic points roughly toward your mouth if you're holding it at chest height or propping it on a stand. The mic capsule has a clear path to your voice. Horizontal orientation (landscape) points that same mic sideways, often toward your shoulder or arm instead of your mouth.
For voice-focused content (podcasts, voiceovers, audio-only recordings), vertical orientation produces better results. The mic positioning works with your natural speaking direction instead of against it.
Video recording complicates this because you need horizontal framing. If you're recording yourself speaking to camera, you'll need to compensate for the less-optimal mic positioning by moving closer to the phone or using an external mic. If you're recording environmental sound or other people, horizontal orientation's rear-facing mics help capture a wider sound field.
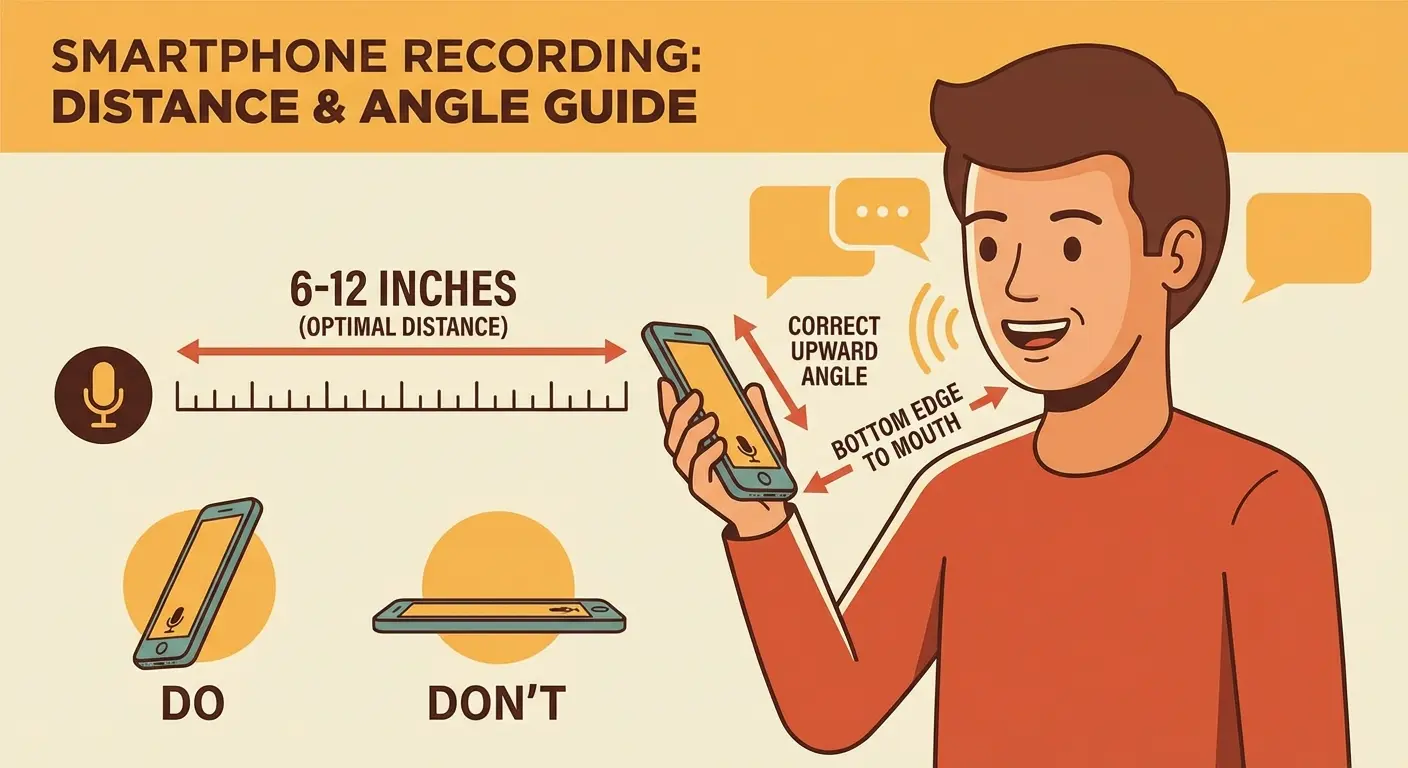
Distance and Angle: The Two Variables That Matter Most
Six to twelve inches from your mouth to the phone's microphone. That's the sweet spot.
Closer than six inches and you'll capture every mouth click, breath, and plosive (those harsh P and B sounds that pop). Further than twelve inches and room noise starts competing with your voice for prominence.
That range isn't arbitrary. It's where your direct voice signal is strong enough to dominate the recording without the proximity effect (excessive bass buildup that occurs when you're too close to a microphone) distorting your natural tone. You'll sound like yourself, just clearer and more present.
Angle matters as much as distance. Point the bottom edge of your phone (where the primary mic lives) toward your mouth, angled slightly upward if you're sitting at a desk. This positioning captures your voice before it travels past the phone and bounces off surfaces behind it. Think of creating a straight line from your mouth to the mic capsule.
If you're getting too much bass or your voice sounds boomy, pull back an inch or two. If you sound thin or distant, move closer. Your voice type affects the optimal distance: deeper voices can sit slightly further back, while higher voices often need to be a bit closer to maintain presence.
Stability Solutions That Don't Require Expensive Gear
Holding your phone while recording introduces handling noise (every tiny movement transfers through the chassis to the microphone) and makes consistent positioning impossible. Your arm gets tired, you shift position, and your audio quality varies from take to take.
You need stability, but you don't need to buy anything yet. A coffee mug with your phone leaning against it works if you're recording at a desk. Stack a few books to get the height right, then lean your phone against the stack. A folded towel or small cardboard box can create the angle you need.
These improvised solutions work for testing and occasional recording. Once you've confirmed that phone recording meets your needs, a basic phone tripod or desk stand makes sense. Find something that holds your phone securely at the height and angle you've already determined works best. Skip the fancy features. You just need stable positioning.
Stability also means you can step away from your recording setup and return to the exact same positioning later. You're not guessing where your phone was or how far you were sitting from it. That consistency matters when you're recording multiple takes or building a series of recordings that need to match tonally.
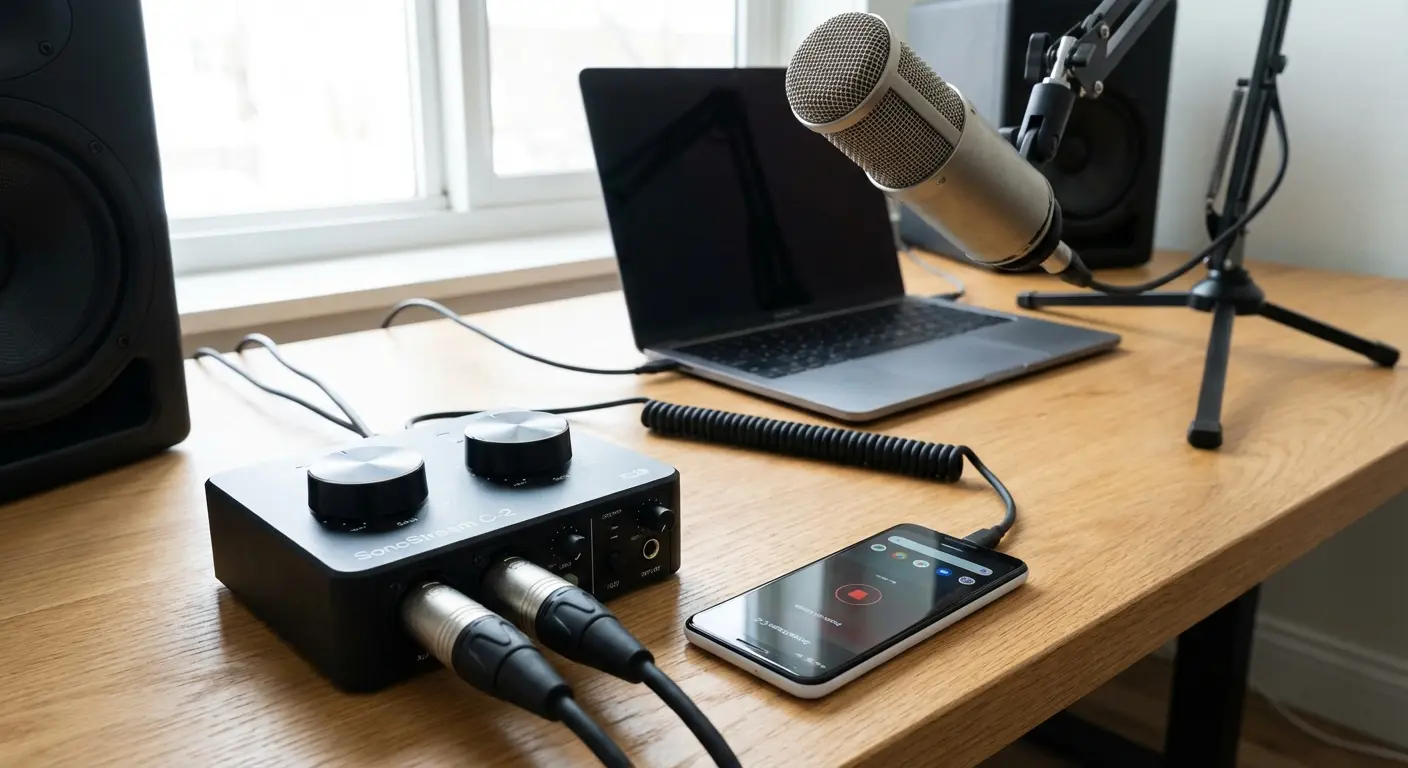
The Adapter and Cable Ecosystem Nobody Explains Properly
When Your Phone's Internal Mic Isn't Enough
You've optimized your positioning, chosen a quiet room, and selected a proper recording app. Your recordings sound significantly better than before, but you're hitting the ceiling of what your phone's internal mics can deliver. That's when external microphones enter the conversation.
External mics won't fix bad room acoustics or poor positioning. But they do capture a wider frequency range, offer directional pickup patterns that reject off-axis noise, and provide more headroom for dynamic performances. The question isn't whether external mics sound better (they usually do), but whether you actually need them or if you're just buying gear to avoid fixing your technique.
Connecting external microphones to phones requires adapters because phones don't have standard audio inputs. You're working with Lightning ports (older iPhones), USB-C (newer iPhones and most Android devices), or occasionally still dealing with headphone jacks (older phones). Each connection method has implications for audio quality, power delivery, and compatibility.
My friend hosts a podcast. She kept wondering why her audio sounded echo-y. Turns out: her keyboard clicks were bouncing everywhere. Lavalier mic, clip it to her shirt three inches from her mouth, problem solved. The mic's directional pattern rejects the keyboard clicks, and the close proximity eliminates room echo entirely. A problem that positioning alone couldn't solve.
The adapter ecosystem confuses everyone because manufacturers never explain what's actually happening. Some adapters are purely passive (they just route connections), others include preamps (they boost weak microphone signals), and some are full digital audio interfaces (they convert analog audio to digital with their own processing). Understanding these differences helps you choose the right solution.
Digital Audio Interfaces: The Professional Path
Digital audio interfaces built for mobile devices are external sound cards. They bypass your phone's internal audio processing entirely, converting your microphone's analog signal to digital using higher-quality components than what's built into your phone. The result is cleaner recordings with less noise and more detail.
These interfaces connect via Lightning or USB-C and draw power from your phone (or include their own battery). They provide XLR or 1/4" inputs for professional microphones, include preamps with gain control, and often supply phantom power (48V required by condenser microphones). You're getting studio-quality recording capability in a portable package.
The tradeoff is complexity and cost. You're now managing a separate device, dealing with additional cables, and spending $100-300 for decent quality. That's only worthwhile if you're regularly creating content where audio quality directly affects your results: podcasts, music recording, professional voiceovers, or field recording.
Look for interfaces with physical gain knobs (easier to adjust than digital controls), direct monitoring (so you can hear yourself without latency), and compatibility with your specific phone model. Some interfaces work better with iOS than Android, or vice versa. Check compatibility before buying, not after.
Analog Adapters: The Middle Ground
Analog adapters are the simple solution: they convert your phone's charging port to a 3.5mm audio input without additional processing. You're still using your phone's internal preamps and converters, but you're connecting a microphone that's positioned more optimally than your phone's built-in mics.
These adapters work well with powered microphones (lavs, shotgun mics with internal batteries) that don't need phantom power. You can clip a lavalier mic to your shirt, run the cable to your phone, and capture much cleaner dialog than your phone's internal mic could manage. The mic is close to your mouth, rejecting room noise, while your phone can be positioned for optimal camera angle.
The limitation is signal quality. Your phone's preamps are designed for basic input, not professional microphones. You'll get better positioning and pickup patterns, but you won't get the ultra-clean signal that a dedicated interface provides. For many creators, that's perfectly acceptable. A $30 lav mic with a $10 adapter dramatically improves audio compared to internal mics.
The shift to USB-C across all iPhone models has simplified the adapter landscape considerably. As noted in Engadget's comprehensive mobile microphone testing, the Sennheiser Pro XS wired lavalier with native USB-C connection eliminates the hit-and-miss experience of headphone adapters, offering seamless compatibility with newer iPhones, most Android devices, and even PCs.
Watch out for adapter compatibility. TRRS (four-conductor) adapters are different from TRS (three-conductor) adapters. Most smartphone-compatible mics use TRRS, but mixing standards creates connection problems. When in doubt, buy the microphone and adapter as a matched set from the same manufacturer.
Wireless Systems: Convenience with Caveats
Wireless microphone systems eliminate cables, which sounds appealing until you understand what you're sacrificing. Wireless transmission introduces latency (delay between speaking and the signal reaching your phone), compression (reduced audio quality to fit bandwidth limitations), and potential for dropouts (signal interruptions from interference or distance).
Bluetooth microphones are trash for serious recording. I don't care what the marketing says. The latency is unusable, the compression is audible, and you're accepting worse audio for the "convenience" of not having a wire. Bluetooth audio codecs compress your signal significantly, and latency can reach 100-200 milliseconds. That's unusable for video recording where you need audio synced to picture. Bluetooth mics work for audio-only recording where you can adjust sync in post, but you're accepting reduced quality for the convenience.
Dedicated wireless systems (a transmitter pack worn on your body and a receiver plugged into your phone) perform better. They use different radio frequencies with less compression and lower latency. Quality systems from established manufacturers can deliver surprisingly good results, though you're still not matching the audio quality of a wired connection.
Wireless makes sense for specific scenarios: walking interviews where cables would be impractical, run-and-gun video recording where mobility matters more than pristine audio, or situations where you need to be far from your recording device. For stationary recording where quality matters most, wired connections win every time.
Monitoring Your Audio in Real Time (Without a Second Device)
Why Recording Blind Fails Eventually
Recording without monitoring is how you waste entire afternoons. You do a 45-minute interview, pat yourself on the back, then discover during editing that a truck was idling outside your window the entire time. Now you need to schedule another interview, apologize to your guest, and redo everything. Ask me how I know.
You hit record, perform your script, hit stop, and play back your recording only to discover that a truck idled outside your window for the entire take. Or your levels were too high and your loudest moments clipped. Or your phone shifted position halfway through and your voice sounds different in the second half.
The problems that monitoring catches are often subtle. A slight hum from your computer fan that you've tuned out. The rustle of your shirt against a lavalier mic. Your voice dropping in volume as you lean back in your chair. These issues are obvious when you're listening in real time, but easy to miss until you're reviewing the finished recording.
Professional recording workflows always include monitoring for this reason. You need immediate feedback to make adjustments during the recording, not after. The good news? Monitoring your phone recordings doesn't require expensive equipment, just the right approach and a pair of wired headphones.
Wired Headphone Monitoring Techniques
Wired headphones are non-negotiable for monitoring. Bluetooth monitoring is useless. I know because I tried it once and sounded like I was talking to myself from the future. Weird delay, totally disorienting. Just use wired headphones.
Most phones no longer include headphone jacks, which complicates monitoring. You need either a USB-C or Lightning adapter that supports audio output, or you need to use a digital audio interface that includes a headphone jack. Some adapters support simultaneous charging and audio output (useful for long recording sessions), while others force you to choose between power and monitoring.
Not all recording apps support real-time monitoring. Apps that do will have a "monitor" or "playthrough" option in their settings. Enable this, connect your wired headphones, and you'll hear your voice with minimal latency (usually 20-30 milliseconds, which is barely perceptible). This lets you hear exactly what your phone is recording as you record it.
What should you listen for? First, overall level. Your voice should sound present and clear, not distant or quiet. Second, background noise. You'll immediately hear that fan, traffic, or HVAC hum that you might otherwise ignore. Third, proximity issues. If you hear excessive bass or popping P sounds, you're too close. If you sound thin or echoey, you're too far or in a bad room.
Visual Monitoring Through Waveforms and Meters
Visual monitoring complements audio monitoring, especially if you can't use headphones (maybe you're recording in a shared space where wearing headphones would be awkward, or your recording setup doesn't support simultaneous headphone monitoring).
Level meters show your audio signal strength in decibels. Most apps display this as a vertical bar that moves up and down as you speak. Aim for peaks around -12dB to -6dB. If you're consistently below -18dB, your levels are too low and you'll have a weak signal buried in noise. If you're hitting 0dB or above, you're clipping and creating distortion.
The meter's color usually indicates signal health: green for good levels, yellow for approaching maximum, red for clipping. If you see red, stop recording and reduce your gain. Don't try to salvage a clipped recording. The distortion is permanent.
Waveform displays show the shape of your audio over time. During recording, you're watching it build from left to right. A healthy waveform has visible peaks and valleys, showing dynamic range in your speech. If the waveform is barely visible, your levels are too low. If it's completely filling the vertical space with flat tops, you're clipping.
Watch for consistency. If your waveform's amplitude varies wildly (some phrases barely visible, others hitting the top), you're either moving relative to the mic or your gain is set wrong. Adjust your position or your input level to create more consistent peaks across your recording.
Post-Recording Rescue: When Your Setup Falls Short
What You Can Fix (and What You Can't)
About post-production: it's not magic. You can't polish a turd. You can't transform a terrible recording into a great one, but you can take a decent recording and make it good, or a good recording and make it great. Understanding this saves you hours of frustration trying to fix the unfixable.
Clipping is permanent. I cannot stress this enough. I've seen people spend hours trying to "fix" clipped audio with plugins and EQ. You can't fix it. It's destroyed data. Once your signal exceeds 0dB and distorts, that information is destroyed. No amount of processing will remove that harsh, broken quality. If your recording is severely clipped, re-record it. Don't waste time trying to salvage fundamentally damaged files.
Yes, I learned this the hard way. Recorded an hour-long interview with the gain maxed out. Every word was distorted garbage. Had to redo the whole thing. You're welcome for my suffering.
Low-level recordings (where your voice barely registers above the noise floor) are also difficult to rescue. When you boost the level in post, you're boosting both your voice and all the background noise proportionally. The ratio between signal and noise doesn't improve. You just make everything louder. If your recording is more than 20dB below optimal levels, you're better off re-recording with proper gain.
What you can fix: moderate background noise (using noise reduction plugins), slight level inconsistencies (compression and normalization), tonal issues (EQ to add presence or reduce muddiness), and minor mouth noises (manual editing to remove clicks and pops). These improvements require decent source audio to start with. You need a clean signal above -12dB with minimal distortion.
Room reverb is partially fixable but difficult. Specialized plugins can reduce reverb, but they often introduce artifacts that sound worse than the original problem. Your best bet is recording in a better space next time rather than trying to de-reverb in post.
Compression artifacts from recording in low-bitrate MP3 formats are also permanent. You can't restore information that was discarded during encoding. This is why recording in WAV or high-bitrate formats matters if you plan to do any post-processing.
Mobile Editing Apps That Work
You don't need a computer for basic audio cleanup. Several mobile apps handle essential post-production tasks directly on your phone, which is convenient when you're recording and publishing from the same device.
Ferrite Recording Studio (iOS) is the most capable mobile audio editor. It offers multi-track editing, EQ, compression, noise reduction, and precise waveform editing. The interface takes some learning, but it's genuinely powerful. You can record, edit, and export finished audio without ever touching a computer.
WavePad (iOS and Android) provides similar functionality with a more traditional editing interface. It includes noise reduction, amplification, normalization, and basic effects. The free version is limited, but the paid version unlocks professional features for about $4.
For quick fixes, Lexis Audio Editor (Android) handles trimming, level adjustment, and basic EQ without overwhelming you with options. It's not as powerful as Ferrite, but it's easier to learn and perfectly adequate for simple cleanup tasks.
These apps won't replace professional desktop software for complex projects, but they handle the most common fixes: removing dead air at the beginning and end, boosting overall level, reducing background hum, and adjusting EQ to improve clarity.
The Three Post-Production Moves That Matter Most
Three post-production processes will improve most phone recordings: noise reduction, level optimization (compression and normalization), and EQ. Applied correctly, they transform acceptable recordings into polished ones. Applied incorrectly, they create artificial-sounding audio that's worse than the original.
Start with noise reduction. Most audio apps include this feature, often labeled "noise reduction" or "noise gate." The process samples a section of background noise (usually from a quiet moment when you're not speaking), then subtracts that noise profile from the entire recording. Use it conservatively. Aggressive noise reduction creates a warbling, underwater quality that's immediately recognizable as processed. Aim to reduce noise by 6-10dB, not eliminate it entirely.
Next, optimize your levels. Compression reduces the dynamic range between your loudest and quietest moments, making the overall recording more consistent. Then normalization raises the entire recording so your peaks hit a target level (usually -1dB or -2dB, leaving a tiny bit of headroom). This two-step process ensures your recording is loud enough without distortion.
Finally, apply EQ to improve clarity. A gentle high-pass filter (removing frequencies below 80Hz) eliminates rumble and low-frequency noise that adds nothing to voice recordings. A small boost around 3-5kHz adds presence and helps your voice cut through. Don't boost more than 3-4dB in any frequency range. Subtle adjustments sound natural, while dramatic EQ sounds processed.
Process in this order: noise reduction, compression, normalization, then EQ. Each step builds on the previous one, and changing the order often produces worse results.
You cannot fix fundamentally bad audio in post. I know there are YouTube videos claiming otherwise. They're lying. Well-positioned audio recorded in a decent room will always beat poorly-recorded audio with $500 worth of plugins thrown at it.
Making Your Phone Mic Work for Specific Use Cases
Podcasting: The Consistency Challenge
Podcast listeners are remarkably forgiving of audio quality, but they're unforgiving of inconsistency. Your first episode can sound like it was recorded on a phone as long as every subsequent episode sounds similar. Wildly varying audio quality from episode to episode signals amateurism and makes your show hard to listen to.
Solo podcasting from your phone requires a repeatable setup. Record in the same location, position your phone the same distance from your mouth, and use the same app settings every time. Take photos of your setup so you can recreate it exactly. This consistency matters more than having the absolute best audio quality.
Interview podcasts complicate things because you're capturing multiple voices. If you're in the same room, position your phone equidistant between speakers (this compromises optimal positioning for both, but maintains balance). Better solution: each person records their own audio on their own phone, then you sync and mix the files in post. This "double-ender" technique produces much better results than a single phone trying to capture multiple speakers.
Remote interviews require different tools. Your phone can record your side of the conversation, but you'll need a separate service (Riverside, Zencastr, SquadCast) to capture your guest's audio with quality. These platforms record each person locally, avoiding the compression and quality loss of phone calls or video chat.

Remember that your audience develops expectations based on your first few episodes. Set a quality baseline you can maintain, not an aspirational standard you'll struggle to replicate.
Voiceover Work: Proximity and Clarity
Voiceover recording demands cleaner audio than conversational content. You're recording scripted material that will accompany visuals or stand alone as narration, and listeners expect a polished, professional sound. Phone mics can work for voiceover, but you're pushing their limits.
Position yourself closer than you would for conversational recording (4-6 inches instead of 8-10), but slightly off-axis to avoid plosives hitting the mic directly. Speak across the top edge of your phone rather than directly into the bottom mic. This positioning captures intimate, clear audio while minimizing breath sounds and pops.
Your recording environment becomes even more critical for voiceover. Room reflections and background noise that might be acceptable in a podcast are distracting in voiceover work. Record in your quietest, most acoustically controlled space. A walk-in closet or small, heavily furnished room works better than a treated office.
Phone recordings are acceptable for scratch tracks (temporary voiceover used during video editing), internal training videos, or casual explainer content. They're marginal for YouTube videos where viewers expect decent audio. They're inadequate for commercial work, audiobooks, or professional client projects. Know where the line is for your specific use case.
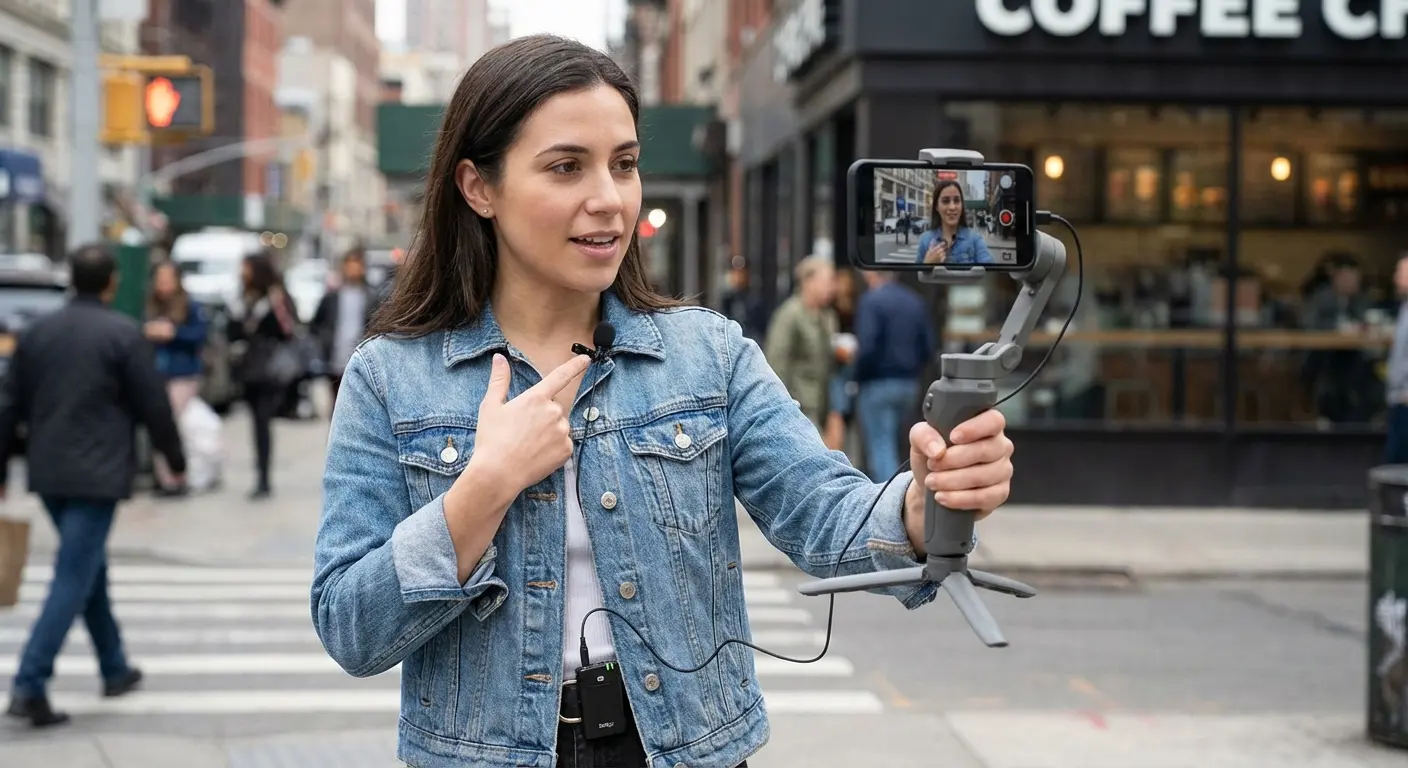
Field Recording and Interviews: Adapting to Uncontrolled Environments
Field recording throws out most of the controlled environment advice. You're working in spaces you can't modify, often with background noise you can't eliminate. The goal shifts from perfect audio to usable audio that captures the moment.
Position yourself to minimize the worst noise sources. If you're near a street, position your phone so your body blocks direct sound from traffic. If you're in a crowded space, move to the edge of the room where ambient noise is lower. You're not eliminating background sound (that's impossible), but you're optimizing the ratio between your voice and the environment.
Timing matters when you have any control over it. Record your interview during a lull in activity rather than during peak noise. Wait for the plane to pass overhead before starting your take. These small timing adjustments can mean the difference between usable and unusable audio.
I saw this vlogger in Bangkok trying to interview street vendors. Total chaos, noise everywhere. But she held her phone six inches from people's faces and just waited for quiet moments. She also recorded 10 seconds of ambient sound separately to use as background texture in editing. The resulting interviews sounded authentically "on location" without being incomprehensible. The subject's voice was clear and 8-10dB louder than the background activity.
Sometimes background sound adds context and authenticity. A cafe interview sounds like it's happening in a cafe. That's not a flaw if it matches your content's vibe. Street interviews sound like they're happening on the street. The key is ensuring your subject's voice is clearly intelligible over the background, not that the background is silent.
External lavalier mics become much more valuable for field recording. Clipping the mic to your subject's collar puts the capsule inches from their mouth, ensuring their voice dominates the recording regardless of environmental noise. A $30 lav mic transforms field recording quality more than any other single upgrade.
If you want good phone audio in unpredictable environments, accept imperfection while maximizing intelligibility. You're documenting reality, not creating studio conditions.
Video Content: Syncing Audio and Visual Priorities
Video recording forces compromises. Your phone needs to be positioned for the shot you want, which is rarely the optimal position for audio. A wide shot requires the phone several feet away, but that distance ruins your audio. A close-up might frame well but point the mic at your chest instead of your mouth.
The cleanest solution is separating your audio and video sources. Record video on your phone positioned for the best shot, while recording audio on a second device (another phone, a dedicated recorder, or an external mic connected to your video phone). Sync the audio and video in post using a clap or other sharp sound as a reference point.
If you're recording audio and video on the same phone, you'll need to compromise. Tighter shots generally produce better audio because the phone is closer to you. Medium shots (chest and up) work reasonably well if you're in a quiet environment. Wide shots sacrifice audio quality for visual context. Accept that trade-off when the shot requires it.
Horizontal phone orientation (required for proper video framing) points the primary mic sideways instead of toward you. Compensate by angling your phone slightly so the bottom edge tilts toward your mouth, or use an external mic that you can position independently of the phone's camera.
Vloggers face this challenge constantly. Many successful video creators use an external mic (usually a small shotgun mic or wireless lav) because phone positioning for video creates poor audio. If you're serious about video content, that external mic becomes a necessity, not a luxury.
Look, Here's the Truth
Your phone's microphone is more capable than you've been using it. Most recording problems aren't hardware problems. They're technique problems disguised as equipment limitations.
Before you buy an external mic, an audio interface, or any other accessory, test the strategies I've covered. Move your phone closer to your mouth. Record in a smaller, more furnished room. Turn off the AC for five minutes. Choose an app that shows you what you're recording in real time. These changes cost nothing and often solve the problems you thought required spending money.
Half the people asking me about $300 audio interfaces haven't figured out basic mic positioning yet. You don't need expensive gear. You need to stop recording in your echoey kitchen with your phone three feet away.
The gap between acceptable and professional audio is smaller than you think. You don't need pristine, studio-quality recordings for most content. You need clear, intelligible audio without distracting background noise. Your phone can deliver that if you position it correctly and choose your recording environment thoughtfully.
Start with one recording. Apply the positioning and environmental strategies from this guide, monitor your levels, and listen to the result. Compare it to your previous recordings. You'll hear the difference immediately, and that difference will tell you whether your phone mic is sufficient for your needs or whether you've genuinely hit its limits and need to explore external solutions.
The tools matter less than understanding how to use them. That applies to your phone's microphone as much as it applies to professional recording equipment.

