


Table of Contents
Keep Your Phone From Becoming a $1,000 Road Projectile
Crash Protection That Actually Protects Something
Visibility Upgrades for Riders Who Refuse to Be Invisible
Comfort Modifications That Address Long-Ride Fatigue
TL;DR
Your phone mount will fail. Your stock crash protection isn't enough. Nobody can see you. And you'll be uncomfortable after two hours. Here's how to fix all of that without wasting money on garbage that doesn't work.
I've put 50,000+ miles on Indian motorcycles over the last six years. In that time, I've wasted probably $2,000 on accessories that either broke, didn't work as advertised, or solved problems I didn't actually have.
This isn't a comprehensive list of every accessory available. This is the stuff that actually matters. The accessories that solve real problems you'll encounter if you spend serious time in the saddle. Some of this is boring. Some of it's expensive. All of it works.
Keep Your Phone From Becoming a $1,000 Road Projectile
1. Magnetic Phone Mounting Systems Built for Motorcycles
Look, everyone knows your phone is basically the most important thing on your bike, but most people just slap on whatever mount they find on Amazon. I watched a guy's phone fly off his bike at 70 mph last summer because he trusted a $15 mount. That's a $1,200 mistake.
Generic car mounts fail within weeks on a motorcycle because they weren't built for sustained vibration at varying frequencies. My first phone mount lasted three weeks before the vibration cracked the plastic housing.
Motorcycle-specific magnetic mounts use multiple contact points and vibration dampening. The cheap car mounts? They'll vibrate your phone loose in about two weeks. I've tested this. Multiple times. Because I'm apparently slow to learn.
Here's what actually matters: how the mounting plate is designed. Systems that spread magnetic force across a wider surface area prevent the concentrated stress points that cause phones to work loose.
Make sure the mount can handle your phone's weight with some safety margin. Most solid systems support devices up to 10 oz comfortably. Weatherproofing matters too. Your charging ports and speakers need protection from rain and road spray, which means looking for mounts with integrated weather shields or compatible case systems.
Where you stick this thing actually matters. I've seen people mount phones so close to their handlebars that the thing rattles loose in a week. Mounting too close increases vibration transfer, while positioning too far reduces visibility and reach. You want it right above your gauges, close enough to glance at without taking your eyes off the road for more than a second.

2. Weatherproof Phone Cases with Impact Protection
Your phone case needs to do more than look good when you're dealing with indian motorcycle parts that generate serious heat and vibration. Standard cases crack, warp, or lose their grip after exposure to engine heat and UV radiation.
Get a case with military drop protection (MIL-STD-810G if you want to sound fancy). Your phone's going to take a beating. Motorcycle-specific cases add features that matter on two wheels. Raised bezels protect your screen during those tip-overs that happen in parking lots. We've all been there, don't pretend you haven't.
Textured grips prevent the case from slipping when you're wearing gloves. Some advanced options include integrated heat sinks that prevent thermal throttling during navigation on hot days.
The charging port cover design makes or breaks these cases. You need quick access without removing gloves, which means flip covers or magnetic closures rather than tight rubber plugs. Compatibility with your mounting system is non-negotiable. Verify the case works with your chosen mount before purchasing, because returning motorcycle accessories gets expensive fast.
3. RAM Mount Ball Adapters for Custom Positioning
RAM mounting systems give you positioning flexibility that fixed mounts can't match. The ball-and-socket design adjusts viewing angles on the fly, which becomes essential when sun glare hits your screen or you need to switch between portrait and landscape orientation.
Double-ball arms absorb more vibration than single-ball configurations, and the difference is noticeable on longer rides. You can position your phone exactly where your sight line naturally falls without compromising handlebar space or blocking critical gauges.
The modular nature means you're not locked into one configuration. Add a second mount for a GPS unit or action camera without drilling new holes or adding separate mounting plates.
Don't cheap out here. Genuine components use glass-filled nylon that maintains grip tension across temperature extremes, while knockoffs lose their hold after a few months of UV exposure. I've tried both. The knockoffs are garbage.
Thread-locking compound on all connection points prevents gradual loosening from vibration. Check tightness before every long ride because even quality components can work loose over time. Yeah, I'm that guy who checks bolt tension before every long ride. Judge me.
4. USB Charging Ports with Voltage Regulation
Your Indian motorcycle's electrical system wasn't designed with multiple USB devices in mind. Voltage fluctuations during engine start and varying RPMs can damage sensitive electronics or provide inconsistent charging.
Dedicated USB charging systems with built-in voltage regulation solve this problem by maintaining steady 5V output regardless of what your bike's electrical system is doing. Get systems with individual port fuses that protect your devices if something shorts out.
Where you put this decides whether you'll actually use it or get pissed off and rip it off after a month. Handlebar-mounted ports give easy access but increase exposure to weather and potential damage during a fall. Frame-mounted options near the battery offer better protection but require longer cable runs to reach your phone. For riders who need reliable power on the road, exploring options like the motorcycle 12V to USB adapter ensures consistent device charging.
Amperage capacity matters when you're running navigation and charging simultaneously. Get the 2.1A port. Actually, scratch that, get 3.0A or higher. 2.1A was fine five years ago. Now it'll give you the dreaded "charging slowly" notification when your screen is on full brightness.
Weatherproof caps are mandatory, not optional. Even brief exposure to moisture can corrode the contacts and render the port useless. Do this and your ports will actually last instead of crapping out after six months.
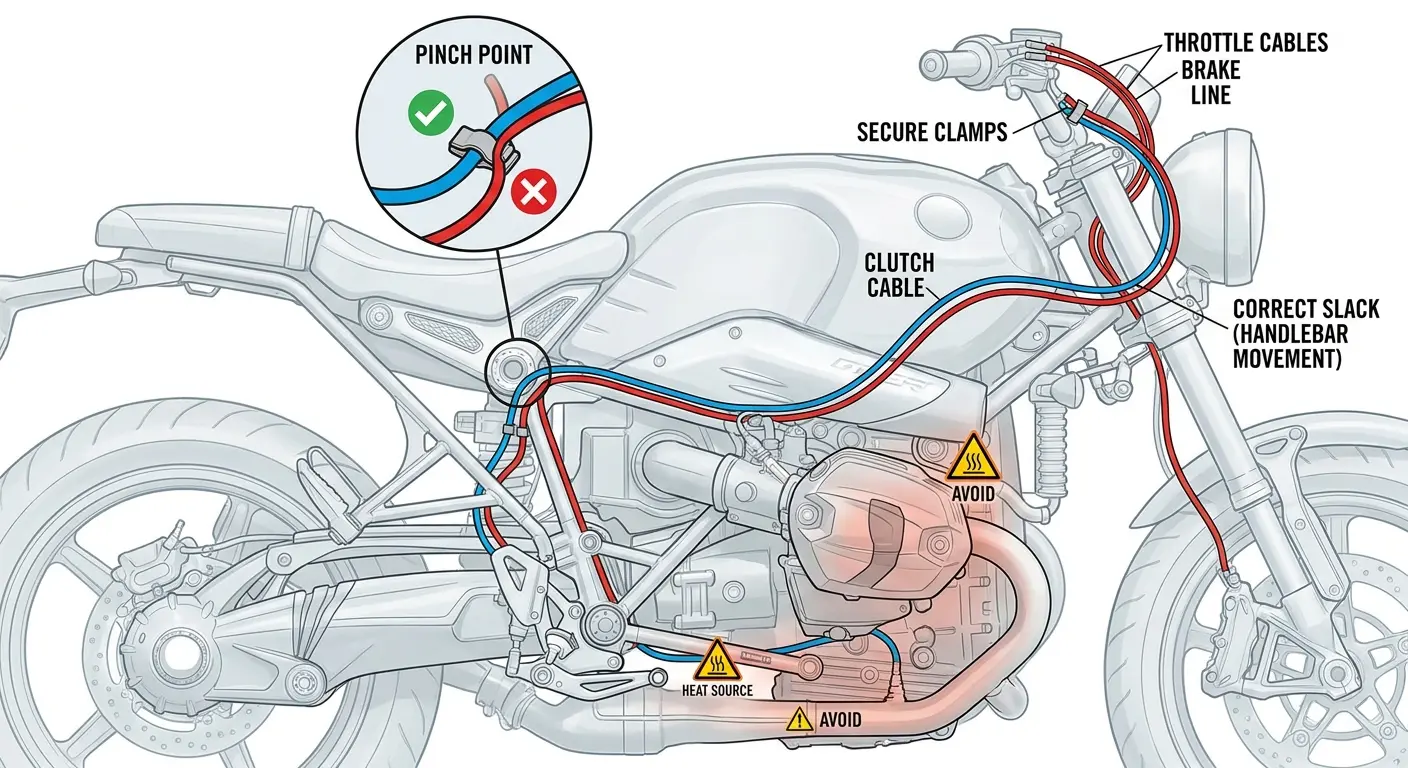
5. Cable Management Solutions for Clean Routing
You know what nobody talks about? Cable management. It's boring. It's also the difference between a clean setup and a rat's nest that'll eventually cause problems.
Loose cables are more than an aesthetic issue on a motorcycle. I've seen a charging cable wrap around a brake lever mid-corner. That's a brown-pants moment you don't want. They catch on controls, interfere with steering, and create potential failure points when they rub against hot or moving components.
Purpose-built cable management for Indian accessories keeps your charging cables, headphone wires, and communication system connections organized and protected. Spiral wrap protects cables from abrasion but makes future changes difficult. Velcro cable ties offer flexibility for modifications while keeping things tidy.
The routing path should avoid heat sources (exhaust pipes, engine cases) and pinch points where cables could get crushed or severed. Leave enough slack for full handlebar travel in both directions. Test by turning the bars lock-to-lock before securing cables permanently.
Heat-shrink tubing at connection points prevents moisture intrusion and adds strain relief where cables meet connectors. This small detail extends cable life instead of having them fail after six months.
Crash Protection That Actually Protects Something
I'm going to be blunt. You're probably going to drop your bike at some point. Parking lot tipover, gravel in a corner, diesel on pavement, doesn't matter. The question is whether that drop costs you $200 or $2,000.
Frame sliders saved my Scout's engine case when I lowsided in gravel last year. $200 in sliders prevented $3,000 in damage. Do the math.
6. Frame Sliders with Load-Distributing Mounts
Frame sliders prevent expensive fairings and engine cases from becoming the first point of contact during a slide. How you mount them matters more than the slider material itself.
Sliders that bolt through the frame distribute impact force across a wider area, preventing stress cracks that can compromise frame integrity. When installing any indian motorcycle part designed for crash protection, precision becomes paramount.
Use Delrin for the sliders. Everyone wants aluminum because it looks better, but aluminum can catch on pavement and flip your bike. Delrin slides smoothly. That's the whole point of sliders, to slide. HDPE works too if you're on a budget.
Length and diameter affect performance. Longer sliders provide more standoff distance from the bike but create more leverage on the mounting point. Shorter, thicker designs sacrifice some protection but reduce stress on mounting bolts.
Don't half-ass the installation. Over-torquing the mounting bolts can crack the frame, while under-torquing allows movement that elongates mounting holes. Use a torque wrench and follow manufacturer specs exactly.
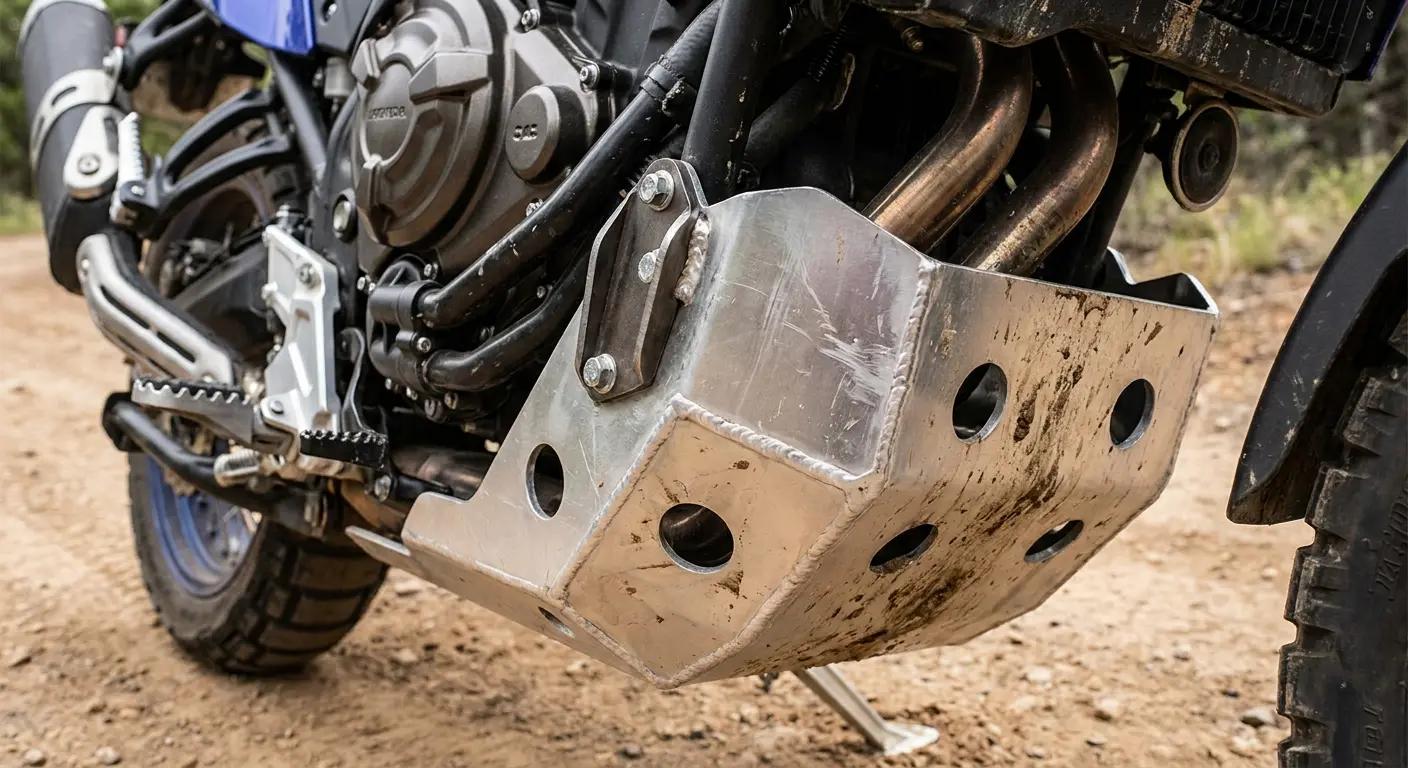
7. Skid Plates for Undercarriage Protection
Hit a pothole at 60 with no skid plate and you might punch a hole in your oil pan. Ask me how I know. Actually, don't.
Road debris, speed bumps taken too fast, and uneven parking lot entrances all threaten your bike's undercarriage. Skid plates protect oil pans, exhaust headers, and frame components from impact damage that could leave you stranded.
Aluminum plates offer the best strength-to-weight ratio for most riders, though steel provides superior protection if you frequently ride rough terrain. The mounting system should allow some flex to absorb impacts rather than transferring all force to the frame. Rigid mounts can crack welds or damage mounting points during hard strikes.
Drainage holes prevent water and debris accumulation that leads to corrosion. Without proper drainage, you're creating a catch basin that holds moisture against your frame and promotes rust.
Clearance matters when selecting a skid plate. Adding protection shouldn't reduce ground clearance so much that you're scraping on every speed bump. Test clearance with your typical load (passenger, luggage) before committing to a specific design.
8. Handlebar End Weights for Vibration Damping
These often-overlooked indian parts serve double duty as crash protection and vibration control. During a fall, bar-end weights prevent handlebar damage by absorbing the initial impact. During normal riding, they reduce handlebar vibration that causes hand numbness and fatigue on long rides.
Weight and material affect performance. Brass weights provide better damping than aluminum due to higher mass and different resonant frequencies. The installation method determines effectiveness. Expanding internal mounts grip better than external clamps and don't loosen from vibration over time.
Match the weight to your riding style. Heavier weights (8-12 oz per side) work better for highway riding where vibration is constant, while lighter options (4-6 oz) suit urban riding with frequent handlebar inputs. Bar-end weights come in enough styles that you can find options that complement your bike's appearance while delivering real performance benefits.
9. Radiator Guards Against Road Debris
Your radiator is expensive to replace and vulnerable to damage from rocks, road debris, and insects that accumulate on the fins. Radiator guards provide a protective barrier without significantly restricting airflow.
Mesh size determines the balance between protection and cooling efficiency. Finer mesh blocks more debris but can reduce airflow by 10-15%, while coarser mesh maintains cooling but allows smaller particles through. Stainless steel mesh resists corrosion better than aluminum and maintains structural integrity after impacts.
The mounting system should secure the guard without drilling into the radiator itself. Frame-mounted brackets distribute stress away from delicate cooling fins. Understanding vibration dampeners and protective accessories helps riders make informed choices.
Powder-coated or anodized finishes prevent corrosion and maintain appearance, though any coating will eventually show wear from constant debris impacts. Regular cleaning prevents debris buildup that reduces cooling efficiency. A quick spray with a garden hose every few weeks keeps the mesh clear and maintains optimal airflow.
Visibility Upgrades for Riders Who Refuse to Be Invisible
Drivers don't see motorcycles. I don't mean they ignore us, though they do. I mean their brains literally don't register us as threats, so they look right through us. You need to force their attention.
Half the LED "upgrades" on Amazon will make oncoming traffic hate you. The beam pattern matters more than lumens, and most cheap LEDs scatter light everywhere except where you need it.
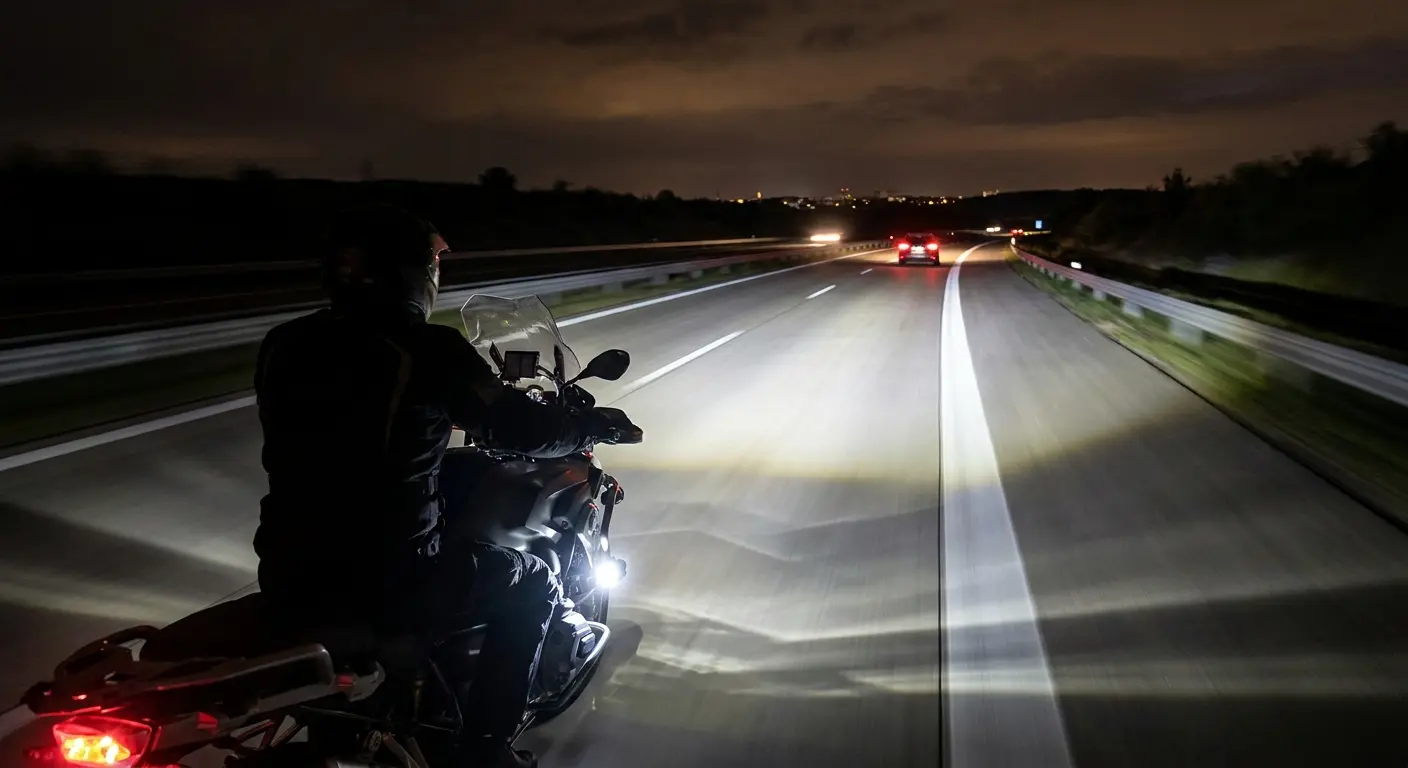
10. Auxiliary LED Driving Lights with Focused Beam Patterns
Lumens are bullshit. Well, not bullshit, but everyone obsesses over lumens and ignores beam pattern. You can have 5,000 lumens pointed at the sky accomplishing nothing, or 2,000 lumens with a proper beam pattern that actually lights up the road. Guess which one costs less and works better?
Good auxiliary lights have focused beam patterns that illuminate where you're looking without creating glare. Spot beams reach 500+ feet ahead for highway riding, while flood patterns light up peripheral areas for urban environments and twisty roads. Combination setups with both beam types give you options for different riding conditions.
Mounting height and angle determine effectiveness. Lights mounted too low get blocked by road contours and oncoming traffic, while lights positioned too high create shadows directly in front of your bike. Mount them slightly below your headlight and angle downward just enough to prevent blinding oncoming drivers.
Wiring should include a relay to prevent voltage drop and a switch within easy reach for quick on/off control. Running auxiliary lights constantly drains your battery and annoys other drivers during daylight hours when the extra illumination provides minimal benefit.
Beam Type |
Effective Range |
Best Conditions |
Typical Lumens |
Mounting Recommendation |
|---|---|---|---|---|
Spot |
500-800 feet |
Highway, open roads |
2000-3000 |
Lower fairing, angled slightly down |
Flood |
50-150 feet wide |
Urban, twisty roads |
1500-2500 |
Frame-mounted, wider angle |
Combination |
300-500 feet + peripheral |
All-around use |
2500-4000 |
Below headlight, adjustable |
11. LED Headlight Bulb Upgrades with Proper Heat Management
LED headlight conversions promise better visibility and lower power consumption, but cheap bulbs create more problems than they solve. Heat management separates functional LED upgrades from those that fail within months.
Solid LED bulbs include active cooling (small fans) or substantial passive heat sinks that prevent the LEDs from overheating and dimming prematurely. Beam pattern accuracy matters more than raw output. LEDs that don't match your stock bulb's filament position create scattered light that reduces visibility and blinds oncoming traffic.
Get bulbs with adjustable mounting collars that rotate the LED chips to match your reflector's design. Color temperature affects visibility in different conditions. 5000-6000K provides good visibility without eye strain, while higher temps (7000K+) look cool but reduce your ability to see in rain and fog.
Installation requires attention to polarity and secure connections. Vibration can loosen poorly installed LED bulbs, causing intermittent operation or complete failure.
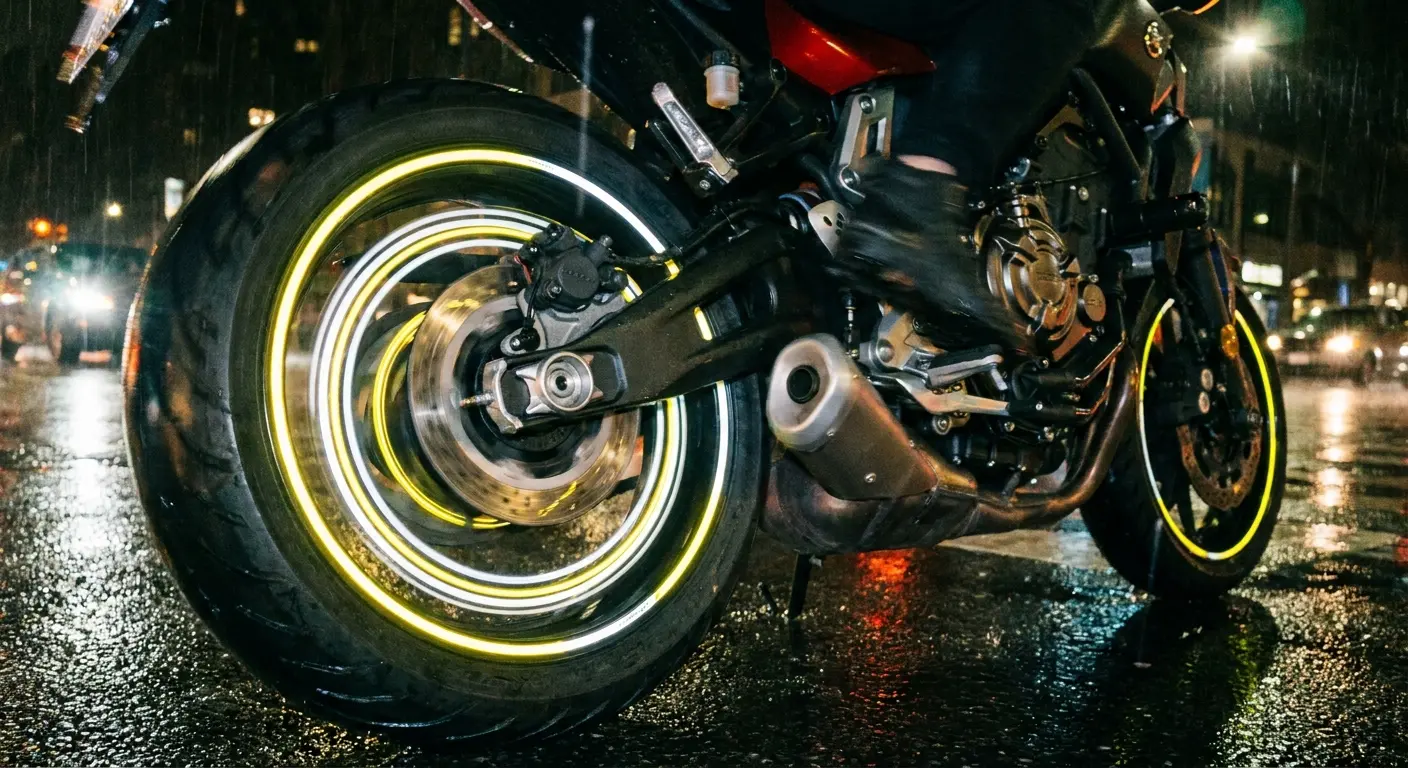
12. Reflective Rim Tape for 360-Degree Visibility
Reflective rim tape makes your wheels visible from all angles, which helps other drivers judge your speed and distance more accurately. The spinning motion creates a distinctive visual signature that catches attention better than static reflectors.
Good rim tape uses 3M or similar high-grade reflective material that maintains brightness through years of UV exposure and weather. Width affects visibility and appearance. 7mm tape provides good visibility without overwhelming the wheel design, while 10mm+ options maximize reflectivity for riders who prioritize visibility over aesthetics.
Application technique determines longevity. Clean the rim thoroughly with alcohol, apply the tape in a warm environment (60°F+), and use firm pressure to ensure complete adhesion. Starting at the valve stem makes alignment easier and creates a clean finish.
Color choice impacts visibility in different conditions. White reflects most light but shows dirt quickly, while red or yellow provides good visibility and hides grime better. Avoid black or dark colors that defeat the purpose of adding reflective material.
13. Brake Light Modulators for Attention-Grabbing Stops
Rear-end collisions are a significant risk for motorcyclists, especially at intersections and in stop-and-go traffic. Brake light modulators pulse your brake light rapidly when you first apply the brakes, then switch to steady illumination. This pulsing pattern catches attention more effectively than a static brake light.
The modulation pattern matters. Three rapid pulses followed by steady illumination works best. It grabs attention without confusing drivers about whether you're braking or signaling. Continuous pulsing just pisses people off.
Solid modulators detect brake pressure and activate instantly, with no perceptible delay between brake application and light activation. Cheap units introduce lag that reduces effectiveness. Integration with your bike's existing electrical system should be clean and reversible. Get plug-and-play options that don't require cutting factory wiring.
Some jurisdictions restrict brake light modulators, so verify local regulations before installation. Most areas allow modulation for the first few seconds of braking, but continuous pulsing may violate vehicle codes.
14. Turn Signal Upgrades with Sequential Lighting
Sequential turn signals use multiple LEDs that light up in sequence, creating a directional flow that's easier to perceive than traditional all-at-once signals. The sweeping motion catches peripheral vision more effectively and clearly indicates your intended direction.
The sequence timing affects clarity. A complete sweep should take 200-300 milliseconds, fast enough to catch attention but slow enough for the brain to process the directional information. Brightness consistency across the sequence prevents the first LEDs from washing out the later ones. Quality sequential signals maintain even brightness throughout the sweep.
Mounting position should maximize visibility from multiple angles. Signals mounted too close to the bike's centerline are harder to see from directly ahead or behind.
Integration with your bike's existing flasher relay may require a load equalizer to prevent hyper-flashing. LED signals draw less current than incandescent bulbs, which can confuse stock flasher units designed for higher loads.
Comfort Modifications That Address Long-Ride Fatigue
Comfort modifications feel optional until you're three hours into a five-hour ride and your hands are numb, your ass is screaming, and your knees feel like someone's driving nails into them. Then they feel pretty damn essential.
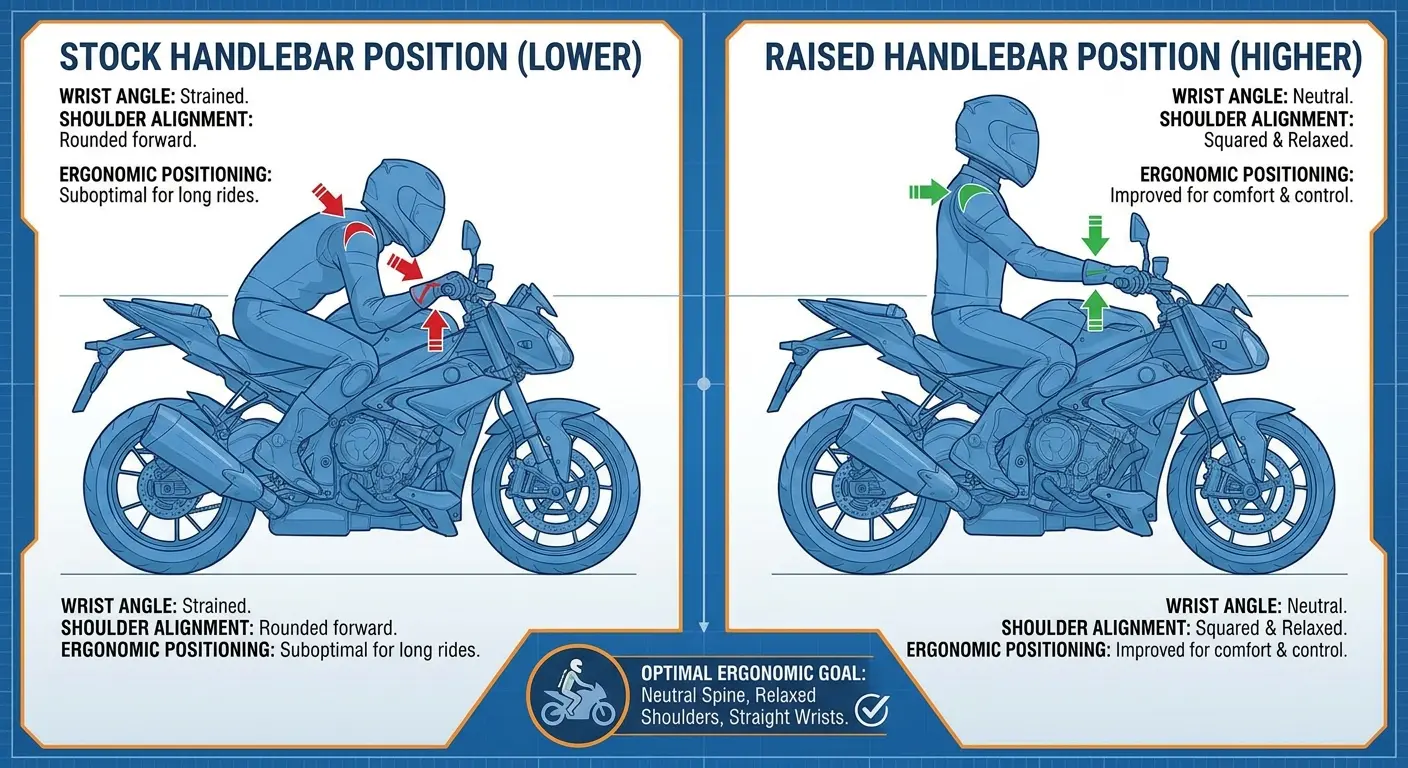
15. Ergonomic Handlebar Risers for Neutral Wrist Position
If your wrists hurt after an hour of riding, your bars are probably too low or too far forward. This isn't a "tough it out" situation. Wrong handlebar position will trash your wrists over time.
Handlebar risers lift and often pull the bars back, creating a more neutral wrist angle and upright posture. The ideal rise depends on your arm length and preferred riding position. Most riders benefit from 1-2 inches of rise, though taller riders may need more.
Pullback angle matters as much as rise. Bars that rise without pulling back can worsen wrist angle by increasing the reach. Test fit before permanent installation. Sit on your bike and have someone hold the bars at different heights and angles while you assess comfort.
Cable and brake line length determines how much rise you can add without replacing lines. Stock cables typically accommodate 1-2 inches of rise, but more requires longer cables and possibly brake line replacement. Solid risers use billet aluminum with precision machining that prevents play or flex. Cheap cast risers can develop stress cracks or allow handlebar movement that compromises control.
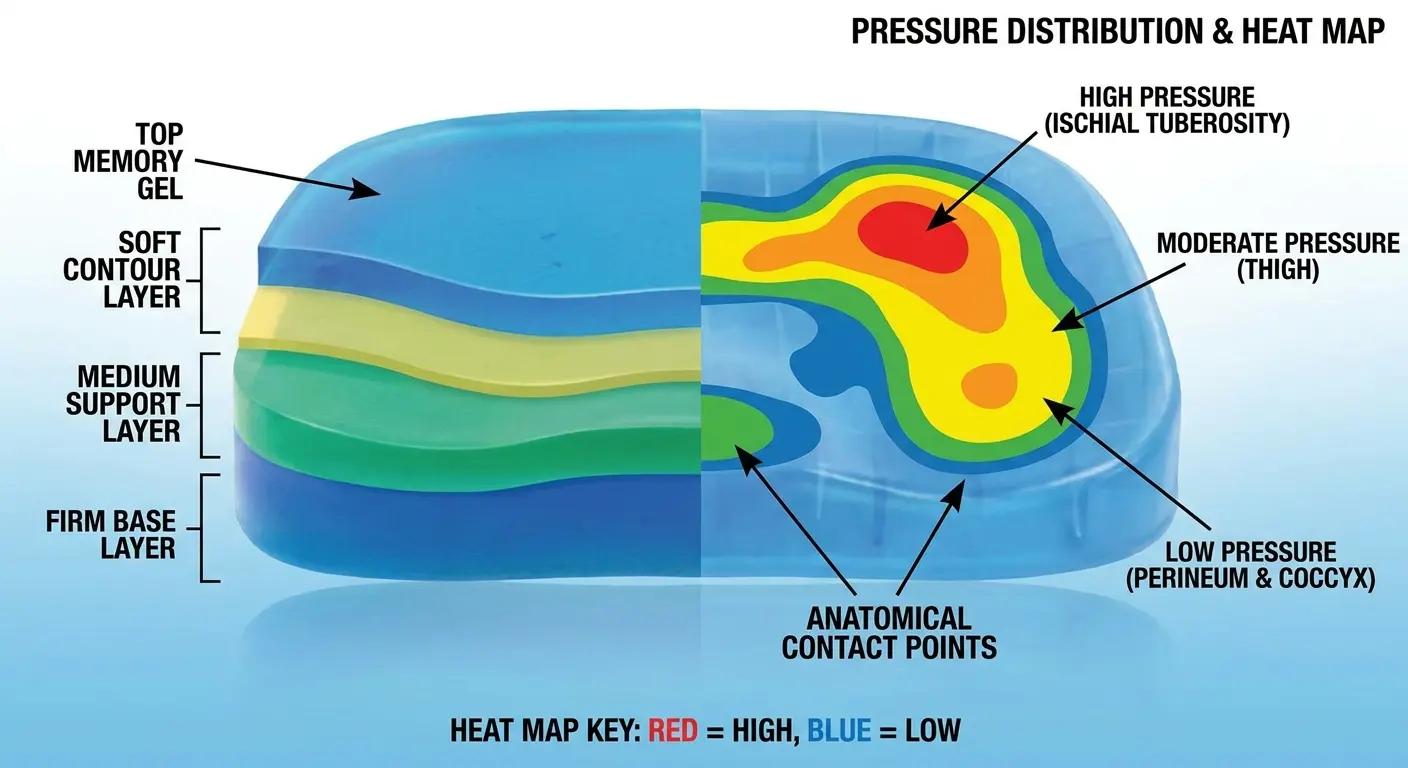
16. Gel Seat Pads That Target Pressure Points
Seat comfort is personal and complex. Generic "comfort" seats often just add more padding, which can increase pressure points by preventing your weight from distributing evenly.
Gel seat pads work differently by conforming to your specific anatomy and redistributing pressure away from sensitive areas. The gel density affects both comfort and durability. Softer gels feel more comfortable initially but bottom out on long rides, while firmer gels maintain support but require a break-in period. Multi-density designs combine soft gel in high-pressure areas with firmer support around the edges.
Thickness matters less than you'd think. A well-designed 1/2-inch gel pad often provides more comfort than a poorly designed 2-inch pad because it's about pressure distribution, not just cushioning.
Covering material should be non-slip to prevent you from sliding forward during braking. Mesh or textured covers also improve airflow, reducing the swamp-butt effect on hot days. Installation should be secure enough to prevent shifting but removable for cleaning or switching between riders.
Some people swear by airhawk seats. Some people say they're garbage. I'm in the "they work for me" camp, but your ass may vary.
17. Footpeg Relocation Kits for Reduced Leg Cramping
Stock footpeg placement works for average-height riders in average conditions, but long rides reveal the limitations quickly. Your knees shouldn't ache after an hour in the saddle.
Footpeg relocation kits move the pegs forward, backward, or lower to create a more natural leg position that reduces knee bend and improves circulation. Forward relocation (1-2 inches) helps taller riders and those with knee issues by reducing the acute angle at the knee joint. Moving pegs lower creates a more relaxed cruiser-style position but can reduce ground clearance in corners.
The trade-off between comfort and cornering clearance is real, and you need to consider your riding style before committing to a specific position. Most riders don't need adjustable relocation kits. If your knees hurt after an hour, yeah, get them. If not, spend your money elsewhere.
Solid kits maintain or improve the strength of stock mounting points. Poorly designed relocators can create stress risers that lead to cracked frames or mounting failures. Brake and shifter linkage must be adjusted or replaced when you relocate footpegs. Stock linkage rarely accommodates significant position changes, so budget for custom or extended linkages when planning your installation.
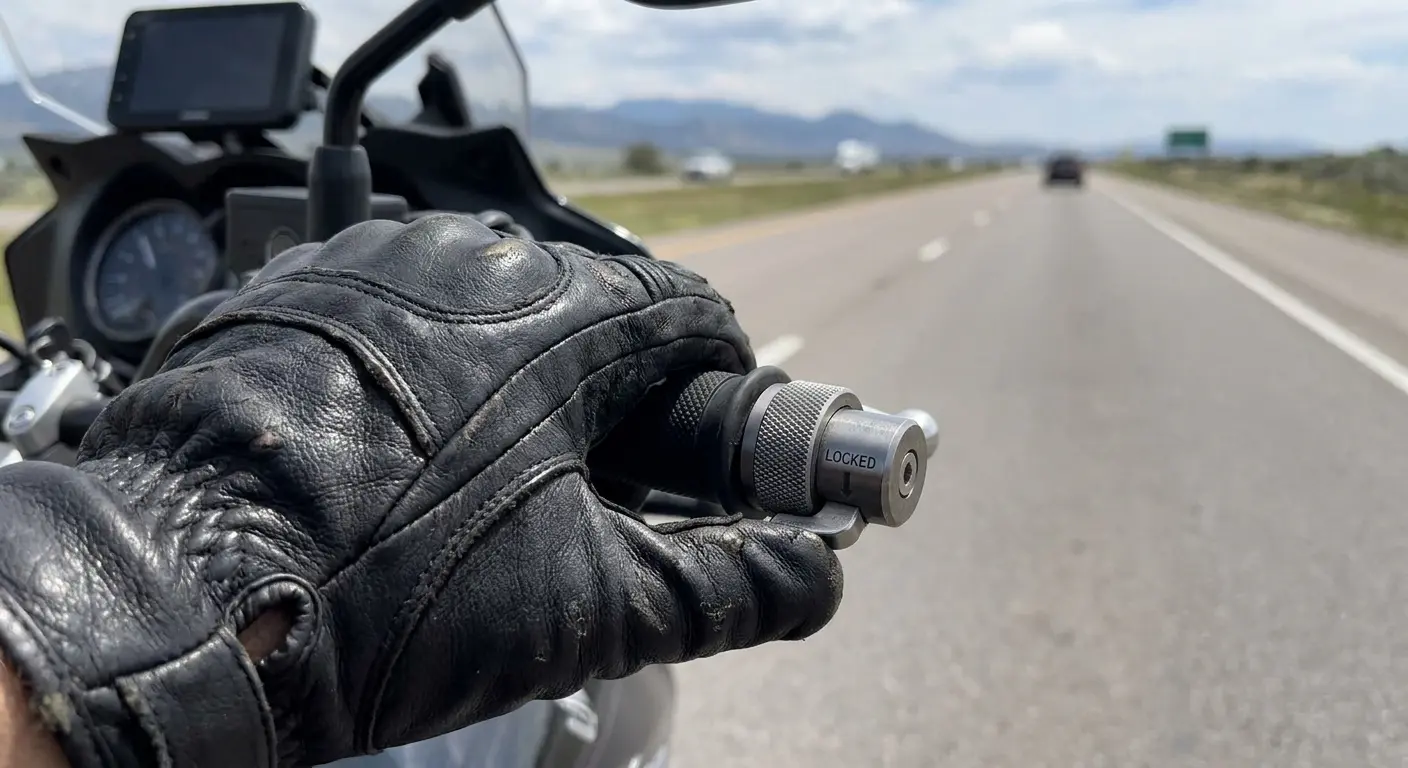
18. Throttle Lock Cruise Assist for Highway Fatigue
Cruise control isn't standard on most Indian motorcycle models, but throttle locks provide a mechanical solution that reduces right-hand fatigue on long highway stretches. These simple devices hold the throttle at a constant position, allowing you to relax your grip and shake out your hand periodically.
Skip throttle locks if you mostly ride urban. They're highway-only tools.
Friction-based locks use a knurled knob that tightens against the grip, creating resistance that holds the throttle position. They're simple and reliable but require your right hand to engage and disengage. Bar-end models integrate into the handlebar end and can be operated with your left hand, which is safer because you maintain grip with your throttle hand.
The engagement mechanism should be smooth enough for easy operation but positive enough that it won't slip under vibration. Cheap throttle locks gradually loosen and lose effectiveness, requiring constant readjustment. Quality units maintain consistent friction across temperature ranges and vibration levels.
You still need to pay attention and be ready to brake or swerve. Throttle locks aren't cruise control. Stay alert. They won't disengage when you brake, so don't be an idiot.
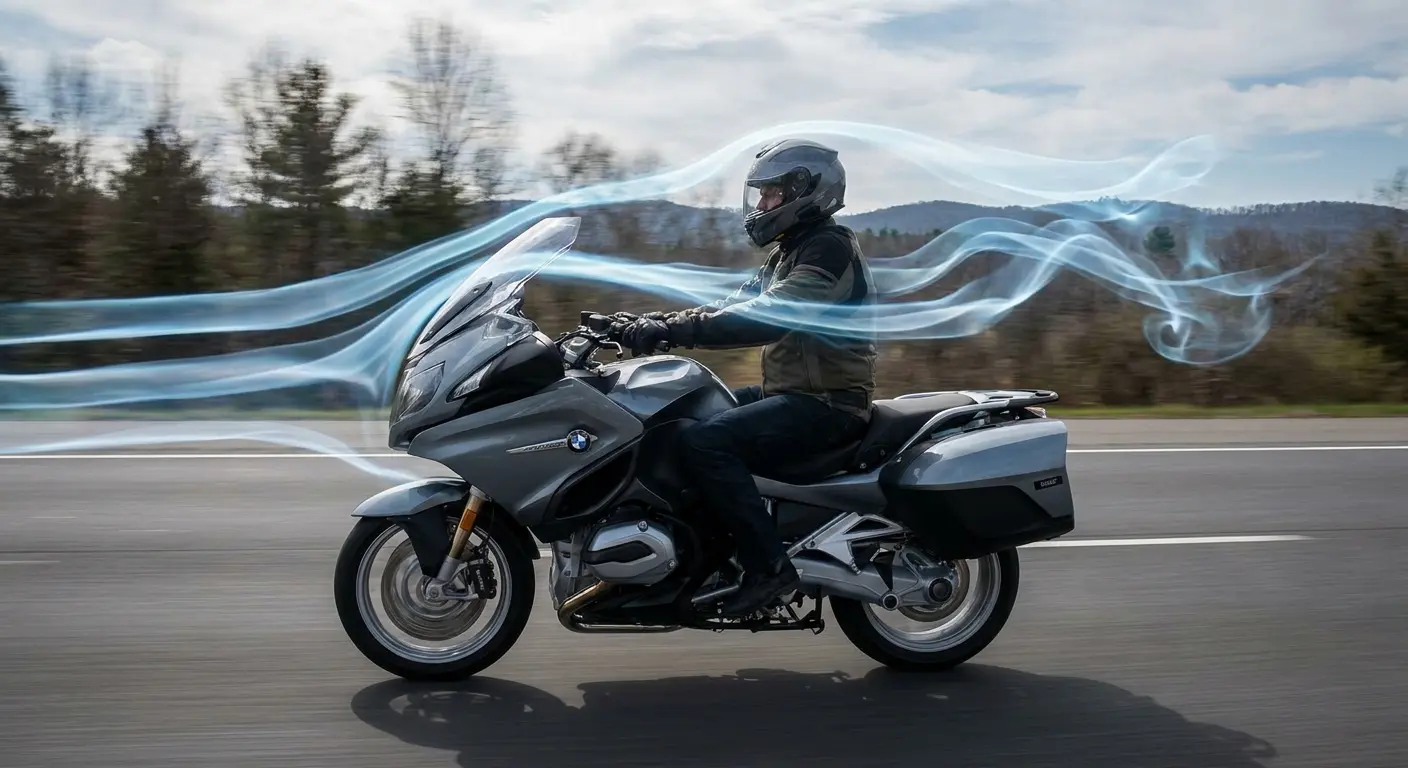
19. Wind Deflectors for Reduced Buffeting
Wind buffeting creates turbulence that batters your helmet, shoulders, and chest, leading to fatigue that sneaks up on you. You don't realize how much energy you're spending fighting wind until you eliminate the buffeting.
Wind deflectors attach to your windscreen or fairing and redirect airflow around your upper body. The shape and angle determine effectiveness. Deflectors that create a smooth airflow transition work better than those that simply block wind, which can create worse turbulence behind the deflector.
Height adjustment fine-tunes the airflow for your specific riding position and helmet height. What works at 60 mph may create problems at 80 mph, so adjustability matters for riders who vary their speeds. Material affects durability and optical clarity. Polycarbonate deflectors resist impacts better than acrylic but can yellow over time with UV exposure.
Clear options maintain visibility, while tinted deflectors reduce glare but can impair vision in low-light conditions. Installation should be tool-free or require minimal tools for quick adjustments. You'll want to experiment with different positions and heights, and complicated mounting systems discourage the experimentation needed to find your optimal setup.
Look, I need to mention Rokform here because their stuff actually works and I use it. The RokLock system is one of the few mounting solutions I trust at highway speeds. Twist-lock mechanism, works with gloves, doesn't rely purely on magnets.
Full disclosure: this sounds like a sales pitch. I don't care. Their mounts cost more than Amazon specials, but I've had the same Rokform setup for three years and it hasn't failed once. Finding a phone mount that actually works felt like winning the lottery. Check out their motorcycle handlebar iPhone mount if you're tired of replacing cheap mounts every season.
Or don't. I'm not your dad. But stop buying $20 mounts that fail.
Final Thoughts
Here's the thing about accessories: the companies selling them want you to buy everything. You don't need everything.
Buy what solves actual problems you're experiencing. If your hands don't go numb, you don't need new grips. If you can see fine at night, you don't need auxiliary lights yet. If your ass is fine after four hours, your seat is fine.
Yeah, this stuff adds up. If you're on a budget, start with phone mount, frame sliders, and auxiliary lights. Everything else can wait. The cheap version of most accessories costs $30 and lasts six months. The good version costs $80 and lasts years. I've learned this lesson the expensive way so you don't have to.
This list is long because different riders have different problems. Figure out your problems first, then solve them. Don't create problems by buying solutions you don't need. Half the accessories marketed to Indian riders are solutions looking for problems.
Some of this stuff you can install yourself. Some of it you really should pay someone to do. Frame sliders? DIY. Electrical work? Maybe pay the shop unless you actually know what you're doing. I'm not a mechanic. If something sounds complicated, pay someone who knows what they're doing.
This is current as of 2024. In three years, half of this might be outdated. Phone mounting was a nightmare five years ago. It's gotten better. It'll probably get better still.
I haven't tested every product on the market. I'm telling you what worked for me. Your mileage may vary. Literally and figuratively.
Now get off the internet and go ride.
