


Table of Contents
Why Your Port Probably Isn't Dead
The Pocket Lint Problem Nobody Mentions
How to Actually Test What's Wrong
The Safety Stuff (Don't Skip This)
Tools You Need vs. Tools YouTube Wants You to Buy
Cleaning Your Port Without Screwing It Up
When You Actually Need a Replacement
Should You Pay Someone or DIY?
How to Not End Up Here Again
TL;DR
Most charging port "failures" are just blockages. Seriously, like 80% of them. Trying to fix it wrong causes way more expensive problems than you started with. You need specific tools and you need to not be an idiot about safety because lithium batteries are no joke. Professional repairs usually cost less than botched DIY attempts when you add up all the replacement parts you'll need. Good cases prevent the drops that break internal connections to your port. Rokform cases have military-grade protection that actually prevents this stuff instead of just making your phone look cool.
Why Your Port Probably Isn't Dead
Your phone's plugged in. Battery percentage isn't moving. You're already convinced the charging port is toast.
I've been fixing phones for eight years. Want to know how many "dead" ports were actually dead? Maybe one in five. The rest? Pocket lint and people who think yanking cables out by the cord is fine.
Charging ports are rated for something like 10,000 connections. Maybe more, I've seen the specs somewhere. According to repair industry data, charging ports are designed to withstand thousands of insertion cycles, but most people assume failure after just a couple years. What actually fails is everything around the port. The cables you're using. The software managing power. And mostly, the tiny space inside the port getting packed with crap.
The Debris Problem Nobody Talks About
Your pocket is disgusting. I don't mean that as an insult, it's just facts. Every time you slide your phone in and out, the charging port acts like a tiny shovel. Lint. Dust. Dead skin cells. Microscopic fabric particles. All of it.
Over months, this stuff compresses into a dense plug at the back of the port. Your cable feels like it's fully inserted, but it's sitting 1-2 millimeters short of making actual contact. Result? Intermittent charging, slow speeds, or nothing at all.
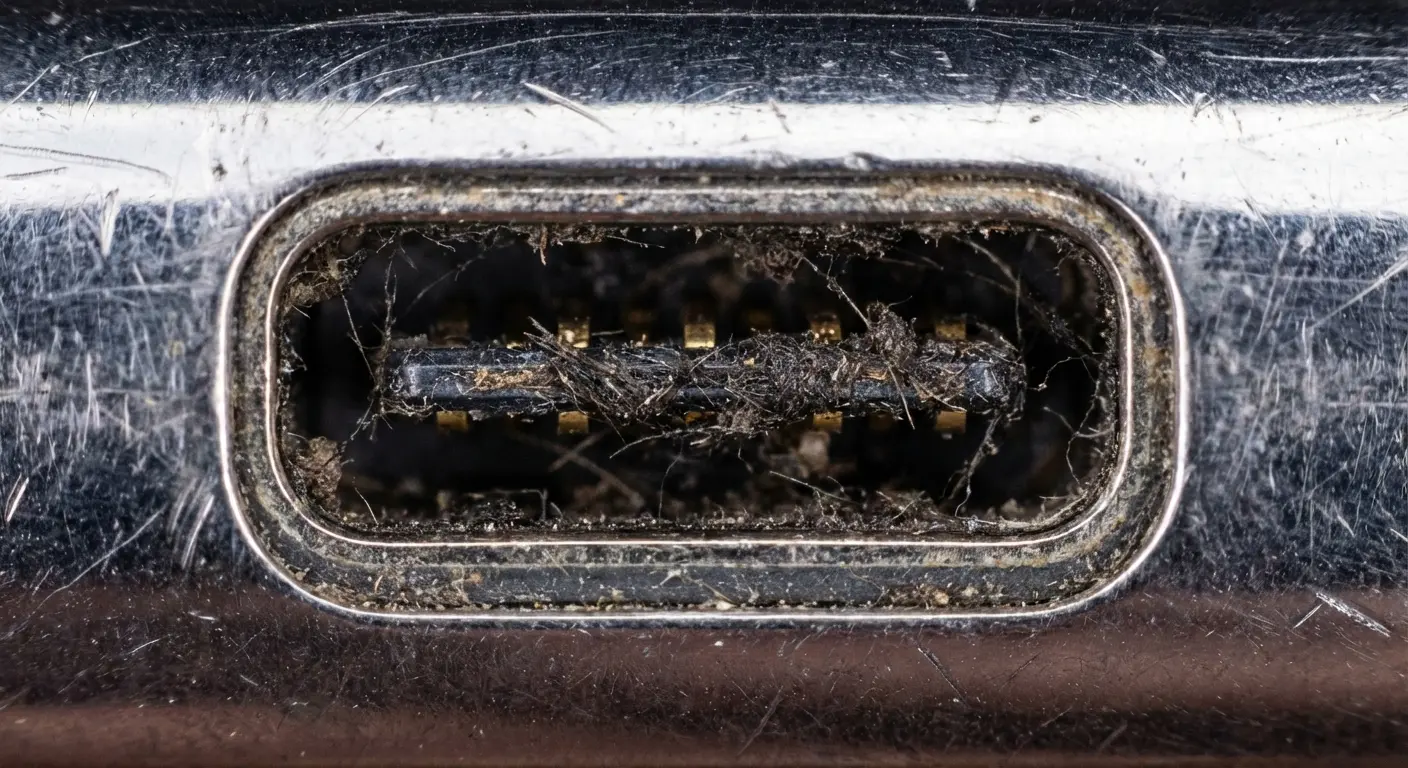
Had a woman come in last month. Real estate agent, always dressed nice, navy blazers. She's convinced her iPhone's charging port is dead. Booked the $120 repair appointment, took time off work, whole thing.
I take one look with a flashlight. There's this compressed ball of navy blue lint jammed in there. Pencil-eraser sized. Ninety seconds with a wooden pick, and her phone's charging perfectly.
She laughed. I didn't charge her. Her port had been working fine the entire time.
Here's what makes this so frustrating: the port itself is functioning perfectly. You're dealing with a cleaning issue. That's it.
Your Cable Is Probably Garbage
Charging cables take brutal abuse. You wrap them tight, yank them at angles, let them dangle under tension. The connector housing cracks. Internal wires fray. Contact pins corrode or bend.
A broken cable looks exactly like a broken port. Same symptoms. Intermittent charging. Slow speeds. That "accessory not supported" message that makes you want to throw your phone.
Most people immediately blame their phone. Test with multiple cables (preferably new ones) before you even think about port repair. You might save yourself hours of unnecessary work.
Software Glitches Pretending to Be Hardware Problems
Modern phones use sophisticated power management systems. These systems can glitch, freeze, or misread sensor data.
A software bug might convince your phone it's overheating and trigger a charging lockout even though everything's physically fine. I've seen phones "fixed" by a simple restart. That's not port repair, that's basic troubleshooting that should happen before you grab any tools.
The Pocket Lint Problem Nobody Mentions
Prevention sounds boring until you're staring at a repair bill. That compressed lint I mentioned? It doesn't just block connections. It traps moisture. Accelerates corrosion. Creates enough pressure to bend or break the delicate pins inside your port.
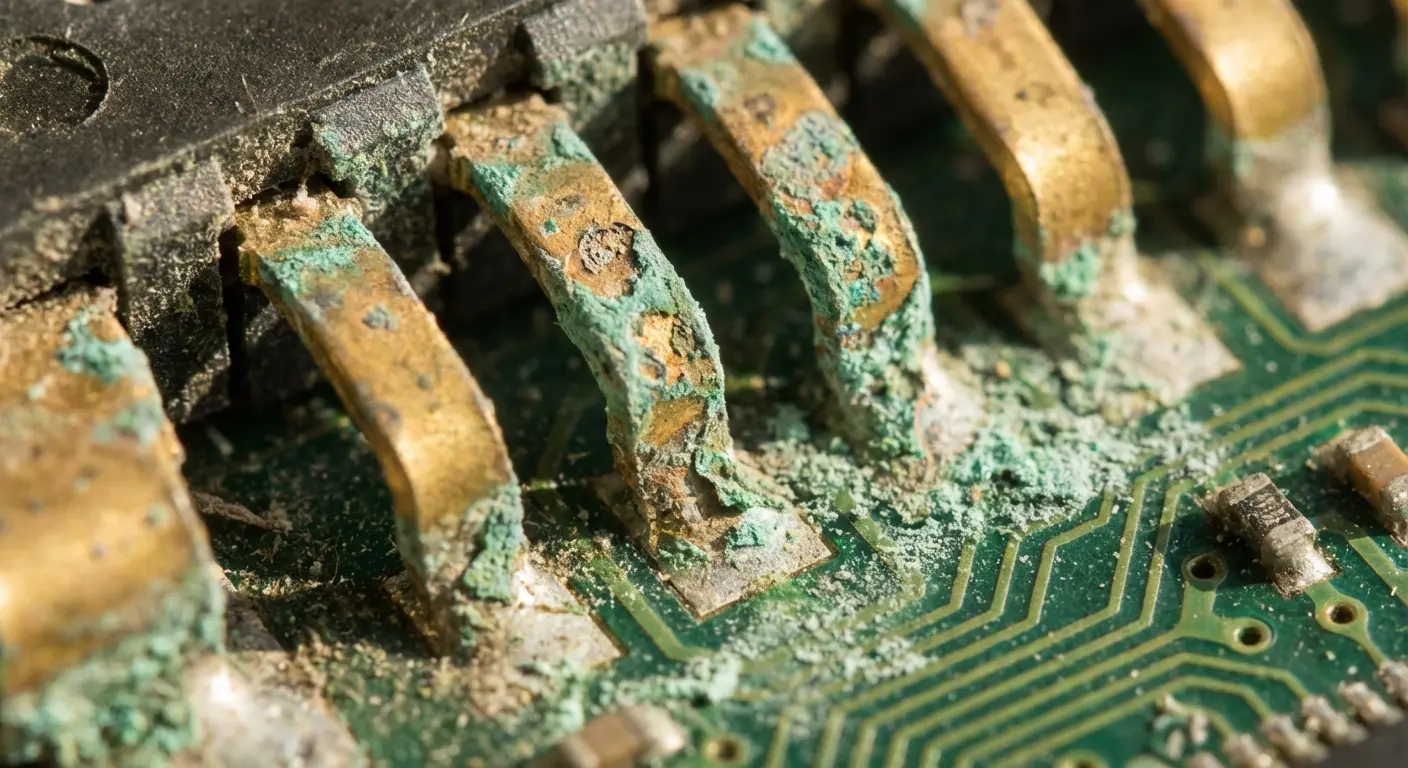
The Corrosion Cascade
Moisture and metal are enemies. When debris traps even tiny amounts of humidity inside your charging port, you've created a perfect environment for oxidation. Those gold-plated contact pins start developing a non-conductive layer that gets progressively worse.
Early stage corrosion is reversible with proper cleaning. Advanced corrosion requires component replacement. The difference in cost? Roughly free versus $80-150, depending on your phone model.
You can spot early corrosion by shining a flashlight into your port. Look for discoloration on the metal contacts or a greenish tint on any visible circuitry. Catching it early matters.
Construction worker in Phoenix kept his Samsung Galaxy S21 in his tool belt all summer. Dust mixed with sweat created this corrosive paste inside the charging port. Within three months, the gold contacts developed visible green oxidation. By the time he addressed it, the corrosion had spread to the circuit board connections. What would've been a free cleaning turned into a $180 logic board repair. Five minutes with a toothpick every few weeks would have prevented the entire thing.
When "Good Enough" Charging Becomes Dangerous
Some people live with degraded charging for months. They find the exact angle that works, prop their phone up just right, convince themselves it's fine.
This isn't just inconvenient. It's potentially hazardous.
Partial connections create resistance. Resistance generates heat. Excessive heat degrades your battery faster and can damage surrounding components. I've seen phones with warped internal frames and swollen batteries, all because someone tolerated a "finicky" charger instead of addressing it.
Your battery's lifespan shortens with every partial-connection charging session. Replace that $15 cable or spend five minutes cleaning your port before you're forced into a $100+ battery replacement.
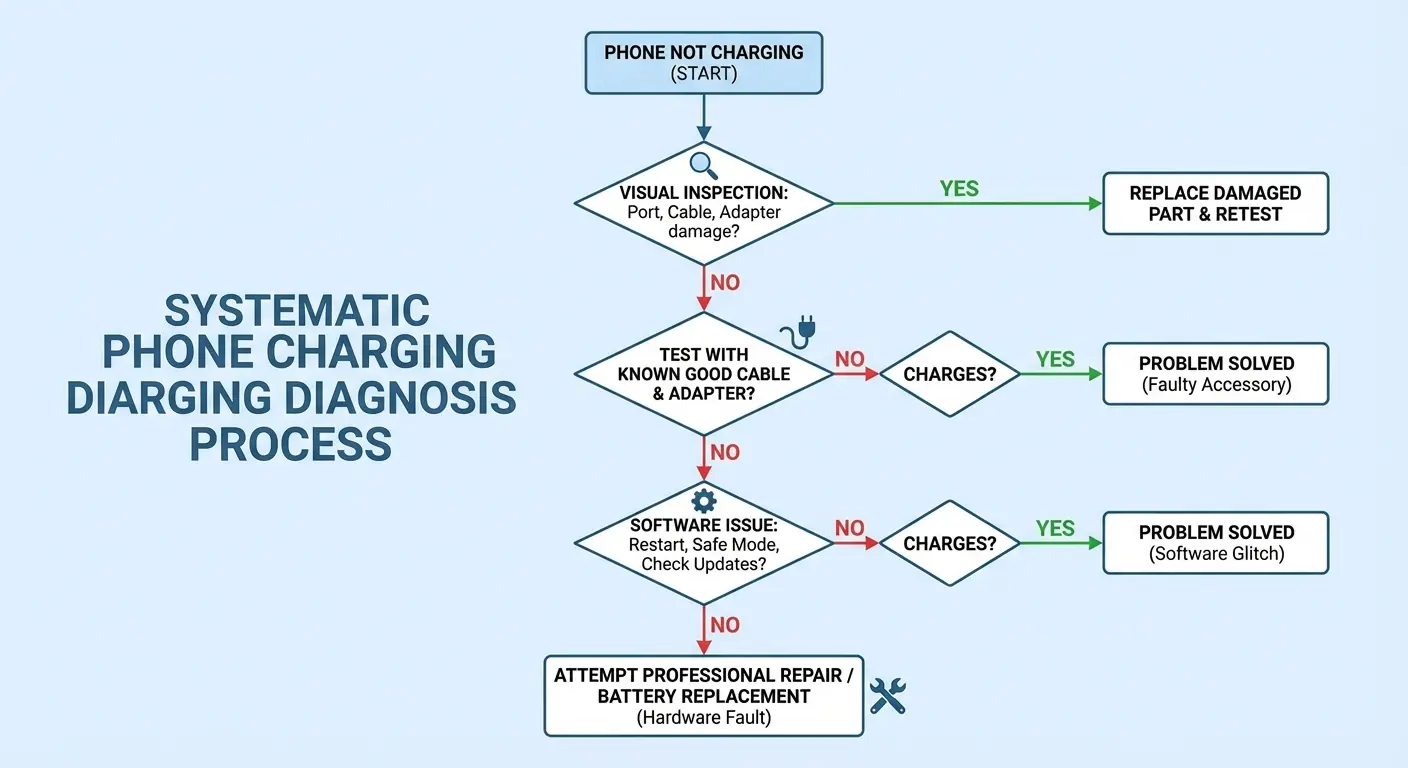
How to Actually Test What's Wrong
Accurate diagnosis prevents wasted effort and accidental damage. You need a methodical approach, not guesswork. Recent troubleshooting guides from major manufacturers emphasize systematic diagnosis over immediate repair attempts. Android Authority's Samsung charging troubleshooting protocol demonstrates that methodical testing eliminates most false diagnoses before users attempt any physical intervention.
When diagnosing charging issues, understanding why your iPhone isn't charging helps eliminate software and cable problems before assuming port damage.
Before You Touch Anything
Complete this diagnostic sequence before touching any tools:
[ ] Visual port inspection with flashlight (check for debris, corrosion, bent pins)
[ ] Test with 3+ different cables from different manufacturers
[ ] Test with 2+ different power adapters (wall and USB)
[ ] Perform full phone restart (not just screen off)
[ ] Check for available software updates
[ ] Test in Safe Mode (if phone powers on)
[ ] Attempt wireless charging (if device supports it)
[ ] Document which combinations work/fail
[ ] Take photos of port interior for reference
Visual Inspection Protocol
Grab a flashlight. Your phone's flashlight works if you're diagnosing a second device. Position it at an angle to illuminate the interior of the charging port. You're looking for:
Visible debris accumulation (appears as dark, compacted material)
Discolored or corroded contact pins
Bent or broken pins (they should be straight and evenly spaced)
Cracks in the port housing or surrounding frame
Take a photo if possible. This gives you a reference point and helps you track changes after cleaning attempts.
The Multi-Cable Test
Test your phone with at least three different cables from different manufacturers. Include one brand-new cable if possible. Document the results.
Does charging work with some cables but not others? Your port is likely fine. You've got a cable problem.
Does charging fail with all cables? You're dealing with either severe debris blockage or actual port damage.
Try both wall adapters and computer USB ports. Some phones are particular about power sources, and this can reveal whether you're dealing with a power delivery issue rather than a physical connection problem.
Software Elimination Checklist
Before you assume hardware failure, eliminate software variables:
Restart your phone (full power cycle, not just screen off)
Check for available software updates
Inspect charging settings (some phones have optimized/fast charging toggles that can glitch)
Try Safe Mode if your phone supports it (this disables third-party apps that might interfere with charging)
I've seen countless "broken" ports that were software bugs or rogue apps interfering with power management. It happens more than you'd think.
The Safety Stuff (Don't Skip This)
Okay, real talk about safety, because people actually hurt themselves doing this.
DIY repairs can save money, but they come with real risks that most YouTube tutorials conveniently ignore. You're working with lithium batteries, sensitive electronics, and sharp tools in tight spaces.
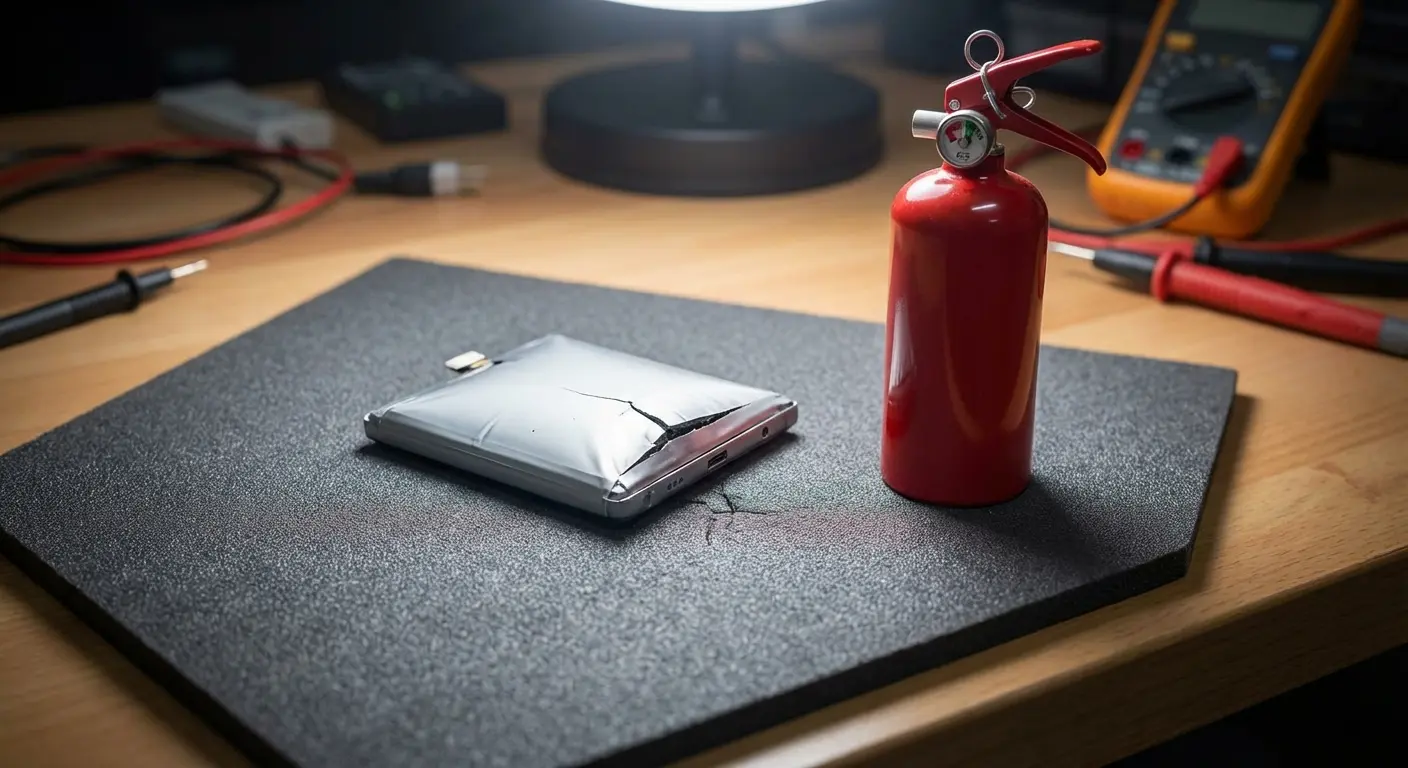
Lithium Battery Puncture: The Big One
Your phone's battery sits directly behind or adjacent to the charging port in most modern designs. Puncturing a lithium-ion battery doesn't just kill your phone. It can cause thermal runaway: a chain reaction that produces toxic fumes, intense heat, and potentially flames.
I've seen it twice. Both times the person dropped the phone and ran outside. Smart move.
This happens when people use metal tools without proper technique. A screwdriver slips, applies too much pressure, or penetrates too deeply. The battery's protective pouch tears, and you've got maybe 30 seconds before things get real.
Work near a window. Keep a fire extinguisher around if you have one. If you puncture a battery and it starts swelling, hissing, or heating up, get it outside immediately and away from flammable materials. Don't try to use the phone or save your data. Your photos aren't worth chemical burns.
Electrical Shorts and Component Damage
Phones contain multiple circuit boards with exposed contacts. Bridging the wrong contacts with a conductive tool or liquid creates a short circuit. This can fry your charging port, damage your logic board, or kill your battery management system.
Static electricity poses another threat. Your body naturally accumulates static charge, especially in dry environments. Touching sensitive components without proper grounding can deliver an electrostatic discharge that damages microscopic circuitry.
Use non-conductive tools whenever possible (wooden toothpicks, plastic spudgers). If you must use metal tools, ground yourself with an anti-static wrist strap. These cost about $5 and prevent hundreds in damage.
Chemical Exposure and Cleaning Agent Risks
Isopropyl alcohol is the go-to cleaning agent for electronics, but it requires proper handling. High-concentration alcohol (90%+ is recommended) is flammable and produces fumes that cause headaches, dizziness, and nausea in poorly ventilated spaces.
Never use water, saliva (yes, people try this), or household cleaners. Water causes corrosion and shorts. Household cleaners leave residues that interfere with electrical contacts or contain chemicals that degrade plastic components.
Side note: I once had a guy bring in a phone he'd tried to clean with Windex. Windex. I don't know what he was thinking. Anyway, don't use household cleaners.
Your Phone's Structural Integrity
Forcing tools into tight spaces cracks plastic housings, bends metal frames, and breaks mounting clips. I've seen people turn a simple cleaning job into a phone that won't close properly because they cracked the frame trying to access the port.
Patience matters more than force. If something doesn't move easily, you're either using the wrong technique or attempting something beyond a basic repair.
Tools You Need vs. Tools YouTube Wants You to Buy
You don't need a $200 electronics repair kit for basic port maintenance. You do need specific tools that won't damage your device.
Beyond basic tools, having the right types of phone chargers on hand helps you test whether charging issues stem from incompatible or damaged charging equipment.
For Cleaning (Most Common Fix)
Start with a wooden or plastic toothpick. Non-conductive, cheap, disposable. You'll use these to gently dislodge compressed debris from the port cavity.
Get a can of compressed air (hold it upright to avoid liquid propellant spray). This blows out loosened debris without physical contact.
Isopropyl alcohol (90% or higher) and cotton swabs complete your basic cleaning kit. The alcohol evaporates quickly and doesn't leave residue.
A bright LED flashlight or headlamp lets you see what you're doing. Total cost for cleaning toolkit? Under $15.
Tool Category |
Specific Items |
Purpose |
Cost Range |
|---|---|---|---|
Basic Cleaning Kit |
Wooden toothpicks, plastic dental picks |
Non-conductive debris removal |
$2-5 |
Compressed air can |
Blow out loosened particles |
$5-8 |
|
90%+ isopropyl alcohol |
Dissolve corrosion, evaporates cleanly |
$3-6 |
|
Cotton swabs |
Apply alcohol to contacts |
$2-4 |
|
LED flashlight/headlamp |
Illuminate port interior |
$5-15 |
|
Advanced Replacement Kit |
Precision screwdriver set |
Remove phone housing |
$15-30 |
Plastic spudger set |
Pry components without scratching |
$5-10 |
|
Fine-tip tweezers |
Handle small components |
$5-12 |
|
Suction cup |
Screen removal |
$3-8 |
|
Heat gun or hair dryer |
Soften adhesive |
$15-40 |
|
Anti-static wrist strap |
Prevent ESD damage |
$5-10 |
|
Replacement port assembly |
Device-specific part |
$20-60 |
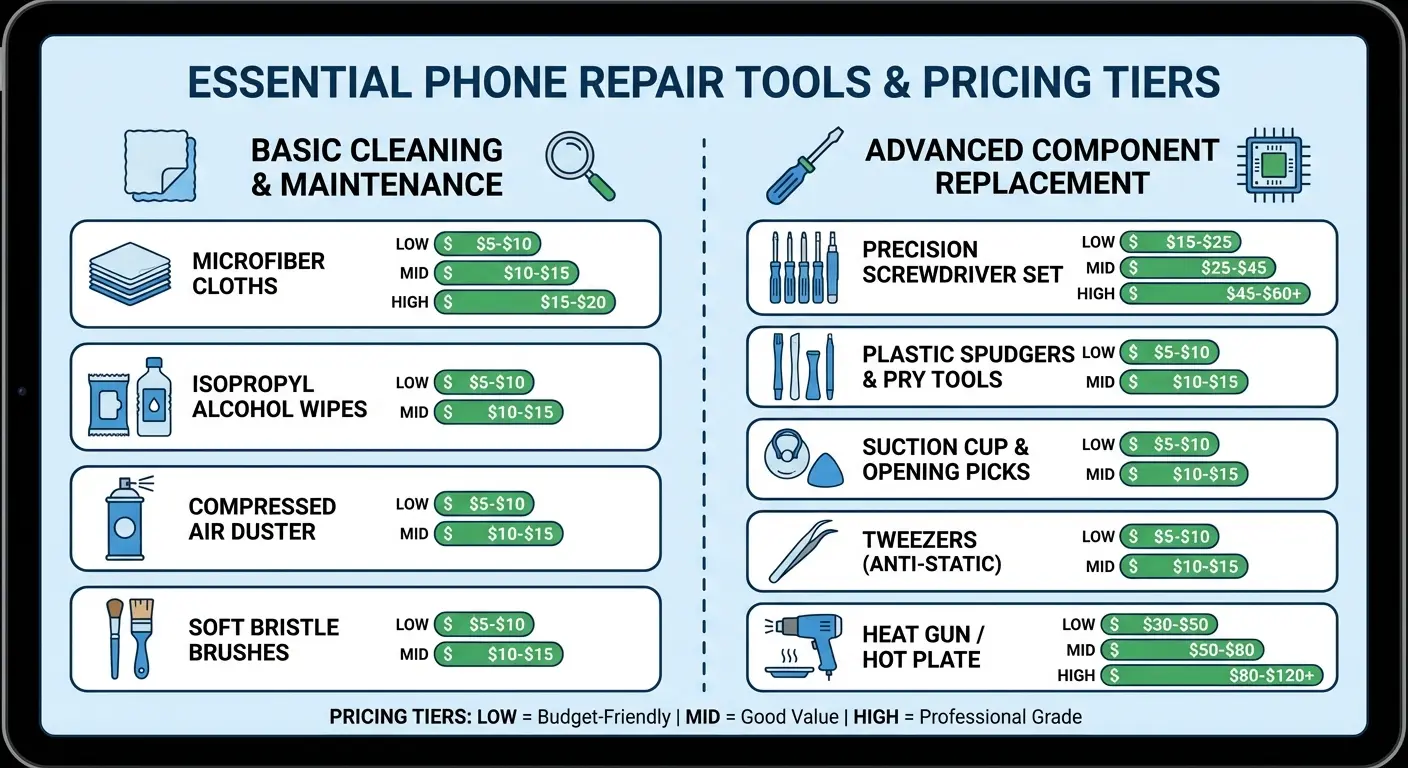
For Port Replacement (Advanced)
Port replacement requires a different level of commitment. You'll need:
Precision screwdriver set (P2 Pentalobe and Tri-point for iPhones, T3 Torx for many Androids)
Plastic spudger set for prying without scratching
Tweezers with fine tips for handling small components
Suction cup for screen removal
Heat gun or hair dryer for softening adhesive

