


You've probably read the standard guides. Apply for your permit, take the MSF course, pass the test, get that M1 endorsement and immediately regret buying a 600cc supersport. But here's what most resources skip: getting your motorcycle license isn't just about checking bureaucratic boxes or memorizing hand signals. The real challenge? The physical conditioning, mental preparation, and gear decisions that determine whether you'll actually enjoy riding once you have that license in your wallet.
We're focusing on what happens before you even sit on a bike at the DMV. The stuff that separates people who pass from people who don't.
Table of Contents
Why Physical Fitness Matters More Than You Think
The Grip Strength Problem
Core Stability and Why Your Back Will Thank You
Heat Management During Multi-Hour Training Sessions
Mental Rehearsal Techniques That Actually Work
The Gear Paradox: What to Buy Before You're Licensed
Phone Mounting Strategy for New Riders
Practice Lot Sessions: What to Do Before Your Official Training
Documentation Prep That Saves You Time
Final Thoughts
TL;DR
Physical conditioning, especially grip strength and core stability, directly impacts your ability to control a motorcycle during testing and early riding
Heat exhaustion during training sessions derails more permit holders than test anxiety
Mental rehearsal using specific visualization techniques prepares your nervous system for real riding scenarios
Buying certain gear before you're licensed helps you train more effectively, but the conventional wisdom about what to buy first is backwards
Your phone becomes a critical navigation and safety tool, but mounting solutions need to work with gloves you haven't broken in yet
Unsupervised practice lot sessions fill skill gaps that formal courses don't always address
Missing one piece of documentation can delay your license by weeks, depending on your state's processing times
Why You Need to Hit the Gym (No, Really)
Here's what the MSF course won't mention in the welcome email: you're about to spend an entire weekend wrestling with controls while dressed like you're storming Normandy. In August. In Texas. Or wherever you live that gets hot. Your forearms will burn. Your lower back might spasm. Your neck will get stiff from the helmet weight.
These aren't just comfort issues. Physical fatigue causes the mistakes that fail tests. You'll miss shifts, grab too much front brake, or lose balance at slow speeds because your muscles gave out, not because you didn't understand the technique.
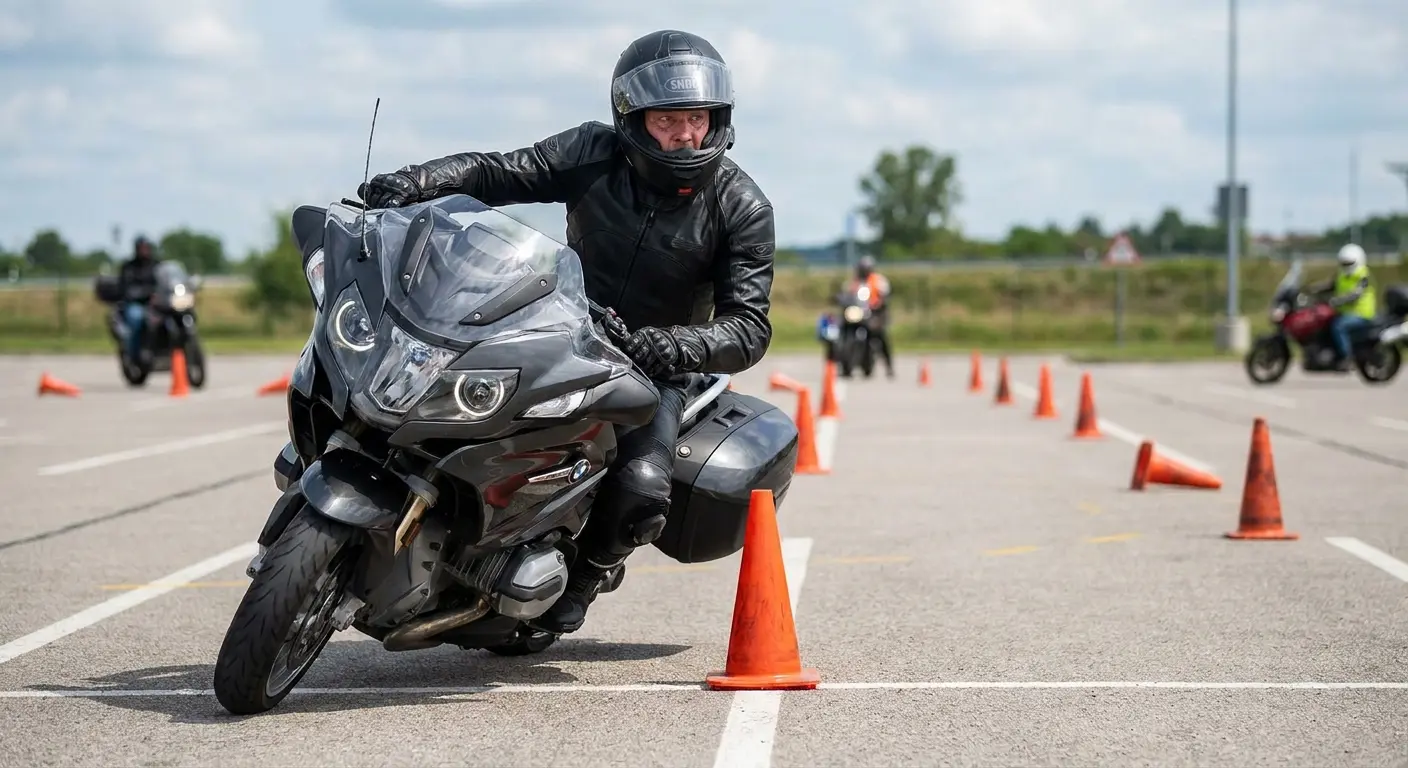
People in decent shape pass way more often. Not because the test is physically demanding like a marathon. It's not. But because when your forearms are screaming by hour two, you start making stupid mistakes. The MSF course and DMV test both involve hours of continuous physical exertion in full gear, often in challenging weather conditions.
Physical Demand |
Duration During Test |
What Happens When Fatigued |
When to Start Training |
|---|---|---|---|
Sustained grip pressure (clutch/brake) |
45-90 minutes continuous |
Stalling, jerky movements, failed friction zone control |
3 weeks of daily grip training |
Core stabilization at low speeds |
60-80% of test time |
Arm compensation, handlebar death grip, balance loss |
2 weeks of rotational core work |
Heat tolerance in full gear |
2-4 hour sessions |
Cognitive decline, slower reactions, forgotten sequences |
24-48 hours of pre-hydration |
Neck endurance under helmet weight |
Entire course duration |
Head dropping, reduced visual scanning, posture collapse |
10 days of neck strengthening |
Starting a basic conditioning routine three weeks before your MSF course changes everything. You don't need to become an athlete, but your body needs specific preparation. Understanding how to get a motorcycle license means recognizing that physical readiness is just as important as knowing the rules of the road.
The Grip Strength Problem
Clutch control determines whether you pass or fail the slow-speed maneuvers. That friction zone everyone talks about? It requires sustained, precise pressure from your left hand for extended periods.
Your hand will cramp.
When it cramps, you'll either stall the bike or release the clutch too quickly and lurch forward. Both scenarios end your test run for that exercise.
During a typical MSF course U-turn exercise, you'll hold the clutch in the friction zone for 8-12 seconds while simultaneously managing throttle and looking through the turn. Repeat this 15-20 times over a two-hour session, and your forearms will be screaming by attempt number ten. I watched three people in my course group fail this exercise not because they didn't understand the technique, but because their left hand simply gave out and they dropped the clutch mid-turn.
Grip strength isn't about how hard you can squeeze. It's about how long you can maintain moderate pressure without fatigue. That's muscular endurance, and it responds quickly to training.
Three weeks of daily grip work makes a measurable difference:
Squeeze a stress ball or grip trainer for 30-second intervals, 3 sets per hand, twice daily
Hold a moderately heavy object (like a cast iron pan) at arm's length for 20 seconds, 3 sets per hand
Practice opening and closing your fist rapidly for 30 seconds, rest, repeat 3 times
Your throttle hand? Same problem. Smooth acceleration and deceleration require fine motor control that disappears when your forearm is screaming. You'll twist too hard, coast when you meant to accelerate, or create jerky movements that upset the bike's balance.
Do this prep work, and you'll have reserve capacity when the evaluator asks you to repeat an exercise you just barely completed.
Core Stability and Why Your Back Will Thank You
Bikes balance themselves once you're moving. But your test? You're going walking speed or slower for most of it, which means YOU are the balance system.
Your core does this work, not your arms. When your core is weak or fatigued, you'll compensate by gripping the handlebars tighter and using arm strength to keep the bike upright. Then you get stuck in this loop: death grip leads to worse control leads to feeling wobbly leads to gripping even harder leads to failing the turn.
The U-turn exercise exposes this immediately. You need to lean the bike while keeping your body relatively upright, and your core manages that separation. Without core strength, you'll lean with the bike, run wide, and either put a foot down or cross the boundary line. Both outcomes fail the exercise.
Ask me how I know. Actually, don't. It was embarrassing.
Planks help, but they're not specific enough. You need rotational core strength and the ability to maintain tension while your limbs move independently:
Dead bugs (lying on your back, opposite arm and leg extensions) train the pattern you'll use during slow turns
Bird dogs (on hands and knees, opposite arm and leg extensions) build the stability you need when shifting your weight
Pallof presses (using a resistance band or cable, pressing away from your body while resisting rotation) directly train anti-rotation strength
Two weeks of this work, 10 minutes every other day, and you'll notice the difference when you're holding the bike in a tight circle.
Your lower back takes abuse during training because you're sitting in an unfamiliar position for hours. The riding position engages your lower back differently than sitting at a desk or standing. Building endurance there prevents the kind of pain that makes you rush through exercises just to get off the bike.
Heat Management During Multi-Hour Training Sessions
MSF courses run in summer. Your DMV test might happen in August. You'll be wearing a helmet, jacket, gloves, long pants, and boots while sitting on an engine and working hard in direct sunlight.
Heat exhaustion doesn't announce itself clearly. You'll just start making dumb mistakes. Your decision-making gets fuzzy. Your reaction time slows. You'll forget the course pattern you just walked through.
The course instructors will give you water breaks, but that's damage control, not prevention. You need a heat management strategy before you show up.
Look, I'm about to give you a checklist that makes me sound like a neurotic parent packing for summer camp. But heat exhaustion is sneaky. You won't realize you're cooked until you're already making mistakes.
Pre-Course Heat Prep Checklist (24-48 Hours Before):
Increase water intake by 1 liter per day (spread throughout the day, not all at once)
Avoid alcohol and excessive caffeine (both dehydrate)
Eat foods with high water content (watermelon, cucumbers, oranges)
Pack electrolyte drink mix or tablets for course day
Wet and freeze a bandana the night before (store in a ziplock bag)
Prepare moisture-wicking base layers (wash and lay out)
Fill a small spray bottle with water
Set phone reminders for hydration during breaks (every 15 minutes)
Start with hydration 24 hours before your course begins. Drinking water the morning of doesn't cut it. Your body needs time to absorb and distribute fluids. Aim for an extra liter of water the day before, consumed steadily throughout the day.
During the course, drink before you're thirsty. By the time you're thinking "man, I'm thirsty," you're already operating on reduced brain power. Which is great when you're trying to remember a 12-step sequence while balancing a 400-pound machine. Small sips every 15 minutes work better than chugging during breaks.
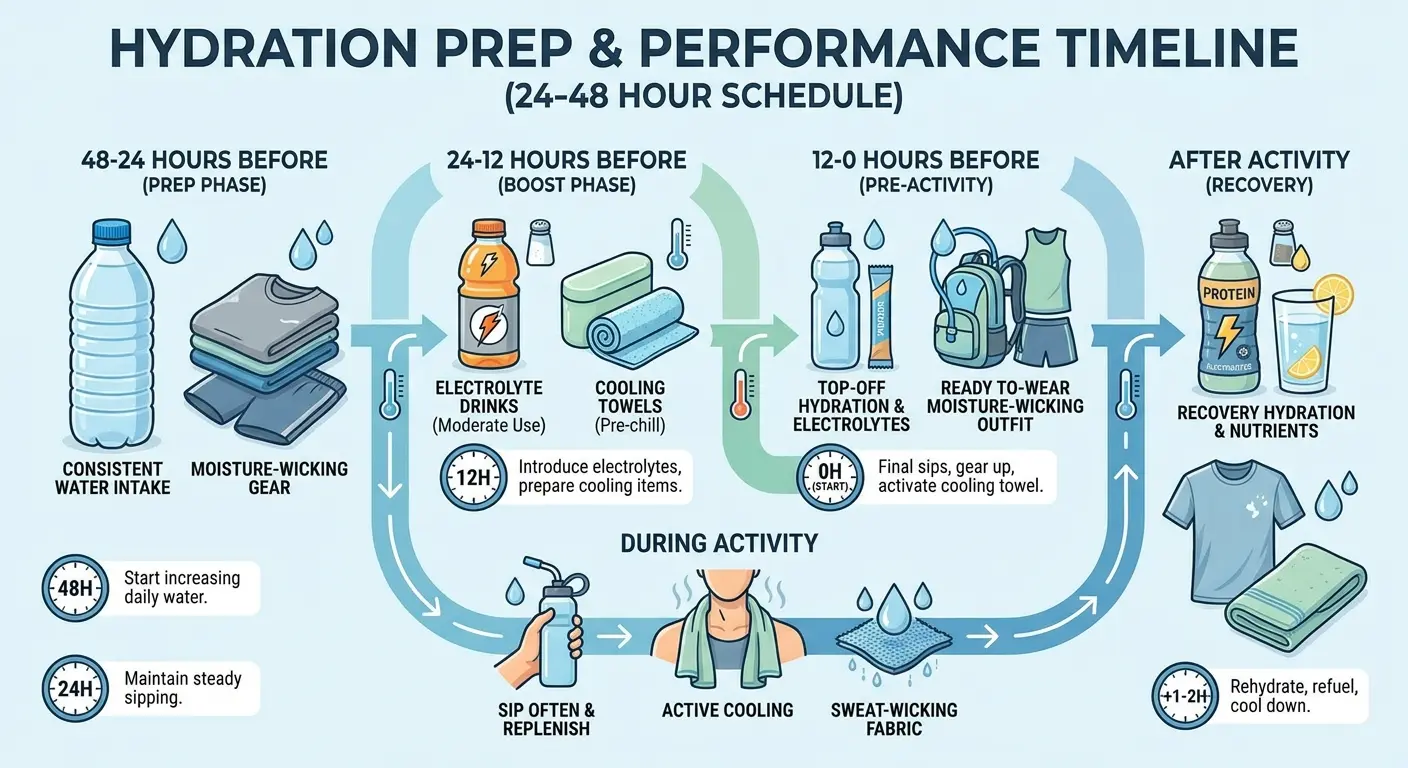
Cooling strategies that work with motorcycle gear:
Wet a bandana or cooling towel and wear it around your neck under your jacket collar between exercises
Keep a small spray bottle in your gear bag and mist your face and neck during breaks
Wear moisture-wicking base layers under your gear (cotton traps heat and sweat)
Pour water on your forearms during breaks (the blood vessels there cool your core temperature quickly)
Every class has that guy who shows up in a t-shirt and sneakers because "it's too hot for gear." Then he goes down during a slow turn, gets road rash, and has to reschedule the whole course. Don't be that guy.
The smarter play: invest in mesh motorcycle gear designed for hot weather. It meets safety requirements while allowing airflow. You'll wear it after you're licensed anyway. Whether you're working on your motorcycle permit or already testing, heat management can make or break your performance.
Mental Tricks That Saved My Ass
This is going to sound like manifestation TikTok bullshit, but stay with me: your brain can't really tell the difference between vividly imagining something and actually doing it. Not at the neural level anyway. This is established neuroscience that athletes and surgeons use for skill development.
The key word is "vividly." Just spacing out thinking about riding does jack shit. You need specific, detailed mental rehearsal that engages multiple senses and includes the physical sensations you'll experience.
Here's what works when learning how to obtain a motorcycle license:
Watch point-of-view riding videos of the exact exercises you'll perform during your test. Your state's DMV might have official videos. The MSF website shows the course exercises. YouTube has hundreds of helmet-cam videos from actual tests.
Watch these videos in a quiet space where you can focus. As you watch, physically move your hands and feet through the motions you're seeing. Twist your right hand for throttle. Pull your left fingers for clutch. Press your left foot down for shifting.
This creates motor memory before you touch a real motorcycle.
My friend Jen did this for five nights before her test. Sat in her desk chair watching cone weave videos on her laptop, physically moving her hands through the motions like a weirdo. Her boyfriend thought she'd lost it. When she performed the actual exercise during her test, she told me it felt like she'd already done it dozens of times. Her muscle memory kicked in automatically, and she passed on the first attempt without a single point deduction.
She passed without a single point deduction on that exercise. Looked stupid, worked perfectly.
The second technique involves closed-eye rehearsal with kinesthetic focus. Sit in a chair. Close your eyes. Mentally walk through an entire exercise from start to finish, but emphasize the physical sensations:
Feel the clutch lever's resistance against your fingers
Sense the bike's weight shifting as you turn
Notice the vibration through the seat and pegs
Feel your head turn to look through the corner
Register the engine sound changing as you shift
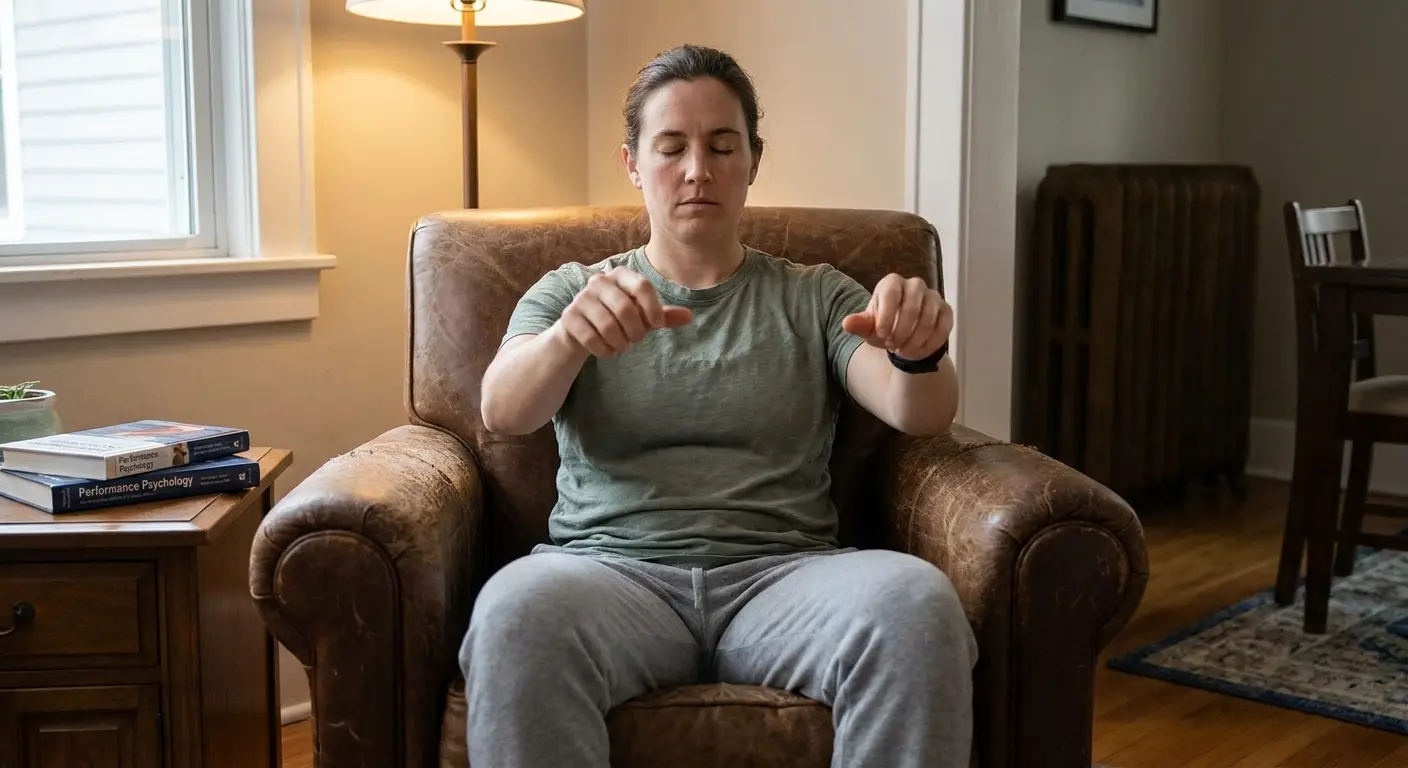
Spend 10 minutes on this daily for a week before your course. Run through each exercise 3-4 times per session.
The mistake most people make is rehearsing failure. They visualize dropping the bike or failing the test, which trains their nervous system to execute those outcomes. Your brain practices what you show it.
If you catch yourself imagining mistakes, stop and restart the mental rehearsal. Always complete the visualization successfully.
One more technique that sounds weird but works: verbalize the steps out loud while mentally rehearsing. "Clutch in, shift to first, friction zone, look through the turn, gentle throttle, lean the bike." Speaking activates different neural pathways and reinforces the sequence.
Do this in your car before you walk into the testing site. It settles your nerves and primes your brain for execution. Just as motorcycle maintenance requires consistent practice, mental rehearsal builds the neural pathways you'll need for smooth riding.
The Gear Paradox: What to Buy Before You're Licensed
The standard advice is "don't buy gear until you're licensed." This is mostly right for expensive stuff, but completely wrong for the things that'll actually affect whether you pass your test.
You need gloves before your MSF course. The course requires them, and they'll provide l oaner if you don't have any, but borrowed gloves never fit right. Too loose and you can't feel the controls. Too tight and you'll have blisters by lunch. Either way, you're distracted and making mistakes.
Spend $40-60 on basic summer gloves that fit properly. Go to a motorcycle shop and try on multiple pairs. You want snug without being tight, and you should be able to move all your fingers independently without restriction.
The gloves you buy now will become your warm-weather riding gloves after you're licensed, so this isn't throwaway money.
Here's what to buy now versus later:
Buy before your MSF course:
Gloves ($40-60): Direct impact on every control input. Borrowed ones suck.
Boots ($100-150): Only if you're committed. Better shifter feel, ankle protection when you screw up slow maneuvers.
Wait until after you're licensed:
Helmet: The course loaners are fine. You don't know what style you want yet anyway.
Jacket: You'll have opinions after 500 miles. Trust me.
Pants: Jeans work for the course. Figure out your riding style first.
Yeah, I made this into a simple list instead of another table. You're welcome.
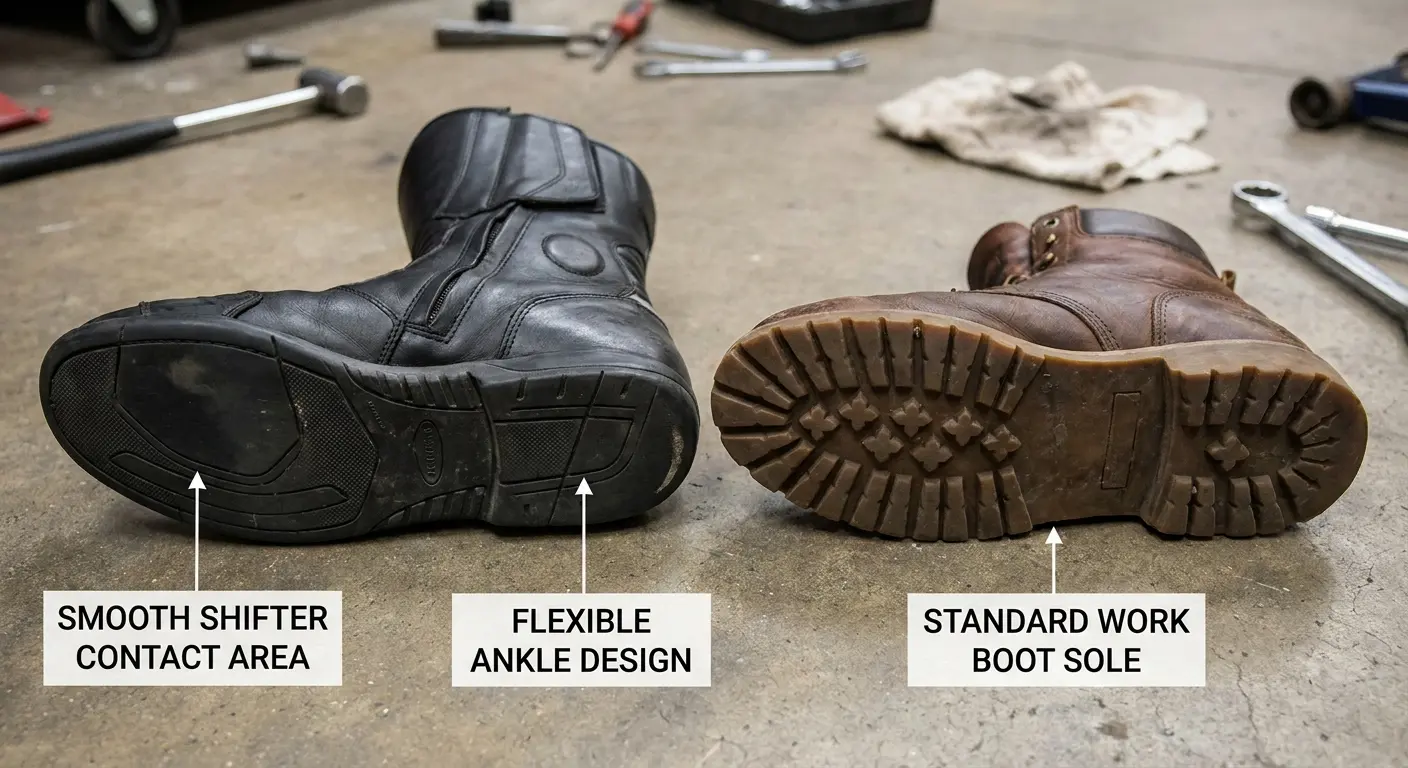
Boots are the second smart pre-license purchase, but only if you're serious about continuing after the course. The course requires over-the-ankle footwear, and most people show up in work boots or hiking boots.
Those work, but they're not designed for motorcycle controls. The shifter and brake pedal require precise foot movements, and boots with thick, stiff soles or aggressive tread patterns make this harder than it needs to be.
Motorcycle-specific boots have smooth, thin sole areas where the shifter and brake contact your foot. They're also designed to flex at the ankle while protecting it. This matters during the test when you're doing slow-speed maneuvers that require frequent shifting and rear brake modulation.
You can find decent entry-level motorcycle boots for $100-150. They'll last years and make your test easier. Whether you're pursuing a california motorcycle license or testing in another state, proper boots give you the control precision you need.
What you shouldn't buy before licensing: helmets and jackets.
Helmets are too personal. You need to try on dozens to find the right shape for your head, and you won't know what style you prefer until you've ridden enough to understand your priorities. The course provides helmets, and while they're not great, they're adequate for learning. Getting your california motorcycle license doesn't require you to own a helmet yet. Save that purchase for when you know exactly what you need.
Phone Mounting Strategy for New Riders
You'll need your phone mounted on your bike from day one of licensed riding. GPS navigation isn't optional when you're new. You don't have the spare mental bandwidth to memorize routes while also managing the physical tasks of riding.
The problem: most phone mounts are designed for experienced riders who already have solid bike control and can glance at their screen without it affecting their riding. You're not there yet.
Your phone mount needs to work with thick gloves you haven't broken in, on a bike you're still getting comfortable with, while you're already managing cognitive overload from traffic and controls.
Mounting position determines whether you can actually use your phone while riding. The ideal spot puts the screen in your peripheral vision when you're looking at the road ahead. You shouldn't have to move your head down to see it.
This usually means handlebar mounting rather than top clamp mounting. Handlebar positions put the phone higher and closer to your natural sight line.
The mount mechanism needs to work with gloves. Touchscreens barely respond to thick gloves, so you need a mount that lets you install and remove your phone quickly with gloved hands. You'll want to remove it every time you stop (theft is real), and fumbling with a complicated mount gets old fast.
I bought this $15 Amazon mount that required two hands and perfect alignment. Lasted exactly three rides before I rage-ordered the Rokform at a gas station. On my third solo ride, I stopped for gas and spent four minutes in the parking lot trying to reinstall my phone with gloved hands while my bike idled. Finally removed my gloves, reinstalled the phone, then had to put my gloves back on. The whole process killed my confidence and made me dread every stop. Switched to a magnetic mount the next day and could install my phone one-handed in under three seconds.
I use Rokform's motorcycle handlebar mount. Not sponsored, just works. The magnetic system means you can slap your phone on with one hand while wearing gloves that feel like oven mitts. When your hands are shaking from first-ride adrenaline and you're wearing gloves you haven't broken in yet, being able to mount your phone without a 5-minute wrestling match matters a lot. Whether you're working toward your motorcycle license in california or already riding, having reliable navigation reduces stress significantly.
The mount also needs to survive your mistakes. You're gonna drop the bike at some point, probably in a parking lot at low speed. A cheap mount will break or let your phone fly off. A solid mount keeps your phone attached and protected.
Vibration dampening is the last factor. Phone cameras have optical image stabilization systems that can be damaged by sustained motorcycle vibration. Some phones have been bricked by a few hours of riding with a rigid mount.
Is this paranoid? Maybe. But I've seen forum posts from people whose iPhone cameras got wrecked by vibration. A $40 dampener is cheaper than a $1000 phone repair.
The motorcycle mount dampener protects your phone's camera from the vibrations that can cause permanent damage during extended rides.
You need either a mount with built-in dampening or a phone case that provides it. This isn't paranoia. Apple and other manufacturers have official warnings about motorcycle mounting.
Set up your mounting system before your first solo ride. Practice installing and removing your phone with your gloves on while the bike is parked. Make sure you can see the screen clearly from your normal riding position.
You don't want to be figuring this out in a parking lot when you're already nervous about your first real ride after getting your motorcycle license in california.
Practice Lot Sessions: What to Do Before Your Official Training
Most states let you sit on and start a motorcycle on private property without a permit, as long as you're not actually riding it. This creates a practice opportunity that almost nobody uses.
Find a friend or family member who rides and ask to spend an hour with their bike in a driveway or private lot. You're not gonna ride it. You're gonna familiarize yourself with the controls and build muscle memory for the hand and foot movements.
This is gonna feel ridiculous. You're gonna sit on a parked motorcycle and pretend to ride it like a kid playing with a toy. Do it anyway.
Pre-MSF Static Practice Session (60 minutes on a parked bike):
First 20 Minutes: Control Location and Feel:
Locate and operate clutch lever 20 times (full pull and release)
Locate and operate front brake lever 20 times (progressive pressure)
Locate and operate throttle (twist forward and return 20 times)
Locate and operate rear brake pedal with right foot (press and release 20 times)
Locate shifter with left foot (feel the lever position without pressing)
Next 20 Minutes: Starting Sequence and Friction Zone:
Run complete starting sequence 15 times (clutch in, neutral check, start button)
Practice finding friction zone 50 times (pull clutch in, slowly release to resistance point, pull back in)
Hold friction zone position for 10 seconds, repeat 10 times
Practice clutch modulation (slow release from full in to full out, 20 reps)
Final 20 Minutes: Shifting Pattern and Coordination:
Shift through gears with engine off (neutral to first, up through all gears, back down) 25 times
Practice coordination sequence: clutch in, shift up, clutch out (50 reps)
Practice launch sequence: clutch in, shift to first, find friction zone, add throttle, release clutch (20 reps, engine off)
Run complete stop sequence: clutch in, both brakes, shift to neutral (20 reps)
Here's what to practice when learning how to get your motorcycle license:
Sit on the bike with the engine off. Find the clutch, throttle, front brake, rear brake, and shifter. Operate each one slowly and deliberately. Notice how much pressure each control requires and how far it moves.
Run through the starting sequence repeatedly: clutch in, bike in neutral, start button, check neutral light. Do this 20 times until it's automatic.
Practice the friction zone with the engine off. Pull the clutch all the way in, then slowly release it until you feel resistance. That's the friction zone. Pull it back in. Repeat 50 times. Your left hand needs to find that zone instantly and hold it steadily.
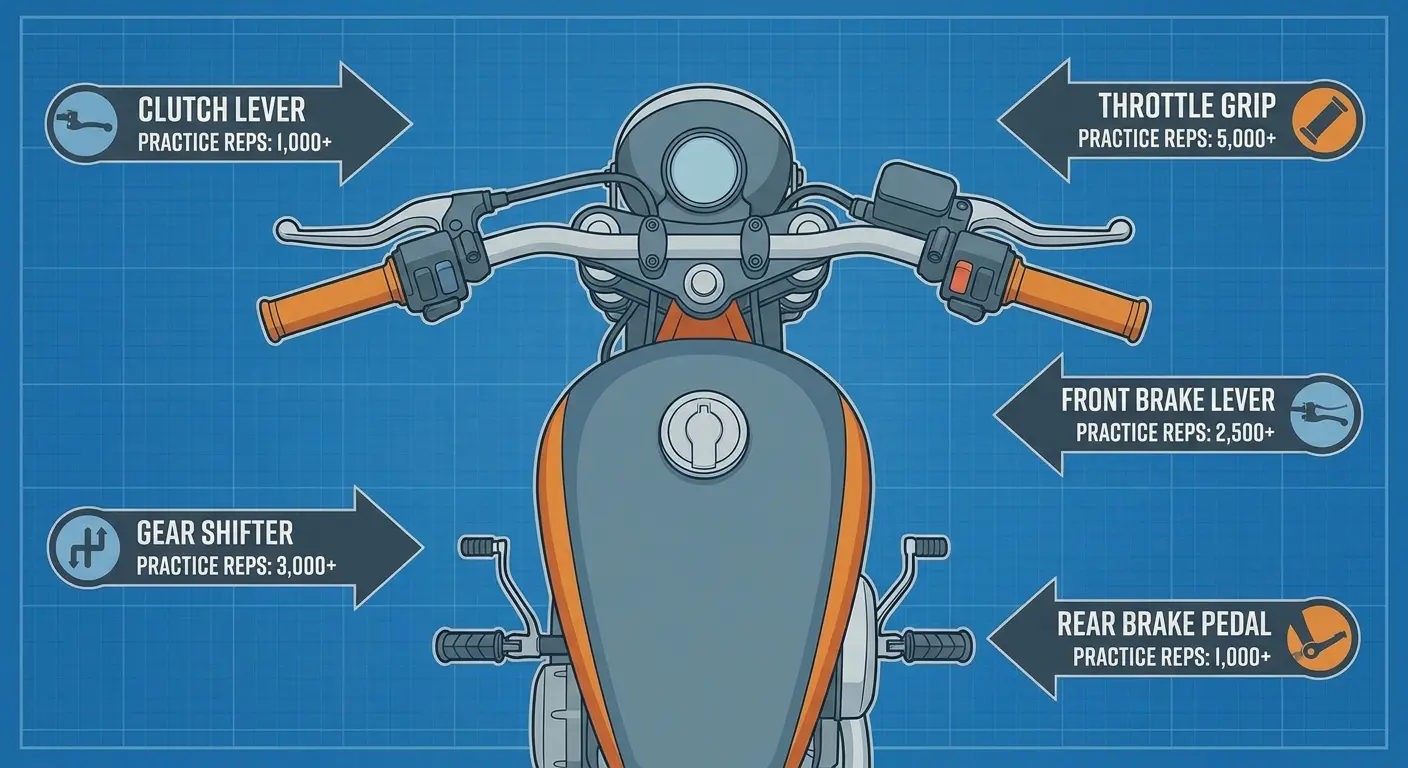
Shift through the gears with the engine off and clutch pulled in. First is down, the rest are up. Feel the click of each gear. Practice the pattern: neutral to first, first to second, second to third, back down. Do this until you can shift without looking at your foot.
I did this in my friend's driveway for an hour. His neighbor watched from the window. Definitely thought I was insane. But when I got to the actual MSF course, my hands already knew where everything was. Worth the weird looks.
The second practice activity happens away from any motorcycle: chair practice.
Chair practice sounds even dumber than parked bike practice. You're literally gonna sit in a chair and mime riding a motorcycle. Your family will question your life choices.
Sit in a chair with your feet flat on the ground. Go through the entire sequence of starting, shifting, and stopping using only your imagination and muscle movements.
Right hand twists forward (throttle), left hand pulls in (clutch), left foot presses down (shift to first), left hand slowly releases to friction zone while right hand twists slightly (launching), right hand twists back (more throttle), left hand pulls in (clutch), left foot lifts up (shift to second), left hand releases (clutch out).
Feel ridiculous yet? Good. That means you're doing it right.
Your brain and muscles are learning the sequence and the coordination pattern. When you sit on a real bike during the course, you'll have a foundation instead of starting from zero.
The third practice activity is balance work, and it helps more than you'd expect. Riding a bicycle slowly (walking pace or slower) trains the same balance and counter-steering instincts you'll use on a motorcycle.
Find an empty parking lot and practice riding your bicycle as slowly as possible without putting a foot down. Make tight U-turns. Weave between imaginary cones. Stop and start smoothly.
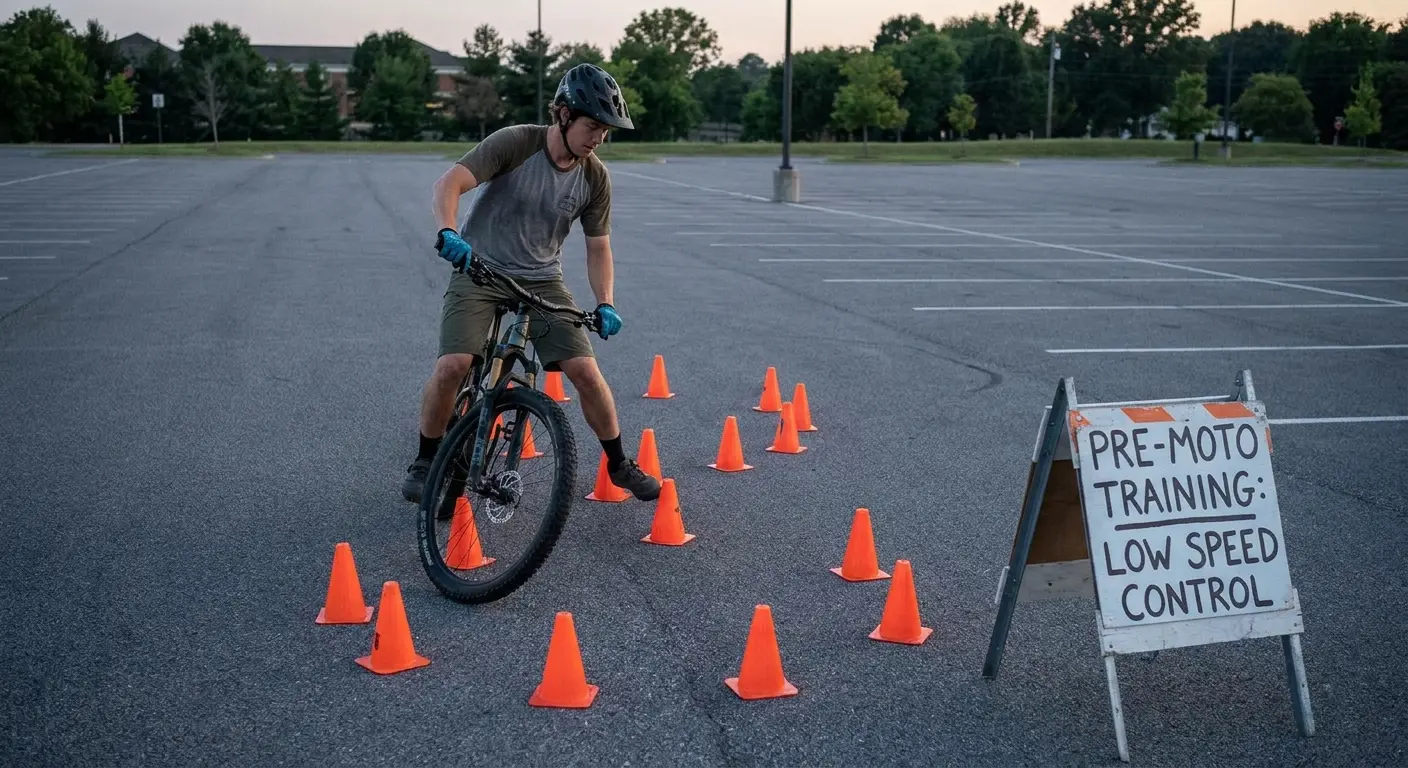
This builds the slow-speed balance skills that make or break your licensing test. The physics are the same: you counter-steer to initiate turns, you look where you want to go, and you use subtle weight shifts to maintain balance.
You can do this legally, it's free, and it directly translates to motorcycle control.
Documentation Prep That Saves You Time
The MSF completion card is your golden ticket. In most states, it lets you skip the DMV riding test, which is great because DMV tests are usually harder and involve your own bike. But that card takes 2-4 weeks to arrive after you complete the course.
You can't just show up at the DMV on Monday morning. The card takes 2-4 weeks to arrive. Yes, this is annoying. No, there's no way around it in most states.
Some states have electronic verification systems where the course completion goes directly into the DMV database. Check your state's specific process before you take the course. If your state requires the physical card, plan accordingly. For those pursuing a california motorcycle license, the DMV typically requires the physical MSF completion card, so factor in that waiting period when planning your timeline.
While you're waiting for the card, gather everything else you'll need:
Your current driver's license (obviously), but check the expiration date. Some DMVs won't process a motorcycle endorsement if your base license expires within six months. You might need to renew your regular license first.
Proof of identity beyond your license. This varies by state, but most require at least two forms. Birth certificate, passport, social security card, utility bill with your current address. The Real ID requirements have made this process even more bureaucratic than it used to be. You'll need your birth certificate, passport, social security card, proof of address, and possibly a blood sample. Okay, not the blood sample. But check your state's specific requirements because some DMVs are absolutely ridiculous about this.
Check your state DMV's website for the exact list, then gather those documents and put them in a folder you won't lose. Don't wait until the morning of your DMV appointment to discover your birth certificate is at your parents' house in another state. When figuring out how to get your motorcycle license, documentation preparation is just as critical as passing the riding test.
Vision test results if your state requires them separately. Some DMVs do vision tests on-site, others require you to bring results from an eye doctor. Find out which applies to you.
Payment method. Some DMVs only take cash. Some only take checks. Some take debit but not credit. Why? Because the DMV exists to test your patience as much as your riding skills. This information is usually buried on their website, but it matters when you're standing at the counter.
The fee amount varies wildly by state, from $15 to $200+. Know the exact amount before you go. The california motorcycle license fee structure includes both the written test fee and the endorsement fee, so budget accordingly.
Here's the mistake that delays people: assuming your MSF card is enough. In some states, you also need to pass a written knowledge test at the DMV even with the MSF completion. The MSF course doesn't always cover every question that appears on your state's test.
Download your state's motorcycle handbook (it's free on the DMV website) and read it cover to cover. Take the practice tests available online. I know a guy who passed the MSF course, waited a month for his card, scheduled his DMV appointment, took the day off work, and failed the written test. Don't be that guy. California has specific motorcycle laws and regulations that differ from other states, so reviewing the california motorcycle license handbook is essential even if you've completed your MSF course.
Appointment scheduling is the other time trap. Some DMVs require appointments booked weeks in advance. Others are walk-in only but have multi-hour wait times. Figure out your DMV's system and plan accordingly.
If your DMV requires appointments, book it as soon as you register for your MSF course. You can always reschedule if needed, but you can't magically create an available appointment slot when you're ready. When pursuing your motorcycle license in california, DMV appointments can fill up weeks in advance, especially during peak riding season.
One more thing: bring your MSF course materials with you to the DMV. Some evaluators want to see your training records, not just the completion card. Having everything in one folder prevents a wasted trip.
Final Thoughts
Most licensing guides treat this like a checklist: take course, pass test, done. But the difference between barely passing and actually being ready to ride comes down to the prep work nobody talks about.
The grip training, the heat prep, the mental rehearsal, the gear decisions. This stuff determines whether you pass your test feeling confident or just relieved it's over.
The people who breeze through their test aren't more naturally talented. They just prepared for the actual challenges instead of just memorizing the handbook.
You're still gonna be nervous. You'll still make mistakes. But you'll make fewer of them, and you'll recover faster when you do.
The license is just permission to start learning for real. But showing up to that first solo ride actually prepared? That's the difference between loving riding and being terrified of it.
Now go squeeze a stress ball and watch some cone weave videos. You'll thank me later.

