


Table of Contents
Why Your Bike Deserves Better Than "Out of Sight, Out of Mind"
-
Sheltered Spaces: When Four Walls Make All the Difference
Prefab Metal Sheds Built for Security
Wood Storage Sheds With Ventilation Systems
Modular Garage Kits You Can Expand
Climate-Controlled Storage Units Off-Site
Attached Garage Conversions
-
Weather-Resistant Options: Protection Without Permanent Structure
Hard Shell Storage Pods
Heavy-Duty Motorcycle Tents
Portable Carports With Anchoring Systems
Reinforced Fabric Shelters
-
DIY and Budget-Conscious Builds: When You'd Rather Make It Yourself
Pallet Frame Lean-To Structures
PVC Pipe Storage Frames
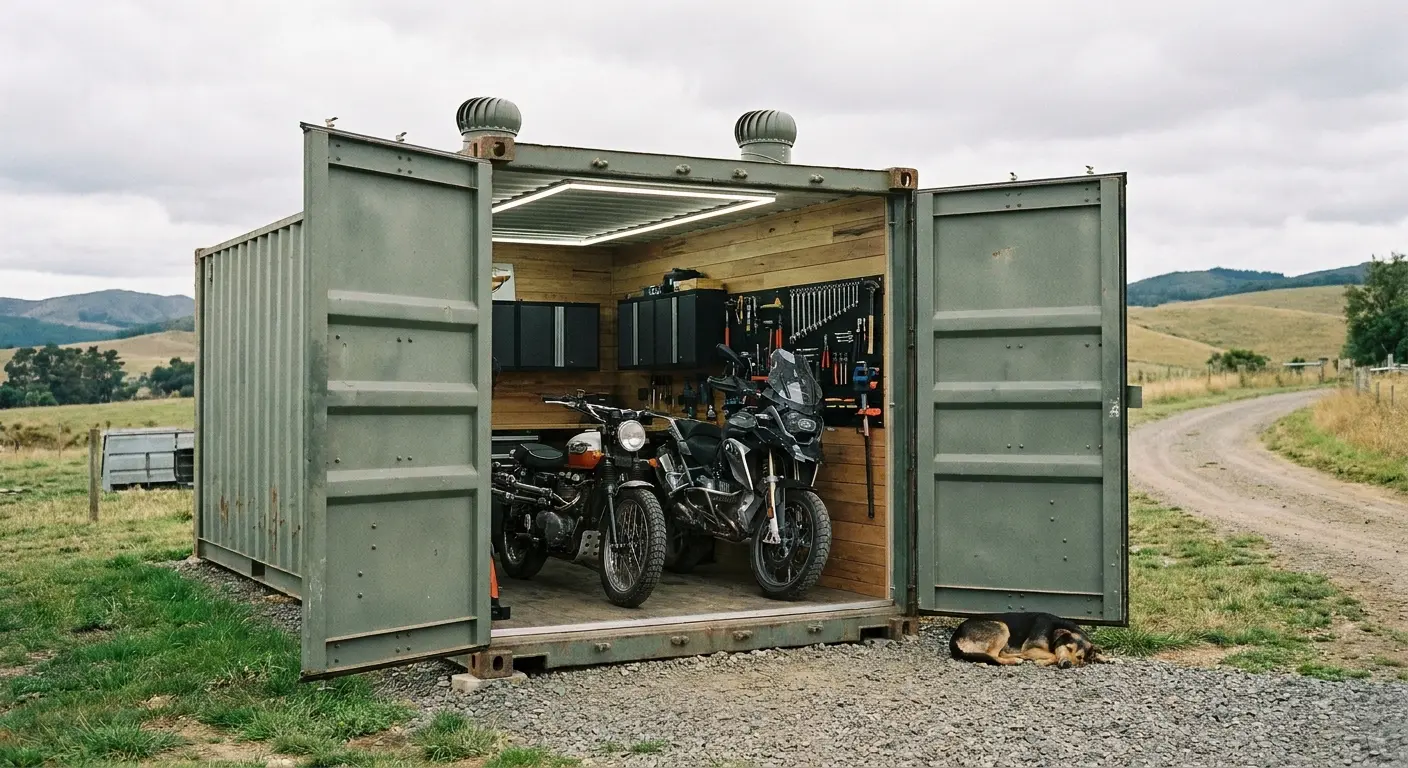
Repurposed Shipping Container Conversions
Wooden A-Frame Covers
Tarp and Rebar Ground Systems
-
Specialized Storage: For Bikes That Need More Than Basic Cover
Motorcycle Lifts With Integrated Covers
Wall-Mounted Vertical Storage Racks
Enclosed Trailers as Mobile Garages
Multi-Bike Stackable Systems
Staying Connected to Your Ride (Even in Storage)
Final Thoughts
TL;DR
Permanent structures are best but expensive. Portable stuff works if you're renting. DIY is legit if you don't half-ass the drainage and airflow. Vertical storage is for people with too many bikes and not enough garage. Also, take your phone mount off before winter or it'll be garbage by spring.
Why Your Bike Deserves Better Than "Out of Sight, Out of Mind"
Last spring I pulled the cover off my bike and found a mouse nest in the airbox. Eight hundred bucks in wiring damage because I thought "just throw a tarp over it" was good enough. Learned that lesson the expensive way.
Here's what actually happens during storage months: slow, expensive degradation that proper protection would prevent entirely. Your humidity levels, temperature swings, and available space matter way more than following some universal formula. A rider in Arizona faces completely different challenges than someone in Michigan, but we all get bombarded with the same generic advice.
Storage method matters more than storage duration. You can park a bike for six months and have it fire up perfectly, or store it six weeks and face hundreds in repairs. The difference comes down to matching your approach to your specific conditions.
Storage Challenge |
What Happens Without Protection |
Typical Repair Cost |
|---|---|---|
Moisture exposure |
Battery sulfation, corroded terminals |
$150-400 |
UV degradation |
Cracked hoses, faded paint, brittle seals |
$300-1,200 |
Temperature swings |
Condensation in fuel system, oil breakdown |
$200-600 |
Pest intrusion |
Chewed wiring, nest material in airbox |
$400-1,500 |
Theft/vandalism |
Missing parts, tipped bike, broken components |
$500-5,000+ |
We're talking about avoiding the preventable damage that eats into your riding budget every spring. The parts you replace because of poor storage could've funded that weekend trip you've been planning.
Sheltered Spaces: When Four Walls Make All the Difference
Okay, actual buildings. Sheds, garages, that kind of thing. They solve pretty much everything at once: weather, theft, UV, pests. But they're not cheap and you need to own your property or have a really cool landlord.
The catch? Ventilation becomes critical. A sealed garage without airflow creates a moisture trap that's worse than leaving your bike outside.
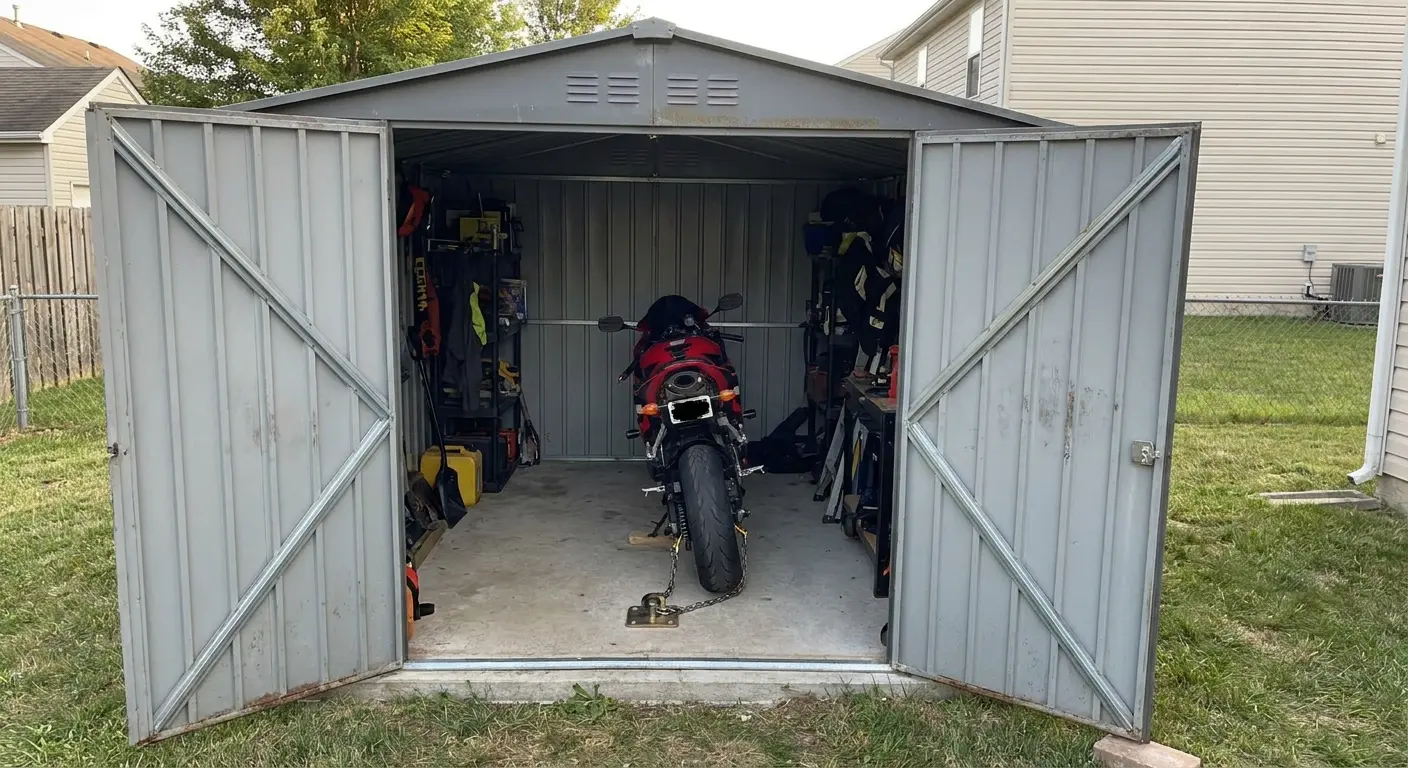
1. Prefab Metal Sheds Built for Security
Metal sheds are basically the Fort Knox option. Wood burns, metal doesn't. Pretty simple math there.
You want 20-gauge steel minimum, and yeah, I know that sounds like random numbers. Here's what it means: anything thinner and some asshole with a pry bar can peel it open like a sardine can. Ask me how I know. (Don't actually ask.)
Can we talk about foundations for a second? Because everyone skips this part and then wonders why their shed is sitting crooked after six months. Concrete's ideal, obviously. But if you're not ready to commit to that level of permanence (or expense), you can get away with gravel over landscape fabric. The key phrase being "get away with." You actually have to prep the ground, not just dump rocks on grass and hope.
Level the area. Compact it. Lay fabric to prevent weed growth. Then add four to six inches of gravel. The fabric also helps with drainage, which prevents water from pooling under your shed.
Metal creates condensation problems that wood doesn't. Temperature swings cause moisture to form on interior walls, which then drips onto your bike. Adding foam board insulation to the walls reduces this issue by minimizing temperature differences between inside and outside. You're not trying to heat the space, just reducing the extreme swings that cause condensation.
Check door width before you buy. Most prefab kits assume lawn equipment, so they spec 4-5 foot openings. You need 6 feet minimum to wheel a bike in without scraping handlebars or mirrors on the frame. Some manufacturers offer wider doors as upgrades, but verify dimensions in your actual space because "6-foot door" sometimes means the frame opening, not the clear passage.
Corner bracing determines wind resistance. Cheaper sheds use thin angle brackets that flex during storms. Quality builds include diagonal bracing or reinforced corner posts. If you're in an area with regular high winds, skip this at your own risk.
Metal sheds are ugly. We're not pretending otherwise. If you've got an HOA breathing down your neck about "aesthetic harmony" or whatever, you're probably stuck with wood. My condolences.
2. Wood Storage Sheds With Ventilation Systems
Wood blends into residential settings better and gives you easier customization options. Want to add shelves, pegboards, or electrical outlets? Wood framing makes modifications straightforward compared to drilling through metal panels.
Use pressure-treated lumber for any ground contact. Regular wood wicks moisture and rots within a few years. Treated lumber costs more upfront but lasts decades. Your floor joists and bottom plates need this protection.
Roof pitch affects everything. Too shallow and water pools, which leads to leaks. Too steep and you're wasting materials on vertical walls that don't add usable space. A 4:12 pitch (4 inches of rise for every 12 inches of run) handles rain and moderate snow while keeping material costs reasonable.
Ventilation makes or breaks wood sheds. Install soffit vents along the eaves and a ridge vent at the peak. This creates airflow that prevents musty interiors and protects your bike from moisture damage. Air enters through the soffits, rises as it warms, and exits through the ridge. Simple physics that saves you from condensation problems.
OSB sheathing needs exterior-grade rating. Interior-grade OSB swells and delaminates when exposed to weather. The price difference is minimal, but the performance gap is massive. Add a vapor barrier on the interior side (not exterior) to prevent moisture from reaching the sheathing. This seems backward, but vapor barriers go on the warm side of the wall to stop humid interior air from condensing inside the wall cavity.
Door hardware takes abuse from weather and repeated use. Strap hinges hold up better than butt hinges under weight and weather exposure. They distribute stress across a larger area and handle the door's weight more effectively. Use stainless steel or galvanized hardware to prevent rust.
Build your foundation slightly oversized. If your shed is 10x12 feet, make the foundation 10.5x12.5 feet. This overhang prevents water from wicking into floor joists and extends the life of your shed. The extra materials cost is negligible compared to replacing rotted framing.
Wood requires maintenance. Plan on re-staining or resealing every 2-3 years depending on sun exposure and climate. Factor in maintenance time along with construction costs.
3. Modular Garage Kits You Can Expand
Modular systems work for riders who might add another bike or need storage that grows with a collection. These kits use interlocking panels that you can extend without rebuilding the entire structure.
Steel-frame modulars handle expansion better than wood-frame versions. The connections are engineered for adding sections, and the materials don't warp or shift like wood can. You're paying for flexibility, which matters if your collection isn't static.
Check local building codes before ordering. Many areas allow structures under 120 square feet without permits, but rules vary wildly. Some municipalities care about permanent foundations, others focus on height, and some have setback requirements from property lines. A quick call to your local building department saves you from ordering a kit you can't legally install.
Base panel options vary between manufacturers. Some kits include integrated flooring, others require you to build a platform first. Integrated floors simplify installation but limit your foundation choices. Separate flooring gives you control over drainage and leveling but adds complexity to the build.
Plan for expansion from day one. If you think you might add sections later, choose a kit with accessible connection points and verify replacement panels will be available years from now. Some companies discontinue product lines, leaving you stuck with an orphaned system you can't expand.
Double doors beat single doors even if you only have one bike now. The extra width makes maintenance easier, simplifies moving bikes in and out, and adds resale value if you ever sell your property. Retrofitting doors later requires cutting panels and reframing, which costs more than specifying them initially.
Insulation usually costs extra. Standard kits provide weather protection but not temperature control. If you're in an extreme climate, budget for insulation packages or plan to add your own. Rigid foam board works well because it doesn't compress and maintains R-value in tight spaces.
Estimated cost: $2,000-4,500 depending on size and features.
4. Climate-Controlled Storage Units Off-Site
Renting makes sense for apartment dwellers, riders with multiple bikes, or anyone dealing with extreme climates. Climate-controlled facilities maintain 55-85°F and 30-50% humidity year-round, which prevents the condensation and temperature swings that damage bikes.
"Climate-controlled" means different things at different facilities. Some maintain tight temperature ranges, others just prevent freezing. Ask specific questions about their HVAC systems and whether they monitor humidity. The cheapest climate-controlled unit might just have a heater that kicks on when temps drop below 40°F, which isn't the protection you're paying for.
Security varies dramatically. Individual unit alarms offer better protection than perimeter cameras alone. Drive through the facility at different times of day. Is staff present? Are gates functional? Do you see evidence of regular maintenance? A facility that can't keep landscaping trimmed probably isn't monitoring security cameras either.
Storage Unit Size |
Bike Capacity |
Typical Monthly Cost |
Best For |
|---|---|---|---|
5x5 |
1 bike (tight fit) |
$50-90 |
Sport bikes, minimal gear |
5x10 |
1 bike + gear/tools |
$75-130 |
Single bike with maintenance space |
10x10 |
2 bikes + equipment |
$120-200 |
Multiple bikes or touring setup |
10x15 |
3-4 bikes + workspace |
$160-280 |
Collectors or shared rental |
Ground-floor units with drive-up access cost more but eliminate the hassle of navigating elevators or ramps. If you plan to visit frequently for maintenance, the convenience justifies the premium. Upper-floor units work fine for seasonal storage where you're dropping the bike off in November and picking it up in April.
Hidden costs add up. Most facilities require insurance, charge administrative fees, and specify lock types you must use. A $75/month unit becomes $95/month after fees and insurance. Factor these into your budget comparison.
Here's the thing though: off-site storage means you won't do casual maintenance or spontaneous rides. Works for bikes you're truly storing seasonally, but it's frustrating if you want to tinker or take advantage of random nice weather days.
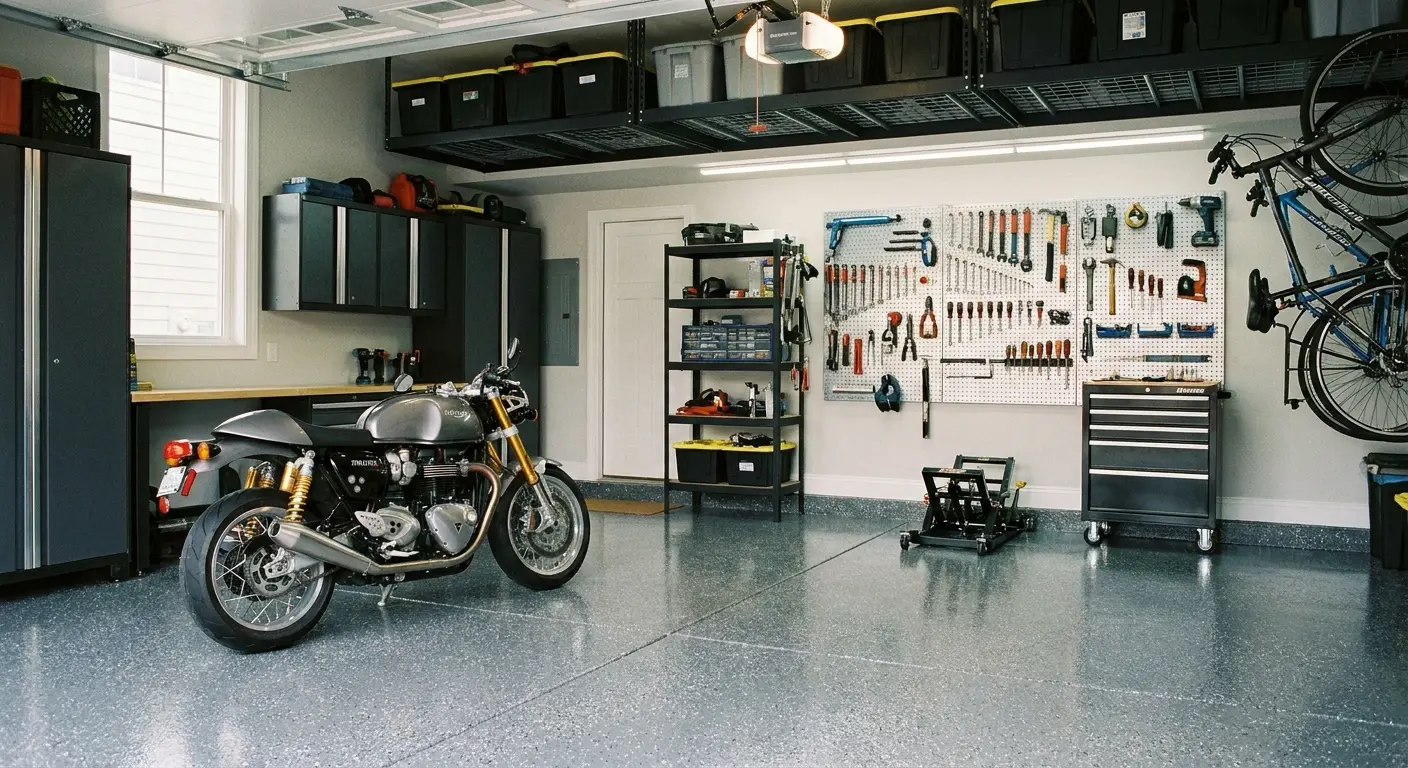
5. Attached Garage Conversions
Converting part of your existing garage gives you climate benefits without new construction. Most attached garages already have electricity, lighting, and protection from weather. You're just optimizing the space you already pay to heat and cool.
Start by reclaiming square footage from accumulated junk. Holiday decorations, old sporting equipment, and things you "might need someday" eat garage space. Overhead storage racks for car-related items free up floor space for your bike. Be ruthless about what actually deserves garage real estate.
Sectioning off a bike area maintains peace with family members who think garages should hold cars. Industrial curtains provide visual separation without permanent construction. They're cheap, easy to install, and you can remove them if your needs change. Partial walls (framed to ceiling height but open at the top) work if you want more defined space while maintaining air circulation.
Floor protection matters when you're sharing space with cars. Epoxy coating provides durable, chemical-resistant surfaces that clean easily. Interlocking tiles install faster and let you create defined zones (bike area vs. car area). Oil-absorbent mats work if you're on a tight budget, but they need regular replacement and don't look as clean.
Add a dedicated circuit for battery tenders and work lights. Running these off existing circuits risks tripped breakers, especially if someone's using power tools or running a space heater elsewhere. A 15-amp circuit handles multiple tenders and LED work lights without issues.
Carbon monoxide from cars becomes a concern in shared spaces. Install a CO detector and make it a habit to run your car outside for a minute before pulling into the garage. This seems paranoid until you realize how quickly CO builds up in enclosed spaces. Seriously, CO poisoning will kill you. Get a detector. Don't be stupid about running cars in enclosed spaces.
Weather-Resistant Options: Protection Without Permanent Structure
What if you can't build anything permanent? Maybe you're renting, maybe you move every couple years, maybe you just don't want to deal with construction. Different approach needed.
Setup speed and weight matter because they determine whether you'll actually use the shelter consistently. A structure that takes six hours to assemble won't get moved when you need to access your bike quickly.
6. Hard Shell Storage Pods
Clamshell-style pods made from UV-resistant plastic or fiberglass provide lockable protection in a footprint barely larger than the bike itself. Most handle 1,200+ pounds, which covers everything except the heaviest touring bikes and cruisers.
Ventilation features separate quality pods from cheap versions. Screened vents prevent moisture buildup while blocking pests. Without ventilation, you're creating a greenhouse that traps humidity and promotes corrosion. Check vent placement during rain to ensure water doesn't enter through the screens.
Integrated flooring prevents ground moisture migration. Pods without floors leave your bike sitting on dirt, grass, or pavement where moisture wicks upward. Built-in floors create a barrier that keeps ground moisture away from your bike.
Anchor options depend on your surface. Auger-style ground anchors work in soil, concrete anchors for pavement, sandbag systems for temporary placement where you can't penetrate the surface. Wind will lift an unanchored pod, and your bike goes with it. Skip this and watch your investment become a kite.
Accessing the bike requires lifting the entire shell. One person can manage this, but two makes it easier and reduces the chance of dropping the shell on your bike. Some pods include gas struts that assist with lifting, which is worth the extra cost if you'll be accessing your bike frequently.
Quality pods run $800-2,000, which feels steep until you compare it to insurance deductibles. One comprehensive claim for weather damage or theft costs more than buying proper protection upfront.
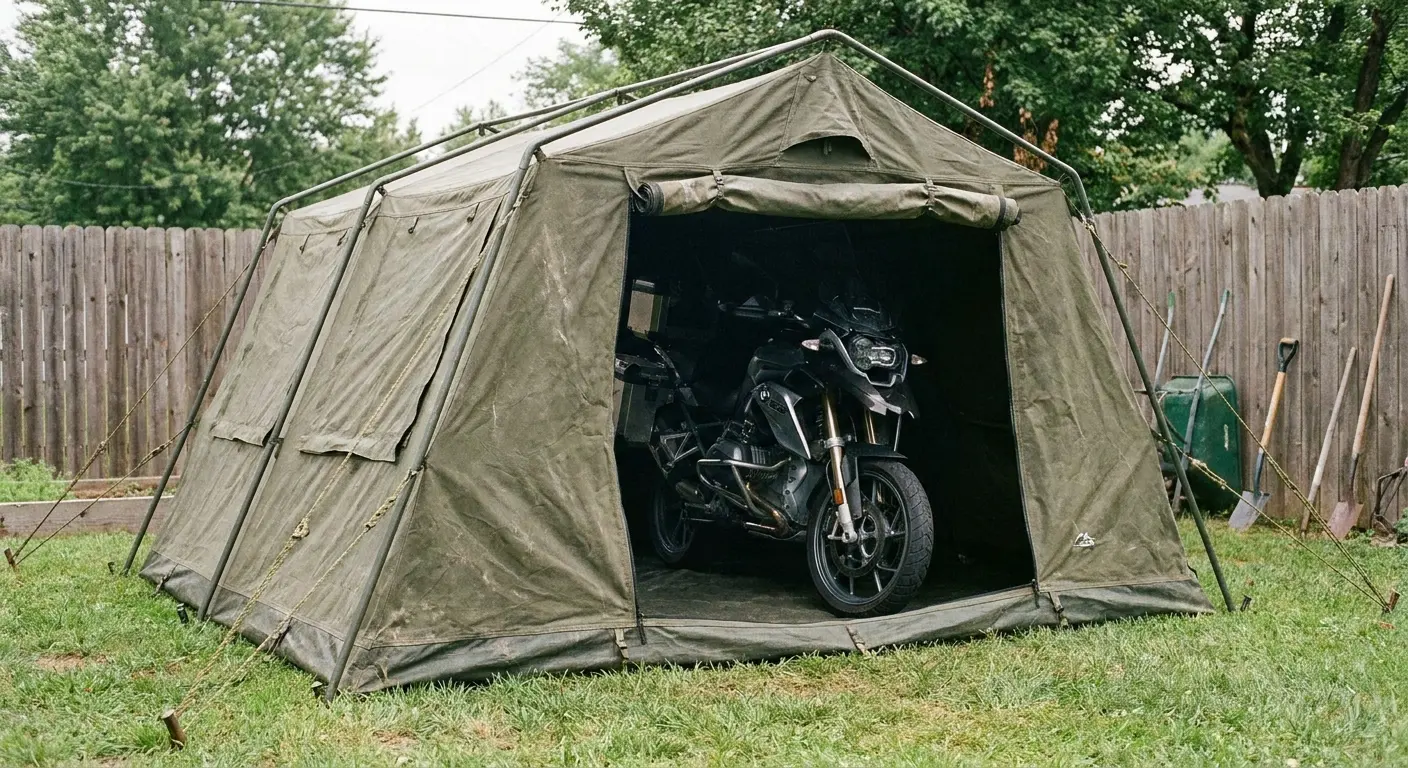
7. Heavy-Duty Motorcycle Tents
Motorcycle-specific tents use reinforced frames, thicker fabric, and floor designs that handle kickstand weight. These aren't camping tents repurposed for bikes; they're engineered for long-term outdoor storage.
Powder-coated steel frames resist rust better than aluminum poles. Steel also provides better rigidity in wind. Aluminum flexes, which creates stress points where poles connect. Over time, these connections fail and you're left with a collapsed tent on your bike.
Fabric thickness starts at 600D polyester for anything worth considering. Thinner materials tear easily and don't hold up to UV exposure. The difference between a $300 tent and a $900 one comes down to frame gauge, fabric UV rating, and zipper quality. Don't cheap out on zippers. Trust me on this. Heavy-duty zippers with double pulls and weather flaps cost more to manufacture but survive years of use. Cheap zippers fail within months, leaving you with a tent you can't close properly.
Peak height determines whether you can work on your bike or just store it. Measure to the top of your windscreen or tallest point, then add at least 18 inches. Cramped interiors make maintenance miserable and increase the chance of damaging your bike while maneuvering inside.
Seam sealing quality matters more than fabric thickness in wet climates. Welded seams outlast stitched-and-taped versions. Water finds its way through stitching eventually, but welded seams create continuous barriers. Check seam construction before buying, especially at stress points where roof panels meet walls.
Ground stakes work in soft earth, but asphalt or concrete locations need weighted bases or sandbags. Most manufacturers provide stake kits but leave you to figure out hard surface anchoring. Budget for concrete anchor bolts or heavy sandbags (50+ pounds each) if you're not installing on grass or dirt.
Wind ratings get exaggerated by manufacturers. A tent rated for 60 mph winds might handle that speed in ideal conditions with perfect anchoring, but real-world performance usually disappoints. Add guy lines at mid-height points to prevent frame flex during storms, similar to how proper motorcycle mount dampeners prevent vibration damage to electronics. Extra tie-down points cost nothing but dramatically improve stability.
Estimated cost: $400-1,200 depending on size and quality.
8. Portable Carports With Anchoring Systems
Carport-style shelters offer more headroom and workspace than bike-specific tents. You can walk around your bike comfortably, which makes maintenance and cleaning significantly easier.
Frame construction starts at 1.5-inch diameter tubing minimum. Smaller tubing flexes too much under snow load or wind pressure. Wall thickness matters as much as diameter; look for 18-gauge steel or thicker. Thin-wall tubing dents easily and weakens the entire structure.
Fabric weight determines longevity. Budget builds use 12-mil polyethylene that lasts 2-3 years before UV damage makes it brittle. Reinforced polyester costs more but survives 5-7 years in full sun. Do the math on replacement costs before choosing the cheapest option.
Sidewall options usually sell separately, which frustrates buyers who assume they're included. Sidewalls transform a carport into an enclosed shelter that blocks wind-driven rain and reduces theft visibility. Even partial sidewalls (covering two or three sides) provide substantial improvement over open structures.
Anchoring determines whether your shelter survives the first storm. Auger anchors for grass twist deep into soil and resist pullout. Concrete anchor bolts for pavement require drilling, but they're the only reliable option for hard surfaces. Weighted leg systems work for surfaces you can't penetrate, but you need serious weight (100+ pounds per leg) to prevent movement.
I'm not exaggerating here. A 10x20 carport presents 200 square feet of surface area that wind pushes against. Proper anchoring isn't optional unless you want to watch your shelter tumble across the yard with your bike inside.
Snow load ratings matter even in mild climates. Heavy, wet snow weighs significantly more than powder. A spring snowstorm in a region that rarely sees snow can collapse a shelter rated for light loads. Check ratings against worst-case scenarios for your area, not typical conditions.
Replacement cover plans make sense for structures you intend to use for years. Fabric degrades faster than frames, so having a known replacement source prevents the frustration of discovering your shelter model was discontinued when you need a new cover.
9. Reinforced Fabric Shelters
These split the difference between tents and permanent structures. Rigid frames provide stability while fabric covers keep costs and weight manageable.
Powder-coated steel frames resist rust better than painted options. Paint chips and exposes bare metal to moisture. Powder coating bonds at a molecular level and flexes with the metal instead of flaking off. The upfront cost difference is minimal compared to frame replacement costs when rust compromises structural integrity.
Triple-layer roof construction justifies higher prices in wet climates. The outer layer blocks UV, the middle layer provides waterproofing, and the inner layer manages condensation. Single-layer roofs work in dry climates but fail quickly where humidity and rain are constant.
Ripstop fabric technology prevents small tears from spreading. A branch puncture or sharp object creates a small hole instead of a growing rip. Matters during storms when debris impacts your shelter. Regular fabric tears completely; ripstop contains the damage.
Foundation options include gravel, grass, or concrete, but level ground is mandatory. Even a few degrees of slope causes water pooling and stress on the frame. Spend time on ground prep before assembly. Shimming or adjusting after installation never works as well as starting with a proper foundation.
Door configurations affect daily use more than you'd expect. Roll-up doors provide wide openings but wear out faster than zippered versions. Zippered doors last longer but take more time to open and close. Rigid doors offer the best weather sealing but add weight and cost. Match door style to how frequently you'll access your bike.
Assembly takes 4-6 hours for first-time setup with two people. Subsequent setups go faster once you understand the frame logic, but yeah, it's not a 30-minute job. Plan accordingly and don't start assembly right before a storm.
Ventilation features include mesh panels and adjustable vents. Without airflow, interior temperatures climb rapidly in summer and condensation builds in winter. Adjustable vents let you balance weather protection with air circulation based on current conditions.
DIY and Budget-Conscious Builds: When You'd Rather Make It Yourself
Some of you are already planning to build your own. I respect that. Here's what actually works versus what looks good on YouTube and fails in six months.
Be honest about your skills and available time before starting. A weekend project that becomes a month-long ordeal kills enthusiasm and often results in abandoned half-finished structures.
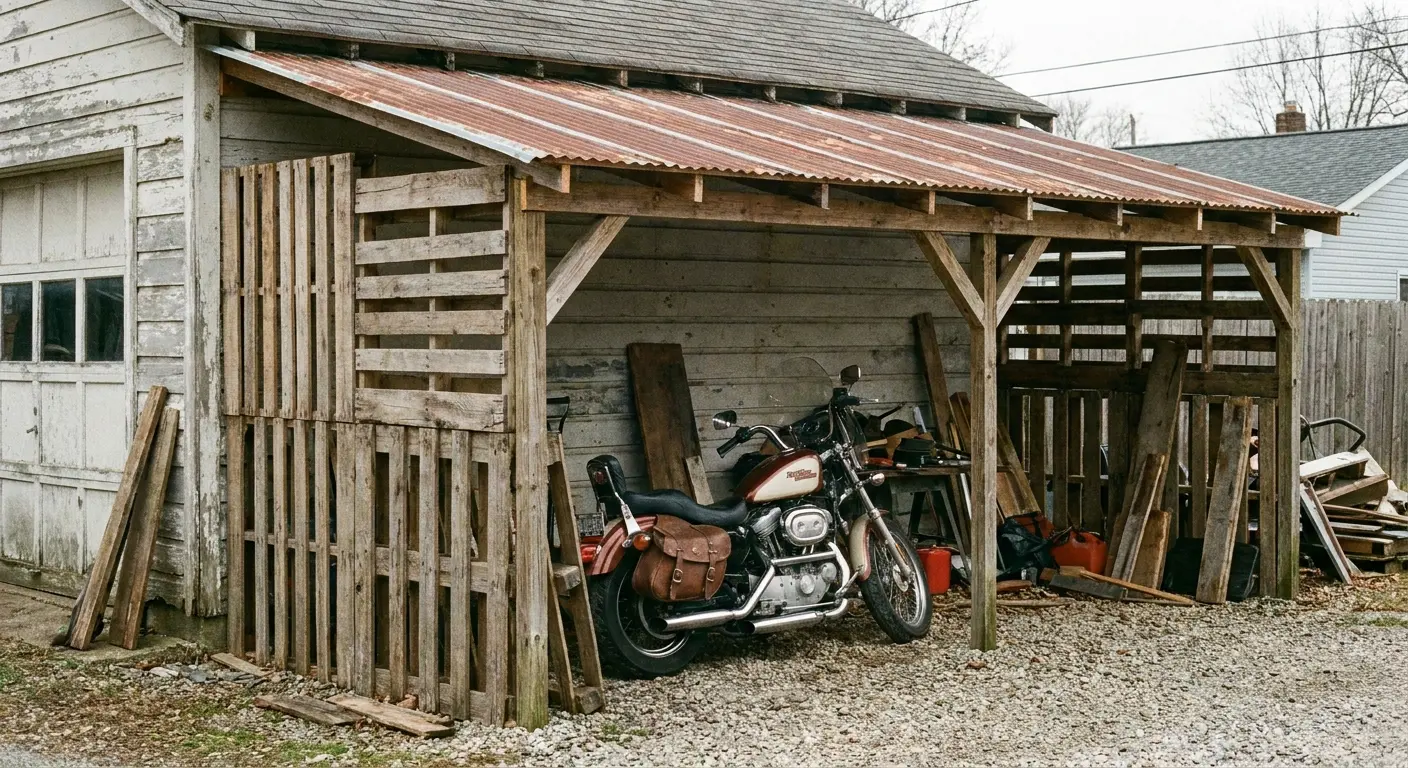
10. Pallet Frame Lean-To Structures
Pallets offer free or cheap structural lumber if you know what to look for. Industrial suppliers use hardwood pallets that outlast softwood versions from retail stores. Avoid any pallet stamped with "MB," which indicates methyl bromide treatment. You don't want those chemicals near your bike or in your breathing space.
Disassembly requires a reciprocating saw or crowbar and patience. Pallet nails don't pull easily, so cutting them flush often works better than trying to extract them. Reclaimed boards won't be perfect, but they're functional for framing.
Lean-to construction uses an existing wall as one side, which cuts materials and labor in half. Attach a ledger board to your house or garage wall using lag bolts into studs. This board supports one side of your roof while posts support the other.
Roof pitch needs minimum 3:12 slope for water runoff. Flatter roofs pool water and leak. Steeper roofs shed water better but require more materials for the same covered area. A 3:12 or 4:12 pitch balances efficiency with protection.
Corrugated metal roofing installs quickly and lasts decades. Overlap panels by at least one corrugation and seal with roofing screws that include rubber washers. The washers create watertight seals that prevent leaks at fastener points.
Waterproof the ground with landscape fabric and gravel. Fabric prevents weed growth and helps drainage. Three to four inches of gravel creates a stable surface that doesn't turn muddy. Leave a gap at ground level between gravel and your structure's bottom for airflow. This prevents moisture from being trapped against wood components.
Estimated cost: $150-300 depending on roofing material. Time investment: one weekend for someone comfortable with basic tools.
11. PVC Pipe Storage Frames
PVC works for temporary or portable solutions. Schedule 40 vs. schedule 80 makes a real difference. Schedule 80 has thicker walls that prevent flex under tarp weight and wind pressure. The cost difference is about 30%, but the performance gap is substantial.
Joint options determine whether your frame is permanent or portable. Slip fittings with PVC cement create strong permanent connections. Threaded fittings allow disassembly, which matters if you need to move or store the frame seasonally. Threaded connections cost more and add bulk at joints, but the flexibility justifies both.
UV-resistant spray paint extends PVC life outdoors. Untreated PVC becomes brittle after a year of sun exposure. A few coats of UV-resistant paint (available at hardware stores) adds years of life for minimal cost.
Hoop-style frames work best for single bikes. Create arches that span over your bike, then connect them with horizontal runs. The curved shape sheds water and provides clearance for handlebars and windscreens.
Stable bases prevent tipping. Flanges bolted to plywood squares create wide footprints that resist movement. Weight or stake these bases depending on your surface. Concrete or asphalt needs weights; grass or dirt allows stakes.
Tarp attachment methods make or break these builds. Bungee cords create stress points that tear grommets. Ratchet straps work better but need protective padding where they contact tarps. Consider adding PVC clips (short pieces of pipe split lengthwise) that grip tarps without punctures, similar to how motorcycle perch mounts use secure attachment systems for reliable performance.
Wind and snow limitations are real. PVC frames handle light snow but collapse under heavy loads. Wind can lift poorly anchored structures. These work for mild climates or temporary protection, not harsh winters or storm-prone areas.
Estimated cost: $75-150 for a single-bike frame. Time investment: 3-4 hours including planning and cuts.
12. Repurposed Shipping Container Conversions
Okay, shipping containers are actually sick for this. Yeah, they're expensive and a pain to deliver, but once you've got one set up? It's basically a vault. I love these things.
Delivery logistics are the first hurdle. You need level ground and clearance for the delivery truck's tilt bed. Measure access routes and verify the truck can navigate your property before ordering.
Container sizes affect capacity and cost. Twenty-foot containers fit two bikes with room for gear. Forty-foot versions accommodate four bikes or create workshop space. One-trip containers cost more but avoid rust and dents that plague used containers. Inspect used containers carefully for holes, rust-through, and structural damage before accepting delivery.
Essential modifications start with access. Standard container doors are on one end, which works poorly for motorcycle storage. Cutting and framing a roll-up door or double doors on the long side improves access dramatically. This requires cutting torch or plasma cutter, steel framing skills, and proper door hardware.
Ventilation prevents interior temperatures from hitting 120°F+ in summer. Roof vents or louvers allow hot air to escape while keeping rain out. Without ventilation, your container becomes an oven that damages plastics, rubber, and electronics.
Insulation options include spray foam or rigid foam board. Spray foam provides superior coverage but reduces interior space and costs more. Rigid foam board gives you control over thickness and costs less, but installation takes longer and requires fastening to container walls.
Foundation needs include support at corners and center. Containers need these support points to prevent floor sagging under weight. Concrete blocks work for temporary setups; poured footings provide permanent solutions.
Local regulations vary wildly. Some municipalities classify containers as temporary structures, others as permanent buildings requiring permits. Check before delivery because removing a non-compliant container costs as much as delivery.
Estimated cost: $2,000-4,000 for container plus modifications. Time investment: one weekend for basic modifications, longer for electrical or extensive interior work.
13. Wooden A-Frame Covers
A-frame designs provide overhead protection with minimal footprint. Two-by-four framing works for most builds. Use pressure-treated lumber for ground contact, standard framing lumber for upper structure.
Peak height calculation starts with your bike's tallest point. Measure to windscreen or mirror tops, then add 6 inches minimum. Cramped spaces make it difficult to cover or uncover your bike without bumping components.
Roof covering options depend on permanence. Plywood sheathing with shingles creates durable permanent roofs. Corrugated plastic panels work for lighter-weight versions that you might move occasionally. Metal roofing falls between these options for cost and weight.
End-wall construction affects airflow and access. Fully enclosed ends provide maximum weather protection but trap moisture without ventilation. Open ends allow airflow but reduce protection from wind-driven rain. Partial end walls (covering the bottom half) balance both concerns.
Anchoring methods vary by perman ence needs. Dig post holes 18 inches deep, fill with gravel, and tamp for permanent installations. This provides stability without concrete. Adding skids or small wheels makes covers movable, which helps if you need to access the ground underneath or relocate the structure.
Ridge vents prevent moisture buildup in enclosed designs. Hot, humid air rises and needs an exit path. Without vents, condensation forms on the interior roof surface and drips onto your bike.
Estimated cost: $200-400 depending on size and materials.
14. Tarp and Rebar Ground Systems
Ground systems work for emergency protection or absolute minimum budget. Drive rebar into the ground at angles to create tension that holds tarps taut. Angled placement (about 45 degrees) provides better holding power than vertical stakes.
Proper tarp selection matters. Look for reinforced corners and rust-resistant grommets. Cheap tarps tear at grommets within weeks. Heavy-duty tarps with reinforced edges last months or even a full season with proper care.
Layering techniques improve protection. Bottom tarp acts as ground moisture barrier, top tarp as rain shield. Your bike sits between layers. This prevents ground moisture from wicking up while blocking rain from above.
Airflow prevents condensation even in simple setups. Drape tarps to create peaks and valleys that shed water while allowing air circulation underneath. Flat tarps trap moisture and create condensation problems.
Prevent tarp contact with painted surfaces using pool noodles or foam pipe insulation as spacers. Tarps that rest against your bike trap moisture and can mar paint finishes. Spacers maintain gaps for airflow.
This is truly temporary storage for weeks or months, not years. Wind and UV exposure eventually win. Tarps tear, rebar works loose, and you're replacing components regularly. But for emergency situations or very short-term needs, it beats nothing.
Estimated cost: $30-75. Time investment: 1-2 hours for setup.
Specialized Storage: For Bikes That Need More Than Basic Cover
Alright, we're deep in the weeds now. If you're still reading, you either really care about storage or you're procrastinating at work. Either way, here are options for specific situations.
Limited floor space, multiple bikes, or quick-access requirements need different approaches. These solutions solve specific problems rather than providing general protection.
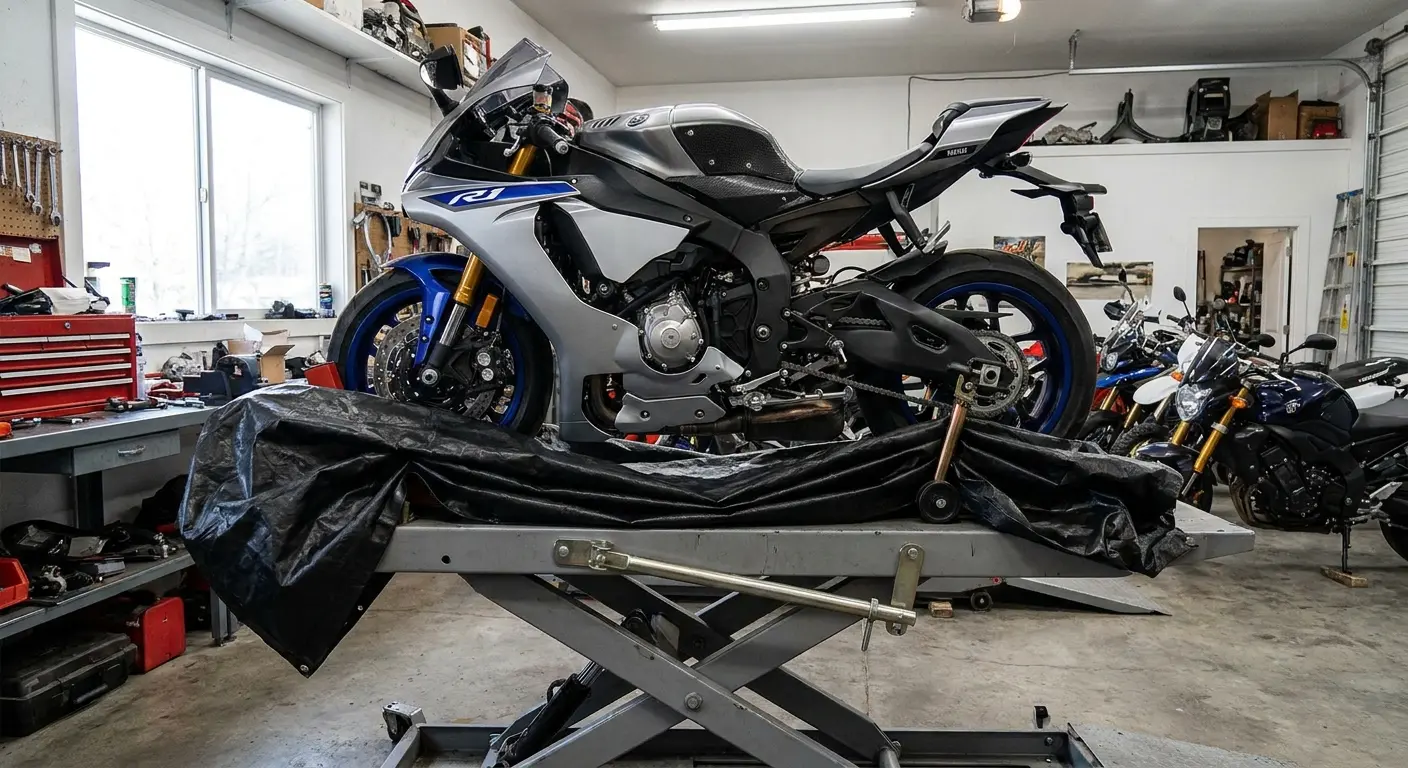
15. Motorcycle Lifts With Integrated Covers
Lifts with covers serve double duty. Elevate bikes for maintenance while providing weather protection. This combination makes sense for riders who work on their own bikes and need storage.
Lift types include hydraulic, pneumatic, and electric. Hydraulic lifts use foot pumps and work anywhere without power requirements. Pneumatic versions need air compressors but lift faster. Electric lifts offer push-button convenience at the highest cost.
Weight capacity verification matters. Most lifts handle 1,500 pounds, but verify against your bike's wet weight plus any accessories. Cruisers and touring bikes with luggage can exceed standard ratings. Check specs carefully before buying.
Safety features separate quality lifts from dangerous ones. Locking mechanisms prevent accidental lowering while you're working underneath. Wheel chocks prevent bikes from rolling off during lifting or lowering. These aren't optional extras; they're essential safety components.
Power requirements vary. Most residential lifts run on standard 110V outlets. Commercial-grade models might need 220V, which requires dedicated circuits and potentially an electrician. Verify power specs match your garage setup before ordering.
Adjustable height positions make maintenance easier. Being able to stop the lift at different heights means you can work at comfortable levels whether you're changing oil, adjusting chain tension, or cleaning wheels.
Cover materials determine longevity. Marine-grade vinyl resists UV damage and mildew better than standard polyester. The cost difference is $100-200, but marine-grade covers last years longer in garage environments with temperature and humidity fluctuations.
Ventilation features in covers prevent moisture buildup. Screened vents allow airflow while blocking dust and pests. Without vents, you're creating a moisture trap that promotes corrosion on metal components.
You're looking at $800 to $2,500 here, maybe more if you want the fancy electric lift instead of the foot-pump hydraulic one. Worth it? Depends on whether you actually work on your bike or just like the idea of working on your bike. I'm not judging. I bought a lift and used it twice before realizing I hate doing my own maintenance.
16. Wall-Mounted Vertical Storage Racks
Vertical racks reclaim floor space by storing bikes at angles or fully vertical. Works in cramped garages where floor space is premium real estate.
Weight distribution requires proper installation. Racks must attach to wall studs, not drywall. Drywall anchors can't handle motorcycle weight safely. Use a stud finder and lag bolts that penetrate at least 2 inches into solid wood.
Wheel cradles prevent tire deformation during long-term storage. Flat spots develop when bikes sit in one position for months. Cradles distribute weight across the tire's circumference instead of concentrating it on one point.
Bikes with low fuel levels store more safely vertically. Full tanks create pressure on fuel system components when the bike is tilted. Keeping fuel at quarter-tank or less reduces this stress.
Installation requires 8-foot ceiling clearance minimum. Measure from floor to ceiling, then account for your bike's height and the rack's dimensions. Tight clearances make loading and unloading difficult and increase the chance of ceiling damage.
Loading procedures take practice. Front wheel goes in first, then you pivot the bike upward using leverage rather than pure strength. The mechanical advantage makes this manageable for one person, but having help for the first few times builds confidence.
This solution works better for lighter bikes. Sport bikes and standards under 500 pounds are ideal candidates. Heavy cruisers or touring bikes create too much stress on wall mounting points and are harder to maneuver into position.
Some riders never feel comfortable with bikes hanging on walls. The engineering might be sound, but if you're constantly worried about your bike crashing down, this option creates more stress than it solves. Be honest with your comfort level.
Estimated cost: $300-800 for quality racks rated for motorcycle weight.
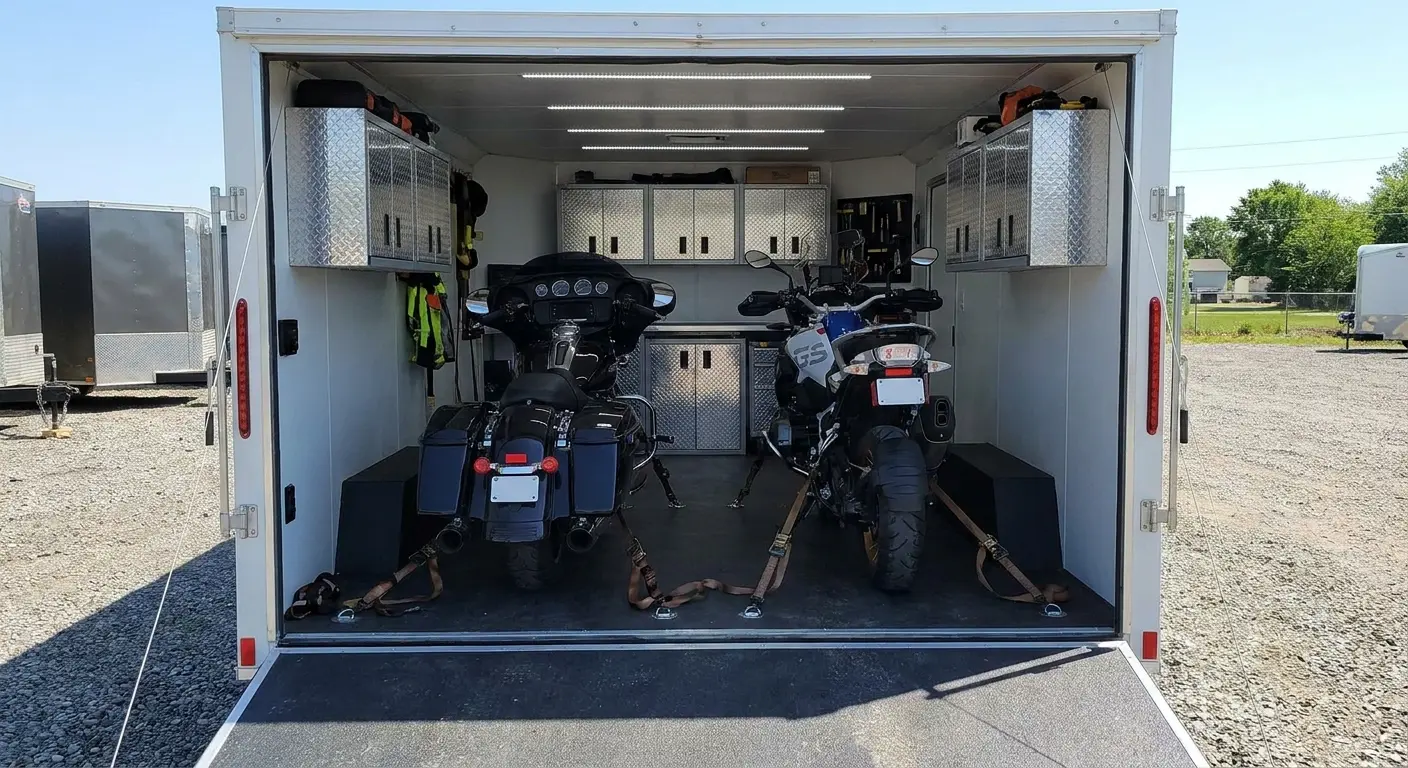
17. Enclosed Trailers as Mobile Garages
Enclosed trailers function as both storage and transport. This dual purpose justifies the investment for riders who travel to events or need to relocate bikes seasonally.
Trailer sizing starts at 6x12 for single bikes. This provides enough length and width for most motorcycles plus minimal gear. Seven-by-fourteen accommodates two bikes or one bike with substantial equipment storage.
V-nose designs provide extra interior space without increasing overall trailer length. The angled front creates a wedge that adds cubic footage for storage. Flat-front versions tow more efficiently due to better aerodynamics but sacrifice interior room.
Aluminum frames resist rust better than steel in wet climates. Steel frames cost less initially but require more maintenance to prevent corrosion. If you're near coastal areas or regions with heavy road salt use, aluminum justifies the premium.
Interior features transform trailers from transport boxes into functional storage. D-rings welded to walls and floors provide tie-down points. Wheel chocks (permanent or removable) secure bikes during transport and storage. Roof vents prevent interior moisture buildup that causes mildew and corrosion.
Shelving or cabinets turn dead wall space into gear storage. Helmets, riding gear, tools, and spare parts stay organized and accessible. Custom interior builds cost extra but maximize trailer utility.
Security considerations matter for mobile storage. Side doors add convenience but create weak points for theft. Rear ramp doors with bar locks offer better security. Some trailers include both; prioritize which matters more for your situation.
Trailer storage requires parking space. Verify you have room before buying. Some neighborhoods restrict trailer parking, and HOAs often have specific rules about visible trailers on properties.
Registration requirements vary by location. Some states require trailer registration, others don't below certain weight thresholds. Check local laws to avoid surprises.
Estimated cost: $3,000-8,000 for new trailers, $1,500-4,000 for used.
18. Multi-Bike Stackable Systems
Stackable systems use vertical space to store multiple bikes in a single-bike footprint. Collectors and multi-rider households benefit most from these space-efficient solutions.
How these systems work: lower bike stays on the ground, upper bike(s) lift on rails or platforms. The mechanism varies by manufacturer, but the concept remains consistent across designs.
Weight limits per level require verification. Your heaviest bike needs to fit the system's rating with safety margin. Don't assume all levels handle the same weight; upper platforms often have lower capacity than ground-level positions.
Installation requirements differ between floor-mounted and ceiling-hung systems. Floor-mounted versions need concrete anchoring with expansion bolts. Ceiling-hung systems require solid joists or beams capable of handling combined bike weight plus equipment weight.
Operation methods include manual crank systems, electric lifts, and hydraulic mechanisms. Manual cranks cost less but require physical effort. Electric lifts offer push-button convenience at higher prices. Hydraulic systems fall between these for cost and ease of use.
Safety features include locking pins at multiple height positions. These prevent accidental lowering if lifting mechanisms fail. Emergency lowering mechanisms allow controlled descent if power fails on electric systems.
Proper wheel chocking on each level prevents lateral movement. Bikes need to stay centered on platforms during lifting and storage. Side-to-side shift can unbalance the entire system.
Access patterns require planning. The bottom bike is always most accessible. Store your most-ridden bike there. Less frequently used bikes go on upper levels. Switching this around means lowering and raising bikes every time you want to ride, which gets old quickly.
Clearance requirements typically need 10-12 feet of vertical space. Measure carefully before ordering. Standard garage ceilings are 8-9 feet, which isn't sufficient for most stackable systems.
This solution appeals to serious collectors or households with multiple riders. The upfront cost requires commitment to the hobby. Casual riders with two bikes might find this overkill.
Estimated cost: $2,000-5,000 depending on capacity and automation level.
Staying Connected to Your Ride (Even in Storage)
Riders obsess over protecting their bikes but ignore the electronics and accessories that suffer during storage months. Phone mounts, GPS units, and other tech accessories face damage from temperature fluctuations and humidity.
Temperature swings cause adhesives to break down. Mounts that stick perfectly in summer become unreliable after winter storage. Mounting hardware develops corrosion that makes spring removal difficult or impossible. You're left with stuck bolts or damaged threads.
Removing accessories before storage extends their lifespan. Store them in climate-controlled spaces where temperature and humidity stay consistent. This prevents the degradation that occurs in unheated garages or outdoor sheds.
Rokform's motorcycle handlebar mount systems use RokLock technology that makes removal and reinstallation simple. This matters when you're cycling between storage and riding seasons. Quick-release mechanisms mean you can pull your mount off in minutes rather than struggling with corroded hardware in spring.
Keeping accessories accessible during storage lets you use them elsewhere. That phone mount works on mountain bikes, cars, or anywhere else you need secure phone attachment. Why let it sit idle for months when it could serve multiple purposes?
Electronics hate moisture. Condensation forms inside sealed devices when temperatures fluctuate. This damages circuits and corrodes connections. Even if your bike is protected, accessories exposed to garage conditions suffer.
Whether you're preparing your cabin motorcycle for winter or storing your daily rider, proper accessory management extends equipment life. Pull mounts, GPS units, and communication devices off the bike. Store them indoors where conditions stay stable.
Come spring, you're reinstalling fresh accessories on a protected bike rather than dealing with corroded mounts and damaged electronics. The few minutes spent removing gear in fall saves hours of troubleshooting and replacement costs when riding season returns.

Final Thoughts
If I had to choose right now, today, for most riders? Wood shed with proper ventilation (#2) or climate-controlled rental (#4). Everything else is either too expensive, too complicated, or too situation-specific. Pick one of those two and stop overthinking it.
Your climate, property situation, budget, and riding patterns determine which solution actually works for you. A rider in Arizona faces different challenges than someone in Minnesota. Apartment dwellers need different approaches than property owners.
The "perfect" storage setup might not exist for your current situation. That's fine. Imperfect storage that you'll actually maintain beats an ideal setup that becomes out-of-sight, out-of-mind. Checking tire pressure monthly, running the engine periodically, and inspecting for pests matters more than having the fanciest structure.
Some riders need year-round access for weekend rides during mild winters. Others are parking bikes for six months of snow and ice. These scenarios require completely different approaches. Don't let someone else's situation dictate your solution.
Pick the method that matches your real constraints, not the one that sounds best in theory. A $200 DIY build you'll use consistently provides better protection than a $5,000 climate-controlled unit you visit twice per season.
Start small if needed. A quality cover and proper fuel stabilizer beats leaving your bike exposed while you save for a shed. Upgrade as your situation allows rather than waiting for perfect conditions that might never arrive.
Your bike got you through this season. Give it the protection it deserves until next season starts. The investment pays back in reliability, longevity, and the peace of mind that comes from knowing your ride is protected.

