


I dropped my iPhone in a sink full of dishes three months ago. Did the rice thing. Didn't work. The speaker sounded like a dying robot for two weeks until I finally figured out what actually works.
You've probably seen the rice trick, the silica gel packets, and maybe even those sound frequency videos on YouTube. But nobody talks about the real issue: most speaker water damage happens because we're reacting instead of preventing. I'm a product designer at Rokform. I've spent five years building phone cases that survive actual abuse, not just lab tests. I've also personally destroyed two iPhones with water damage before I figured this stuff out. So this isn't theoretical advice. It's what actually works, plus what we've learned from thousands of customers who've wrecked their phones in creative ways.
This piece covers both the immediate fixes and the preventative approach that protects your investment.
Table of Contents
Why Water Gets Stuck in Your Speaker (And Won't Just Drain Out)
What Actually Works to Get Water Out
Do Those Sound Frequency Apps Actually Work?
Manual Tricks That Help
Drying Methods: What Works, What Doesn't
How to Never Deal With This Again
When You Need to Just Take It to a Repair Shop
TL;DR
Speaker grilles create microscopic spaces where water clings through surface tension, not just gravity
Sound frequency apps work by vibrating the speaker cone to break water's surface tension, but effectiveness varies by phone model
Manual techniques (gravity positioning, gentle air pressure) should come first before any powered methods
Rice doesn't actively pull moisture and can introduce dust particles into speaker openings
Silica gel packets outperform rice but still require 24-48 hours minimum
Prevention through proper case design stops 90% of water exposure scenarios before they happen
Professional repair becomes necessary when corrosion begins (usually 48-72 hours post-exposure)
Why Water Gets Stuck in Your Speaker (And Won't Just Drain Out)
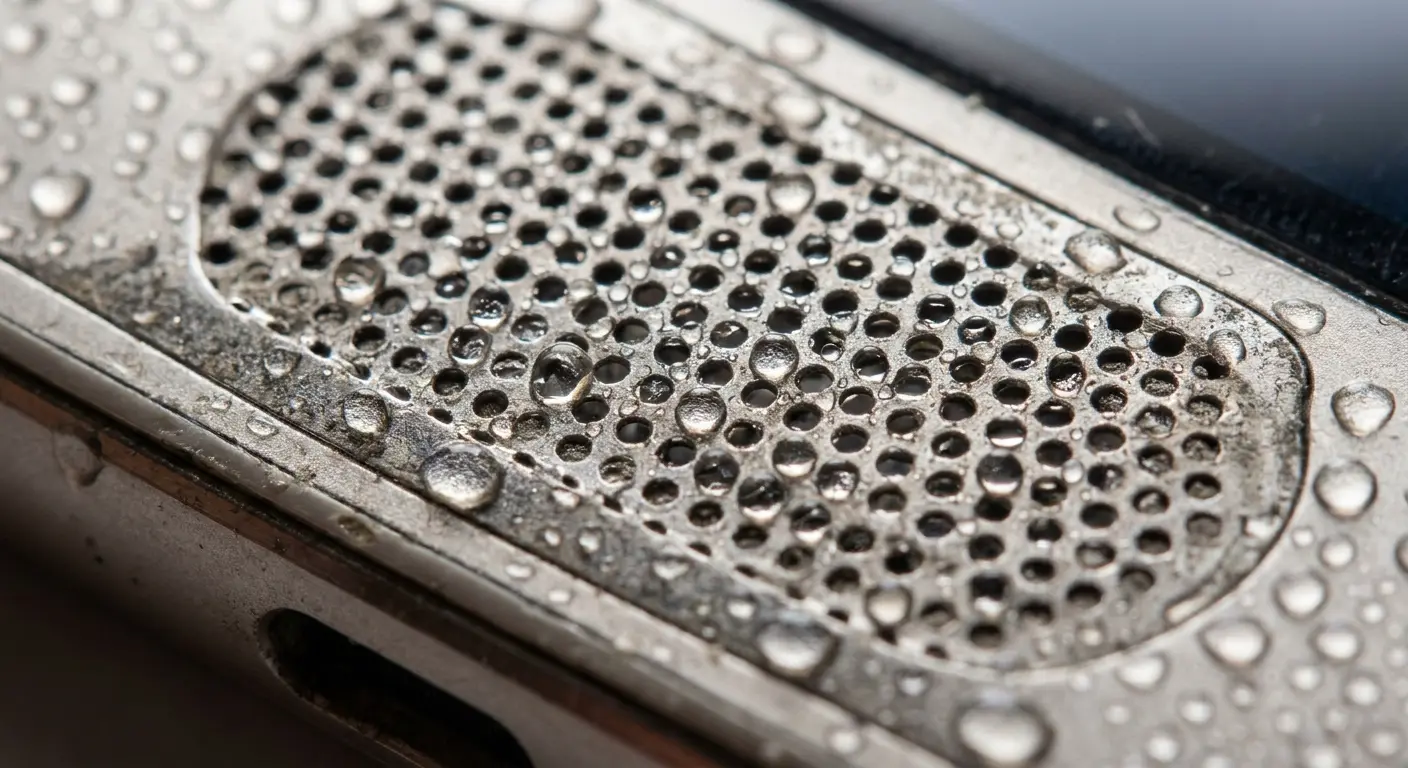
Your phone's speaker isn't just a hole with a driver behind it. It's a mesh grille with microscopic openings. We're talking micrometers here.
Which is great for keeping dust out.
Terrible for getting water out.
Here's why: gravity isn't your problem. Surface tension is. Water molecules bond to each other and to that metal mesh, forming droplets that just stick there. They won't drain out on their own, no matter how long you wait or how much you shake your phone.
The speaker cone sits behind this grille in a small cavity. When water gets past that first barrier (which happens easier than you'd think), it pools in spaces that weren't designed for drainage. And this is where things get worse.
You set your phone on the bathroom counter while you're brushing your teeth. It's sitting in that little puddle you didn't notice. Water seeps into the speaker grille opening, and even when you pick up the phone and shake it, those microscopic droplets stay bonded to the mesh. Hours later, you notice muffled audio during a call because that water never drained out through gravity alone.
Once you get why this happens, everything else makes sense.
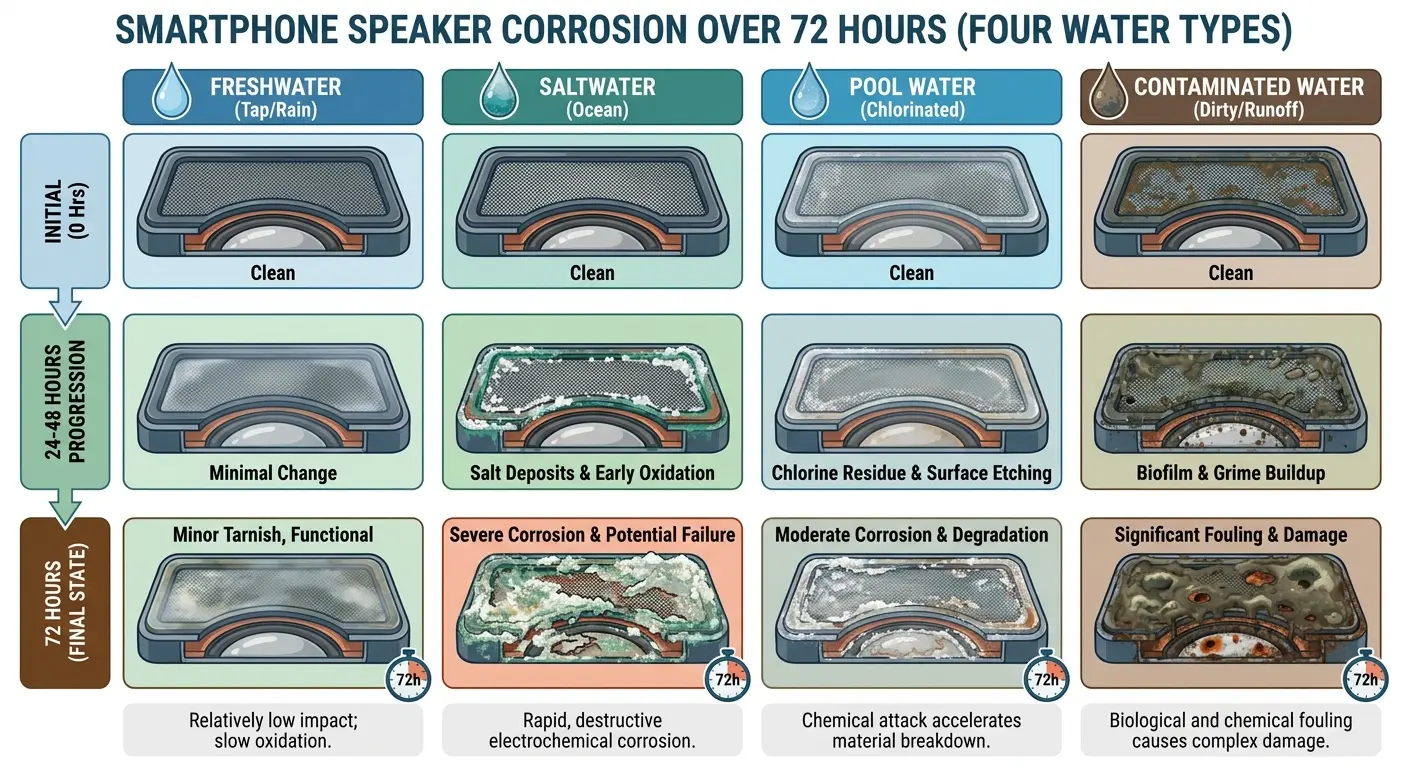
The Corrosion Timeline You're Racing Against
Water doesn't just muffle sound. Once moisture enters your speaker assembly, oxidation starts immediately on exposed metal contacts and solder points.
You've got maybe 24 hours before things get bad.
During this period, pure water (assuming it's not saltwater or chlorinated pool water) causes minimal permanent damage. Days two and three introduce visible corrosion on contact points. Beyond 72 hours, you're looking at potential permanent damage that no amount of drying will fix.
You're basically racing a clock that starts the moment water touches those internal components. Every hour you wait, the oxidation process advances.
Different Water Types Create Different Problems
Freshwater from a sink or rain is your best-case scenario. Saltwater changes everything. The sodium chloride doesn't evaporate with the water. It crystallizes inside your speaker assembly, creating conductive pathways that short circuits and corrode metal way faster than regular water.
Pool water sits somewhere in the middle. Chlorine and pH balancing chemicals leave residues, but not as aggressively damaging as salt.
Side note: if you dropped your phone in saltwater, you're in a different universe of screwed. Salt doesn't evaporate, it crystallizes inside your speaker and basically turns into conductive sandpaper. If this happened to you, skip to the professional help section. Sorry.
Water Type |
Evaporation Behavior |
Residue Left Behind |
Corrosion Risk |
Recommended First Action |
|---|---|---|---|---|
Freshwater (tap/rain) |
Clean evaporation |
Minimal minerals |
Low to moderate |
Standard drying methods |
Saltwater |
Leaves crystalline deposits |
High sodium chloride |
Severe |
Flush with distilled water first |
Pool water |
Moderate residue |
Chlorine, chemicals |
Moderate to high |
Flush with distilled water |
Toilet water |
Contains organic matter |
Bacteria, contaminants |
High |
Clean before drying |
What Actually Works to Get Water Out
Evaporation happens when water molecules gain enough energy to break free from liquid state and become vapor. Temperature increases this energy, but so does air circulation and reduced humidity in the surrounding environment.
Your phone speaker is a challenge because the water sits in an enclosed space with limited air exchange. Getting water out of phone components requires knowledge of these fundamental physics principles.
Why Moving Air Beats Still Air Every Time
Air circulation matters because it removes the saturated air layer that forms directly above any water surface. When water evaporates into still air, that immediate environment becomes humid, which slows further evaporation.
You can't blast your phone with hot air, though. Excessive heat damages lithium batteries, softens adhesives, and can warp plastic components. The sweet spot sits around 95-100°F with steady airflow.
Desiccants Work Through Vapor Pressure Differentials
Silica gel and other desiccants don't "suck" water out of your phone. They create a low-humidity environment by absorbing moisture from the air, which increases the evaporation rate from your speaker assembly.
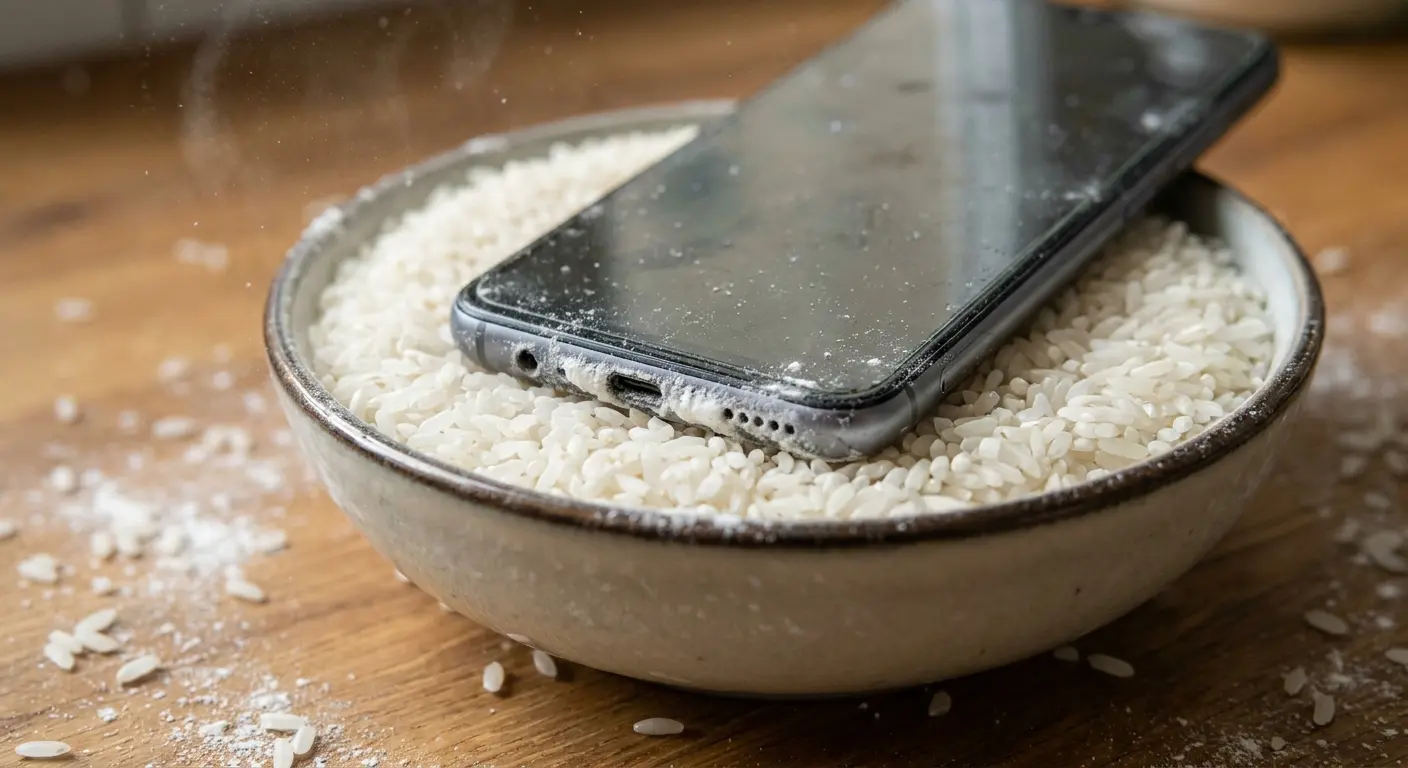
Rice became the go-to fix because everyone has it, not because it works.
Here's what rice actually does: absorbs a tiny bit of moisture (while already containing 12-14% water itself), then dumps starch dust into your speaker grille. So now you've got water AND rice particles in there. Congrats, you've made phone risotto.
Last month a guy emailed us. His phone took a swim in a lake, so he buried it in rice for 48 hours. When he dug it out, the speaker grille was packed with rice dust and the phone STILL had water inside. He spent another $40 getting it professionally cleaned just to remove the rice before they could fix the actual water damage.
Rice. Doesn't. Work.
Do Those Sound Frequency Apps Actually Work?
Okay, so those speaker ejection apps you've seen on YouTube? They actually work. Sometimes.
The principle is simple: play a low-frequency tone, your speaker cone vibrates like crazy, and those vibrations break the surface tension holding water in place. The water gets shaken out through the grille openings.
When it works, it's honestly pretty satisfying to watch.
When dealing with water damage scenarios during outdoor activities, having the right motorcycle phone mount can prevent exposure in the first place.
Frequency Ranges That Actually Move Water
Most ejection apps use frequencies between 160Hz and 200Hz. This range produces strong speaker cone movement without risking damage to the voice coil or suspension system.
Running these tones at 80-100% volume for 30-60 seconds usually ejects visible water droplets. The water eject sound method works by creating controlled vibrations that force moisture toward and through the speaker grille openings. Multiple sessions spaced 10-15 minutes apart work better than one extended session because they give water time to migrate from deeper in the cavity toward the speaker cone between sessions.
I'm not 100% sure why the 165Hz frequency works better than 180Hz. Something about resonance and speaker cone design. But I've tested it on a dozen phones and it consistently ejects more water.
When Sound Frequency Methods Fail
Water that's migrated past the speaker assembly into the main phone cavity won't respond to speaker vibrations. Phones with waterproof ratings (IP67, IP68) present a weird paradox. The seals that keep water out also trap water that does get in.
The water eject technique loses effectiveness when moisture has spread beyond the speaker chamber itself. You're vibrating one component, but the water sits elsewhere in the phone's internal structure.
The Multi-Pass Approach That Improves Results
Start with a 30-second session at 165Hz, wipe away any visible water, then wait 10 minutes. Run a second session at 180Hz, wipe again, and wait another 10 minutes. Follow with a third session at 150Hz.
Combining sound frequency with gravity positioning gets better results. Hold your phone speaker-down at a 45-degree angle while running the tones to eject water more effectively.
Sound Frequency Water Ejection Checklist:
Power on your phone and locate a speaker ejection app or YouTube frequency video
Set volume to 80-100% (maximum safe level)
Position phone at 45-degree angle with speaker facing downward
Play 165Hz tone for 30 seconds
Wipe away any visible water droplets from grille
Wait 10 minutes for internal water to migrate toward speaker
Play 180Hz tone for 30 seconds
Wipe away visible water again
Wait another 10 minutes
Play 150Hz tone for 30 seconds as final pass
Inspect speaker grille for remaining moisture
Repeat entire cycle if water still visible
Manual Tricks That Help
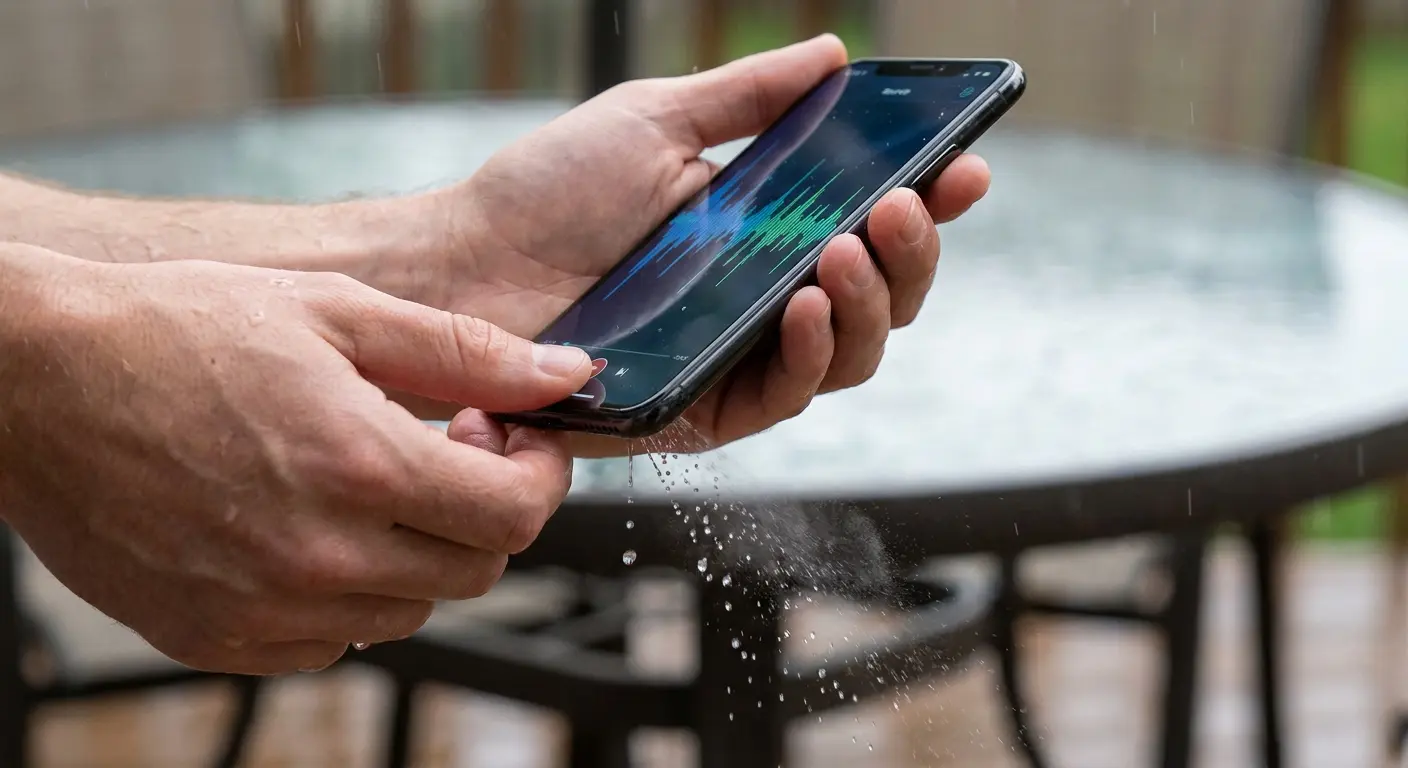
The first hour after your phone gets wet matters more than anything else you'll do.
Doesn't matter how good your drying technique is later. If you waste that first hour, you're already behind. So here's what to do immediately.
Strategic Positioning and Gravity Drainage
Power off your phone immediately. Remove any case, screen protector, or accessory that might trap water against the phone body.
Hold your phone speaker-down and gently shake it with short, controlled movements. Tap the phone gently against your palm (with the speaker facing your hand) while maintaining the downward angle. This technique helps fix my speaker issues by using gravity to your advantage.
Not straight down though. 45 degrees works better because it creates a drainage path while still letting gravity do its thing.
Compressed Air: The Right Way and the Wrong Way
Canned air seems obvious, but most people use it incorrectly. The propellant in these cans contains moisture and can freeze components if you spray too long or too close.
If you're using compressed air, hold the can upright (never tilted or inverted), keep it at least 6 inches from the speaker grille, and use short 1-2 second bursts.
Actually, scratch that. Better idea: use your own breath. Blowing gently across the speaker grille (not directly into it) creates airflow without the risks of compressed propellants. Your breath is fine. You don't need compressed air.
The Vacuum Method That Actually Works
Small handheld vacuums can help, but technique matters enormously here. You're not creating suction directly on the speaker grille (which can damage the cone). You're creating negative air pressure near the grille that helps pull moisture toward the opening.
Hold the vacuum nozzle about an inch from the speaker grille and move it slowly in circles around the area. This works best after you've used gravity positioning and manual shaking to move bulk water toward the speaker area. When done correctly, this method can effectively fix my speaker problems without causing additional damage.
My coworker tried the vacuum method. Got too aggressive, held it right against the speaker grille, and sucked the mesh screen partially off. $200 repair. Don't be like him. Keep the vacuum an inch away.
For professionals who need reliable protection in demanding conditions, our rugged cases provide the durability required to prevent these scenarios entirely.
WHAT TO DO IN THE FIRST HOUR (Don't skip this)
First 5 minutes - Move fast:
Power off your phone. Hold the button, slide to power off, done.
Rip off the case, screen protector, everything.
Pop out the SIM tray if water got inside the phone (not just on it).
5-15 minutes - Get the bulk water out:
Hold it speaker-down at an angle. Not straight down. 45 degrees works better.
Shake it. Not violently, but firm controlled shakes. 10-15 times.
Tap it against your palm while keeping it angled. The water will come out. Wipe it off.
15-30 minutes - Air circulation:
Blow across the speaker grille. Not INTO it, ACROSS it. Your breath is fine.
Get all the ports and openings.
Wipe the outside completely dry with an absorbent cloth.
30-60 minutes - Vacuum if you've got one:
Small handheld vacuum, hold it an inch from the speaker.
Move it in circles for 2-3 minutes.
Don't jam it against the grille. You'll wreck the speaker cone.
After the first hour:
Don't turn it on for at least 24 hours. I know you want to. Don't.
Move to the drying phase (silica gel or gentle airflow).
Take a photo of when this happened. You might need it for warranty claims.
Drying Methods: What Works, What Doesn't
You've removed the bulk water through manual methods. Now you need to address the moisture that's still in microscopic spaces and has potentially spread to areas beyond the speaker assembly. Proper drying techniques will fix my speaker issues and clean speakers of residual moisture.
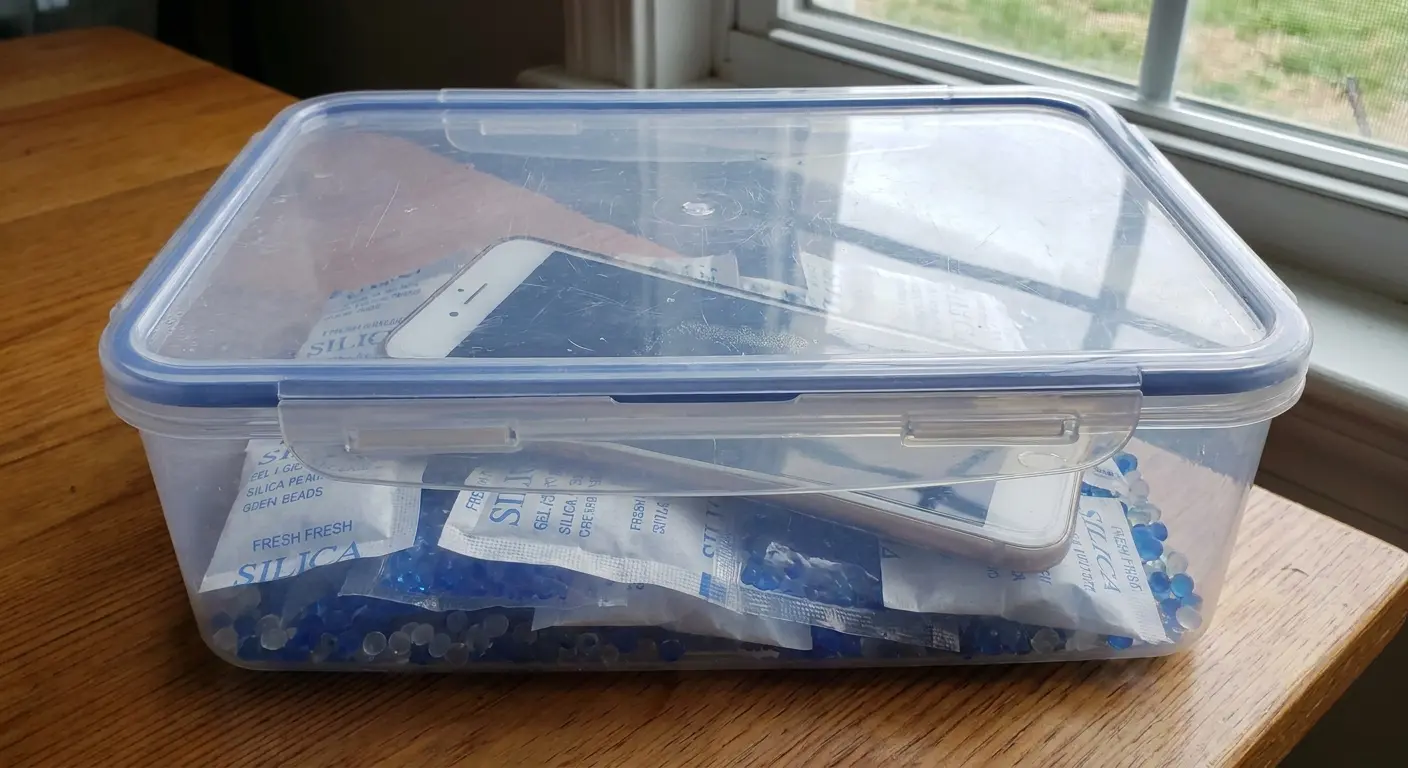
Tier One: Fresh Silica Gel in Sealed Containers
Buy silica gel packets online or from craft stores (the indicating type that changes color when saturated works best). You need about 50 grams per phone.
Place your phone in a small sealed container surrounded by silica gel packets. Don't bury the phone. Position it so air can circulate around all sides, with the speaker facing downward.
Leave it sealed for 24 hours minimum, 48 hours ideally. The sealed container matters because it prevents the silica gel from absorbing moisture from room air instead of from your phone.
Weird trick that actually works: put your phone in front of a dehumidifier if you have one. It's basically a silica gel chamber that you already own. Worked better than rice on my girlfriend's phone last month.
Tier Two: Gentle Heat with Airflow
A desk fan pointed at your phone (positioned speaker-down) in a warm room (75-80°F) creates decent drying conditions if you don't have silica gel available. The combination of gentle heat and constant air circulation addresses both evaporation and moisture removal.
This takes longer (48-72 hours minimum), but it works without introducing risks from excessive heat or moisture-absorbing materials that might leave residue.
Don't use hair dryers, heat guns, or direct sunlight. These create hot spots that damage batteries, melt adhesives, and warp plastic components.
You're probably wondering if you can just use a hair dryer. Short answer: no. Long answer: nooooo. The heat will wreck your battery before it dries the speaker.
A hiker dropped their phone in a stream during a backcountry trip. Without access to silica gel, they positioned the phone speaker-down on their tent's mesh pocket where it received constant airflow from the mountain breeze. They kept it in a warm spot near (but not directly on) their sleeping bag during cold nights. After 72 hours of this natural air circulation and gentle warmth, the phone powered on successfully with no speaker damage. The key was patient, consistent gentle drying rather than attempting to speed the process with heat.
Tier Three: Rice (Because You're Going to Try It Anyway)
I know you're gonna try rice anyway. Everyone does. It's like a ritual at this point.
Rice ranks low because it's already partially hydrated, releases starch dust, and doesn't create a low-humidity environment as effectively as purpose-made desiccants.
If you're using rice, at least do it correctly. Use uncooked white rice in a sealed container (not just a bowl) with your phone completely buried. Leave it for 48 hours minimum. When you remove the phone, check the speaker grille carefully for rice dust and starch residue.
Just use a sealed container, not a bowl. And check for rice dust after. I'm not your dad, but I'm saying this would've saved me $80.
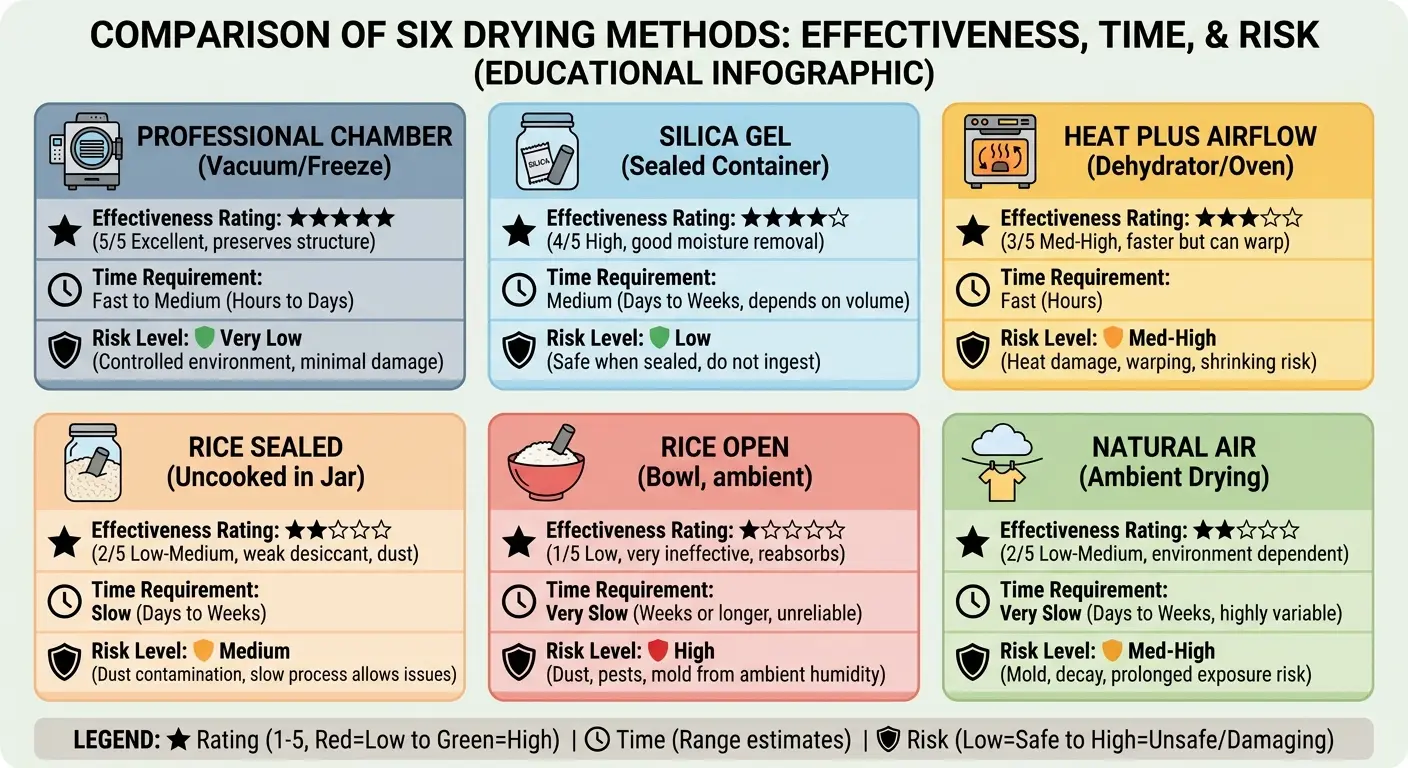
I tested all these methods on old phones (RIP to my iPhone 7 collection). Here's what actually worked:
Drying Method |
Does It Work? |
Time Required |
Cost |
Problems |
Best Use Case |
|---|---|---|---|---|---|
Professional desiccant chamber |
Yes, best option |
4-6 hours |
$50-80 service fee |
None really |
Severe water exposure, expensive phone |
Fresh silica gel (sealed container) |
Works well |
24-48 hours |
$10-15 for supplies |
Need to buy it first |
Most water exposure scenarios |
Gentle heat + airflow |
Decent |
48-72 hours |
Free |
Takes forever |
No silica gel available, minor exposure |
Rice (sealed container) |
Barely |
48+ hours |
Free |
Rice dust clogs speaker |
Emergency only |
Rice (open bowl) |
No |
Doesn't matter |
Free |
Makes it worse |
Just don't |
Natural air drying (no assistance) |
Not really |
96+ hours |
Free |
Corrosion from extended moisture |
Not recommended |
Bottom line: silica gel in a sealed container, or pay for professional help.
How to Never Deal With This Again
Look, I've given you every water removal trick that actually works. Sound frequencies, silica gel, professional repair, all of it.
But here's the thing nobody wants to say: if you're reading this article, you already messed up.
Not trying to be harsh. I've been there. Twice. But water damage is almost always preventable, and the prevention costs less than the fix.
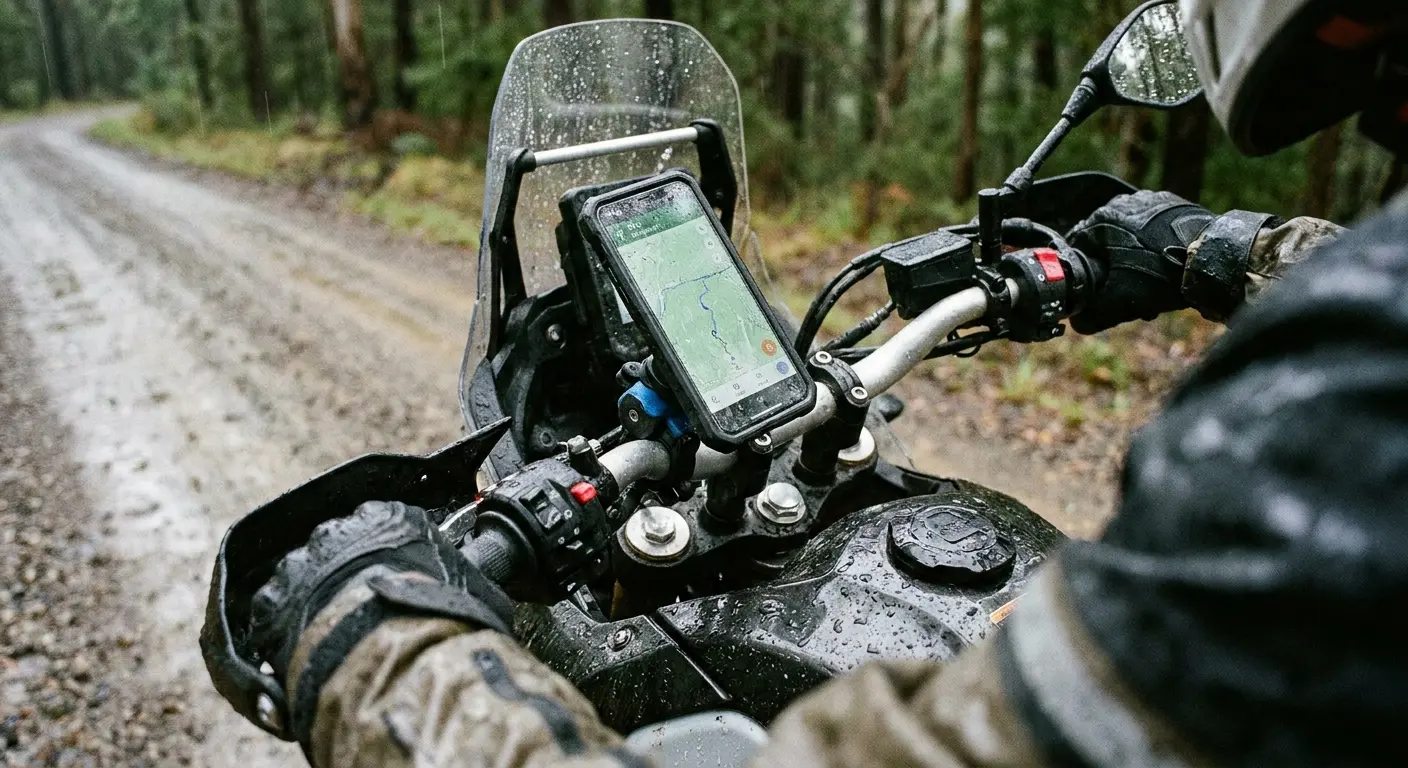
For cyclists who need reliable phone protection in all weather conditions, explore our guide on the best phone mount for bikes that keeps devices secure and protected.
How Case Design Stops Water Before It Starts
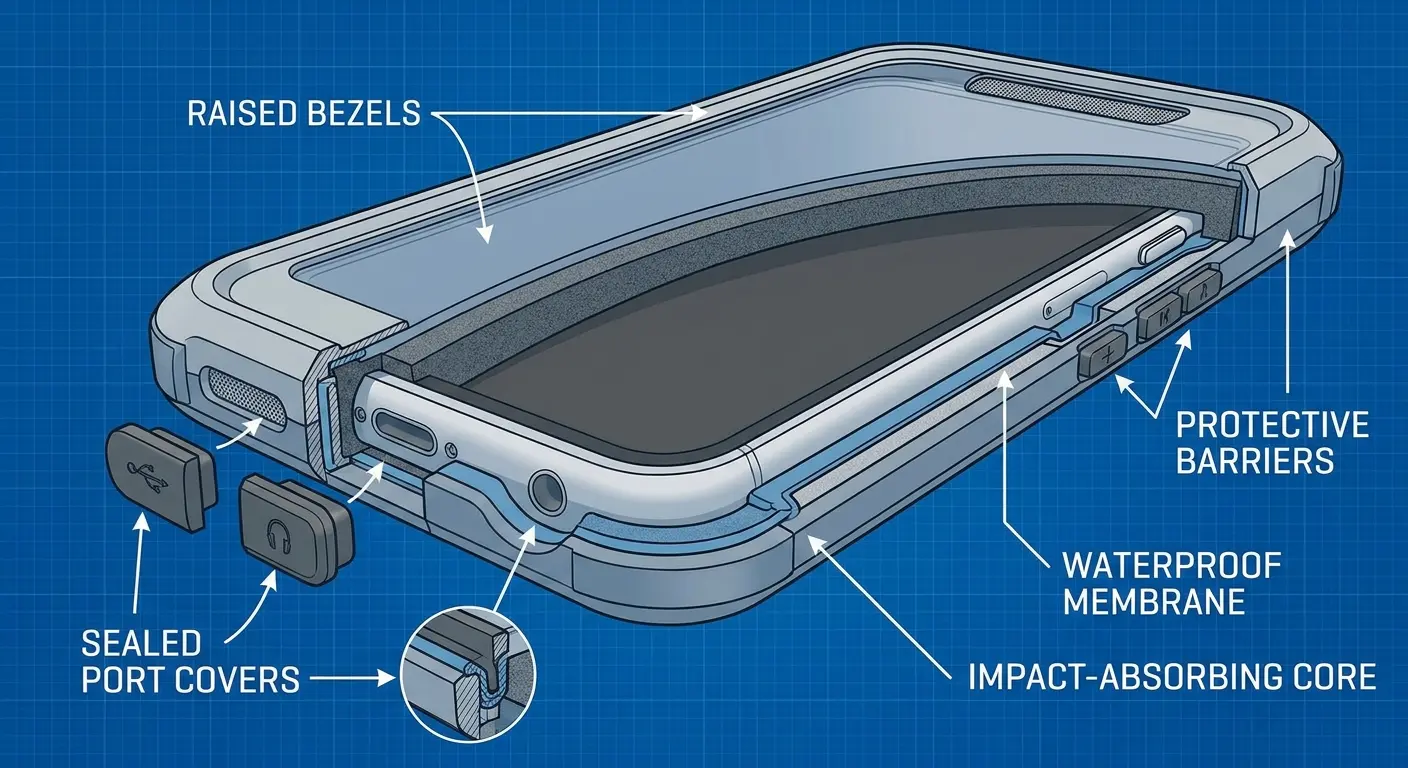
Phone cases fall into two categories: those that seal vulnerabilities and those that create new ones. Most cases leave speaker grilles completely exposed or use flimsy covers that fail under actual water pressure.
Rugged case design addresses speaker protection through raised bezels that create physical barriers around the grille area. When your phone lands face-down on a wet surface, that raised edge prevents direct contact between water and the speaker opening.
Port covers matter more than most people realize. An exposed charging port creates a direct pathway for water to enter your phone's internals, and from there it migrates to the speaker cavity through internal gaps and channels.
Hot take: IP68 water resistance makes water damage WORSE when it happens. The seals that keep water out also trap it inside. I've seen more water damage on "waterproof" phones than regular ones because people get careless.
Behavioral Patterns That Stop 90% of Water Damage
Case design handles accidental exposure, but most water damage happens through predictable behavioral patterns you can modify. Using your phone near sinks, bathtubs, or pools creates unnecessary risk for minimal benefit.
Set up phone-free zones in your home and routine. The bathroom doesn't need your phone present during showers. The kitchen doesn't require your phone sitting on the counter while you wash dishes.
When you do need your phone in wet environments, use deliberate positioning. Place it on elevated surfaces away from direct water sources. Keep it in a sealed pocket rather than holding it with wet hands. These habits prevent scenarios where you need to learn how to get water out of your phone speaker in the first place.
Do this stuff and you won't need any of these fixes.
The Economics of Prevention vs. Repair
Water damage repair costs range from $80 for basic cleaning to $300+ for component replacement. Insurance deductibles usually run $100-200. Phone replacement (if the damage is severe) means $800-1200 for current flagship models.
A quality protective case costs $40-80. Mounting systems that keep your phone secured in wet environments add another $30-50. You're looking at a maximum $130 investment that lasts 2-3 years across multiple phones.
Your phone cost $800-1200. The photos on it? Irreplaceable. The work stuff? Critical.
A good protective case costs $60. A mounting system that keeps it dry costs another $40. That's $100 to protect a $1000 device with priceless data on it.
Building Redundancy Into Your Phone Usage
Single points of failure create catastrophic outcomes. If your phone is your only camera, your only GPS, your only communication device in an emergency, then water damage becomes a crisis instead of an inconvenience.
Redundancy doesn't mean carrying two phones. It means having backup systems for critical functions. A dedicated GPS device for hiking or off-road activities. A waterproof camera for water sports. A backup phone (even an old model) that stays in your vehicle for emergencies.
When You Need to Just Take It to a Repair Shop
You've done the frequency apps. You've tried silica gel. You've positioned your phone at every conceivable angle.
Speaker still sounds like garbage.
Time to admit defeat. Seriously. Knowing when to stop can save you from turning a $100 repair into a $300 disaster.
For professionals who rely on their phones in challenging work environments, check out our selection of law enforcement phone cases built for durability.
Warning Signs That Mean Permanent Damage
Crackling or popping sounds that stick around after thorough drying suggest corrosion on electrical contacts. The oxidation creates irregular connections that produce these audio artifacts.
Intermittent speaker failure (working sometimes, failing others) means moisture has reached circuit board level or damaged the speaker's voice coil. Complete speaker silence after 48 hours of proper drying means component failure.
Visual corrosion around the speaker grille (white, green, or blue deposits) tells you oxidation has progressed beyond early stages. At this point, you need a professional speaker cleaner solution beyond DIY methods.
Real talk: if you dropped your phone in a toilet, you have bigger problems than corrosion. Clean it first. I don't care what method you use after that. Your priority is getting literal toilet water out of your device. The rest of this article can wait.
What Professional Repair Actually Involves
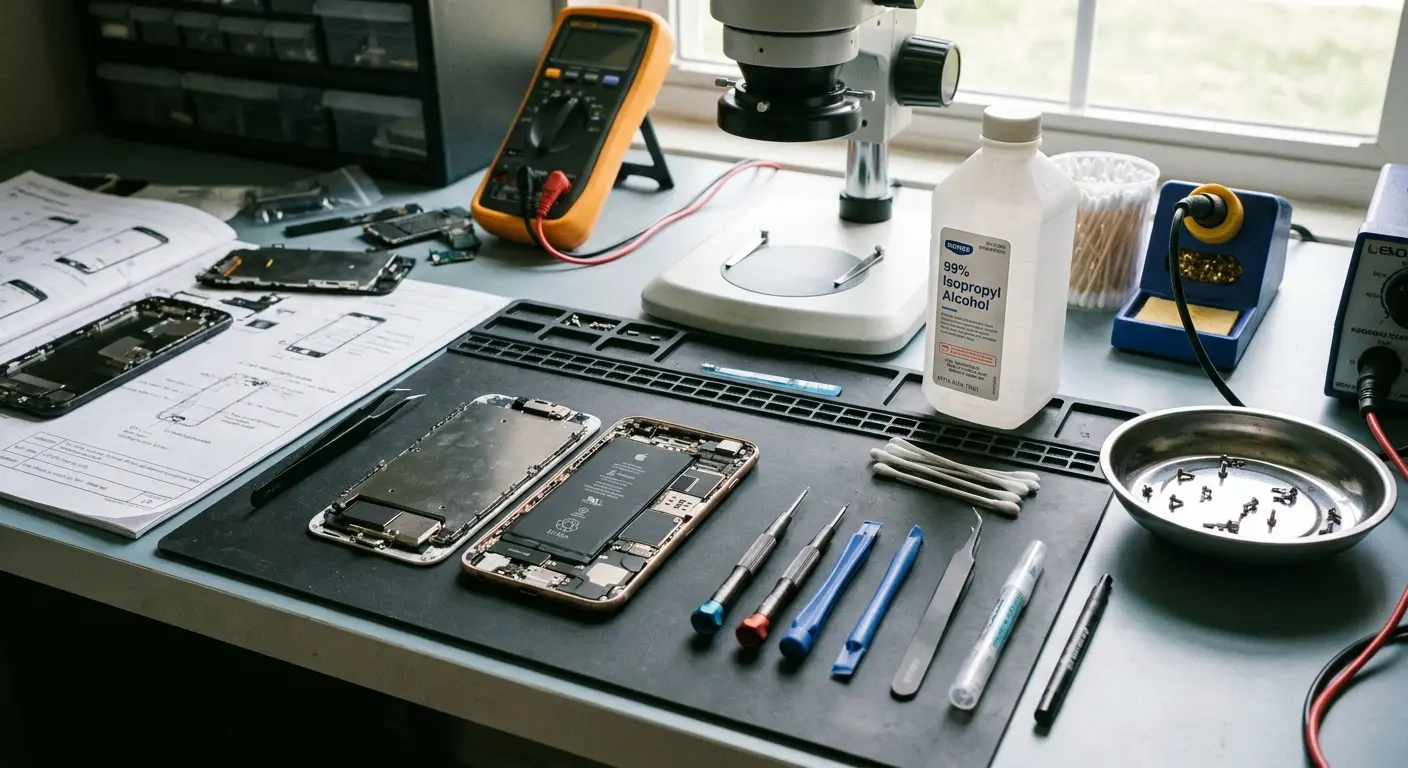
Repair technicians start with complete disassembly. They remove the back panel, disconnect the battery, and access the speaker assembly directly. This allows them to clean speaker components with specialized solutions (usually isopropyl alcohol at 90%+ concentration) and inspect for corrosion on connections you can't see or reach.
Ultrasonic cleaning baths can remove corrosion and mineral deposits from small components without manual scrubbing that might cause additional damage.
Component replacement becomes necessary when cleaning doesn't restore function. Speaker assemblies cost $15-40 for parts, but labor adds $60-100 to the bill.
The Repair vs. Replace Decision Matrix
Phone age matters enormously in this decision. Spending $200 to repair a phone that's worth $300 on the used market makes little sense. That same $200 on a phone worth $800 is a smart investment.
Available backups change the equation. If you have an old phone that works adequately while your main phone gets repaired, the inconvenience factor drops significantly.
Insurance coverage (if you have it) usually makes repair the obvious choice, assuming the deductible is less than the repair cost.
Data Recovery Considerations
If your phone won't power on and you haven't backed up recently, data recovery becomes the priority over phone repair. Professional data recovery services can extract information from water-damaged phones even when the device itself is beyond repair.
These services cost $300-1000 depending on damage severity and data importance. This scenario underscores why cloud backup and regular syncing matter more than any water removal technique.
I once left a phone in silica gel for 72 hours. Pulled it out, turned it on, speaker worked fine for about a week. Then it died completely. Corrosion got it anyway. Sometimes you're just too late.
The Case for Proactive Protection Over Reactive Fixes
Look, I work at Rokform, so yeah, I'm gonna mention our cases. But here's why: we built them for people who actually use their phones in nasty conditions. Construction sites, motorcycle rides, hiking in the rain. The kind of situations where standard cases fail.
Water exposure happens during specific activities: hiking near streams, working in kitchens, using phones at beaches or pools, mounting phones on bikes or motorcycles in unpredictable weather. These aren't random accidents. They're predictable scenarios where standard cases and standard phone handling create vulnerability.
We built Rokform cases around a different approach. Our cases assume you're going to use your phone in challenging environments because that's when you need it most. The mounting systems we've developed keep phones secured and positioned away from water sources during activities where exposure risk runs highest. Check out our rugged case options at Rokform phone cases and our mounting solutions at Rokform mounts to see how proper protection stops water damage scenarios before they happen.
A quality rugged case with proper speaker protection costs less than a single insurance deductible. A mounting system that keeps your phone secured and positioned correctly during outdoor activities costs less than a mid-tier phone repair.
The reactive approach (learning water removal techniques, keeping silica gel packets on hand, knowing which repair shops to call) treats symptoms. The proactive approach stops the problem before it starts. You're not preparing to fix water damage. You're building a system where water damage doesn't occur in the first place.
I'm not saying you need our specific products. I'm saying you need SOMETHING that actually protects your phone before it gets wet, not after.
Or you can keep using that $15 Amazon case and hope for the best. I've done both. The $100 investment is cheaper.
Final Thoughts
Water in your phone speaker isn't an audio problem. It's a symptom of a protection gap in how you're using your device. The sound frequency apps work to eject water. Silica gel helps with water eject processes. Professional repair can save damaged phones. But none of these solutions address why water reached your speaker in the first place.
But if you're already here with a wet phone, start with the sound frequency method and silica gel. You've probably got 24-48 hours before permanent damage sets in. Move fast, and you might save it.
We've approached this topic from a prevention angle because that's where the actual solution lives. The techniques for how to get water out of phone speaker assemblies matter when you need them, but needing them means something in your phone protection strategy failed.
Your phone cost $800-1200. The photos on it? Irreplaceable. The work stuff? Critical. Treating that investment with the protection it deserves costs less than dealing with the consequences of inadequate protection.
Start with honest assessment of where and how you use your phone. Identify the water exposure scenarios in your routine. Then build protection that addresses those specific vulnerabilities. The water removal techniques we've covered give you options when protection fails, but they shouldn't be your primary strategy.
Good luck. Seriously. I've been where you are, and it sucks.

