


How to Make iPhone Louder: The Physical Setup Problem No One Talks About
You've cranked every setting to max. Toggled Late Night mode. Checked the EQ, restarted twice, maybe three times if we're being honest. And your iPhone still sounds like someone's talking into a pillowcase from the next room over.
Here's the thing: volume issues rarely start in Settings. They start with how your phone physically interacts with the world around it. Blocked speakers, muffled cases, surface acoustics, the actual position of your device when sound matters most. Most guides skip this entirely and jump straight into software tweaks that only work if your hardware setup isn't sabotaging you first.
Understanding how to make iPhone louder starts with recognizing that most phone volume issues stem from physical obstructions, not software limitations. The difference between barely audible and perfectly clear often comes down to millimeters of case material, the surface your phone rests on, or debris you can't see without a flashlight.
Table of Contents
Why Your Case Might Be Stealing 40% of Your Volume
Speaker Placement and the Surfaces That Amplify (or Kill) Sound
The Settings Everyone Mentions and the Two They Always Miss
Accessibility Features That Double as Volume Boosters
When Dirt and Debris Are Actually Your Problem
External Solutions That Don't Require Bluetooth Pairing
Why Your Charging Habits Affect Speaker Performance
Rokform's Approach to Audio-Friendly Protection
TL;DR - The Quick Hits:
Your case is probably muffling your speakers more than you think (especially if it's thick silicone)
Where you put your phone matters. Hard surfaces amplify sound, soft ones kill it
Late Night mode compresses audio to boost quiet sounds without distorting loud ones
Mono Audio and Phone Noise Cancellation live in Accessibility and can dramatically improve clarity and perceived volume on iPhone
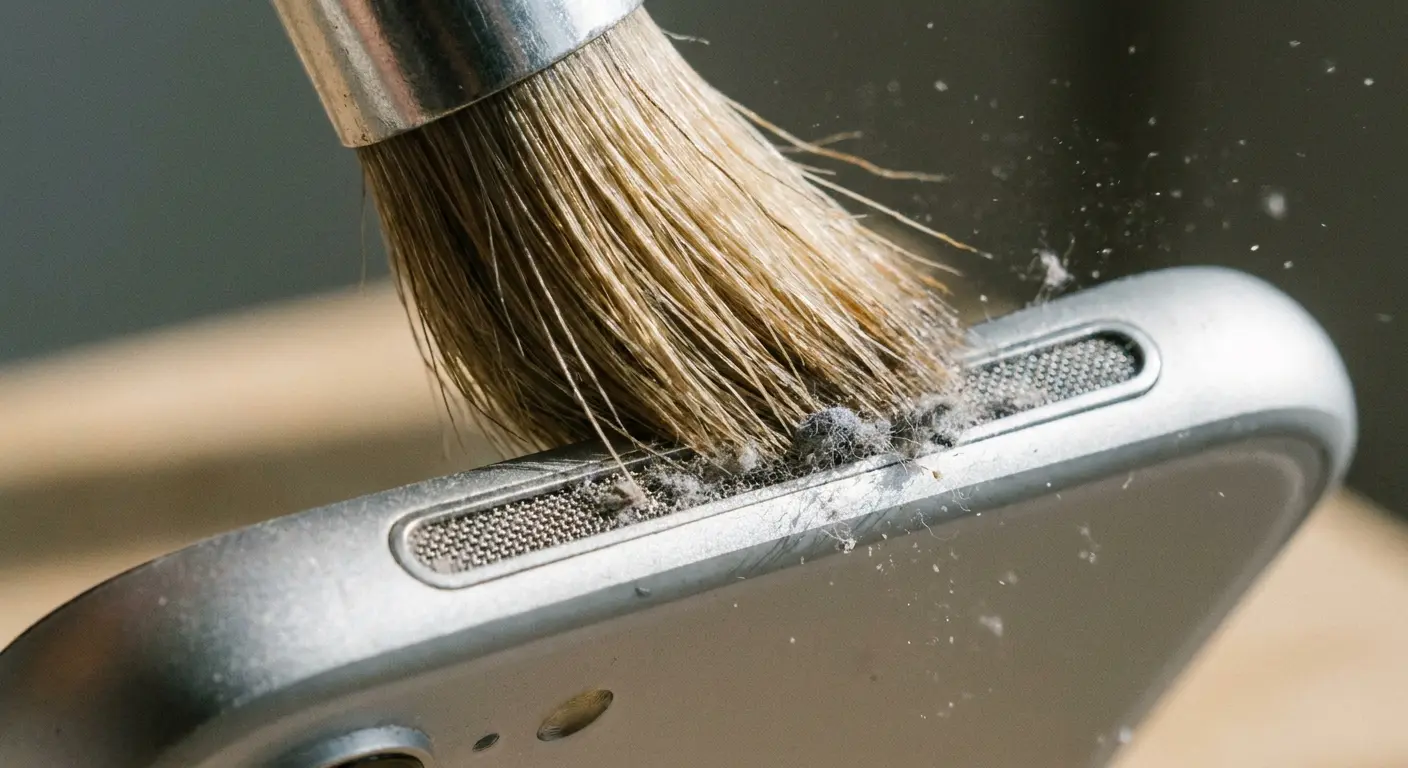
Speaker grills collect pocket lint faster than you think, and a soft brush solves it in seconds
Certain surfaces (wood, ceramic) reflect sound better than fabric or foam
Charging port corrosion creates feedback loops that reduce max speaker output over time
External amplification doesn't always mean Bluetooth speakers. Passive amplifiers and positioning tricks work instantly
Why Your Case Might Be Stealing 40% of Your Volume
Your case is protecting your phone. Great. But there's a decent chance it's also stealing like 40% of your volume, and you'd never know it because you've been using that case since day one. You have no baseline for comparison.
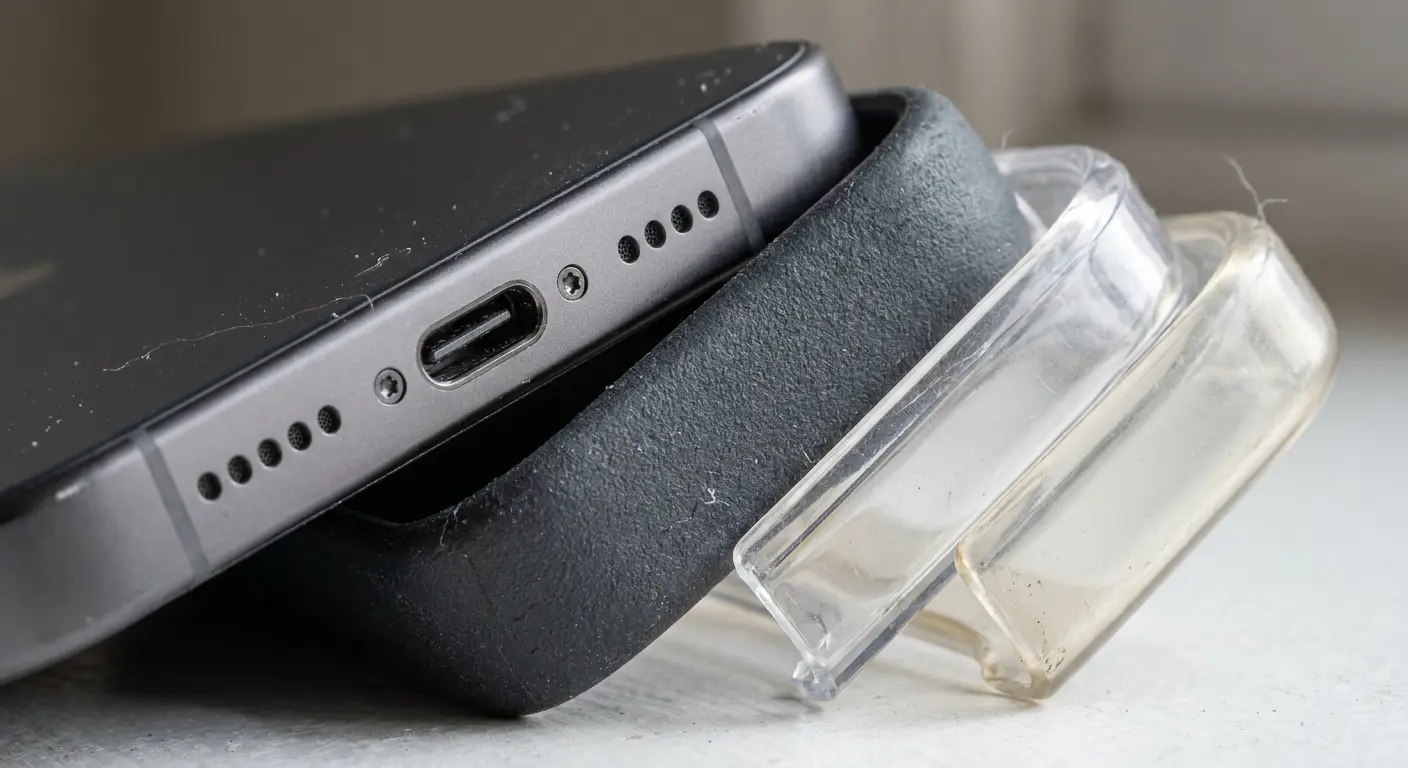
Most iPhone cases wrap around the bottom edge where both speaker grills sit (one actual speaker, one microphone that contributes to stereo sound). Thick silicone, rugged bumpers, and wallet-style cases create a barrier between the speaker and your ear. You lose clarity first, then phone volume second.
The material between your speaker and the outside world determines how much sound reaches you. We're not talking about minor differences here. The wrong case can cut your perceived volume by nearly half.
Material Density and Sound Absorption
Silicone and rubber? They just absorb sound. That's what those materials do. So if your case wraps around the speaker grills with thick material, you're making sound fight through a dampening layer before it can reach your ears.
Hard polycarbonate and thin TPU cases reflect sound better. They don't absorb frequencies the way softer materials do. You'll notice this immediately when you remove a bulky case and play the same audio. The difference isn't subtle.
When selecting protective gear, understanding phone case materials helps you balance protection with audio performance. Different materials interact with sound waves in measurably different ways, and that interaction happens before any volume setting on iPhone comes into play.
Case Material |
Sound Absorption Level |
Volume Impact |
Best Use Case |
|---|---|---|---|
Thick Silicone |
High |
30-40% reduction |
Maximum drop protection, minimal audio needs |
Rubber/TPU |
Medium-High |
20-30% reduction |
Balanced protection, casual listening |
Thin TPU |
Low-Medium |
10-15% reduction |
Daily protection, frequent media use |
Hard Polycarbonate |
Low |
5-10% reduction |
Audio clarity priority, moderate protection |
Precision-cut Hard Cases |
Minimal |
0-5% reduction |
Professional use, clear communication needs |
I know a guy who runs construction sites. Let's call him Mike. He was constantly missing radio calls during job coordination. He'd have his phone at max volume, but between the equipment noise and his massive OtterBox Defender (which, to be fair, he absolutely needs because he's dropped that phone off scaffolding twice), he couldn't hear anything.
We switched him to a hard polycarbonate case with precise speaker cutouts. Same phone, same volume slider position, but suddenly he could hear the radio app again. The phone's output hadn't changed, but the amount of sound reaching his ear increased measurably because sound waves weren't being absorbed by thick rubber before projecting outward.
Cutout Precision Matters More Than You Think
Generic cases often misalign with speaker grills by a millimeter or two. That's enough to redirect sound downward or into the case itself instead of outward toward you.
Precision-cut cases align perfectly with Apple's speaker placement. Sound travels the path of least resistance. If your case cutout is even slightly off-center, you're redirecting audio into plastic instead of air.
Check your case right now. Hold it up to light and look at the speaker cutouts. If they don't match the grill size exactly, you've found part of your problem.
Try this test (takes like 2 minutes):
Remove your case completely and play audio at 50% volume
Note the clarity and volume level as your baseline
Replace the case and play the same audio at the same volume
Listen for muffled frequencies or reduced output
Inspect speaker cutouts under bright light for alignment
Check if cutout edges overlap any part of the speaker grill
Test with case positioned slightly differently (rotated 180°)
If volume loss exceeds 20%, consider a case with better acoustic design
The Lip Height Problem
Cases with raised lips (designed to protect your screen when face-down) also affect sound when your phone sits on a table. The lip creates a gap between the speaker and the surface, which sounds good in theory but often muffles output depending on the surface material.
We'll get into surface acoustics in a sec, but for now, know this: a 2mm lip height performs differently than a 4mm lip. The sweet spot exists, and it's not one-size-fits-all. Your phone volume depends on how that lip interacts with whatever surface you're using.
Speaker Placement and the Surfaces That Amplify (or Kill) Sound
Your iPhone has two speakers. One fires from the bottom edge (the actual speaker), and one fires from the earpiece at the top (repurposed for stereo sound in landscape mode). Where you place your phone determines whether those speakers project sound effectively or dump it into a void.
Surface choice matters more than most people realize. The same phone at the same volume setting produces wildly different output levels depending on what it's sitting on. I mean, we're talking about measurable differences that can make or break your ability to hear navigation directions, follow a recipe video, or catch an important call.
Hard Surfaces Reflect, Soft Surfaces Absorb
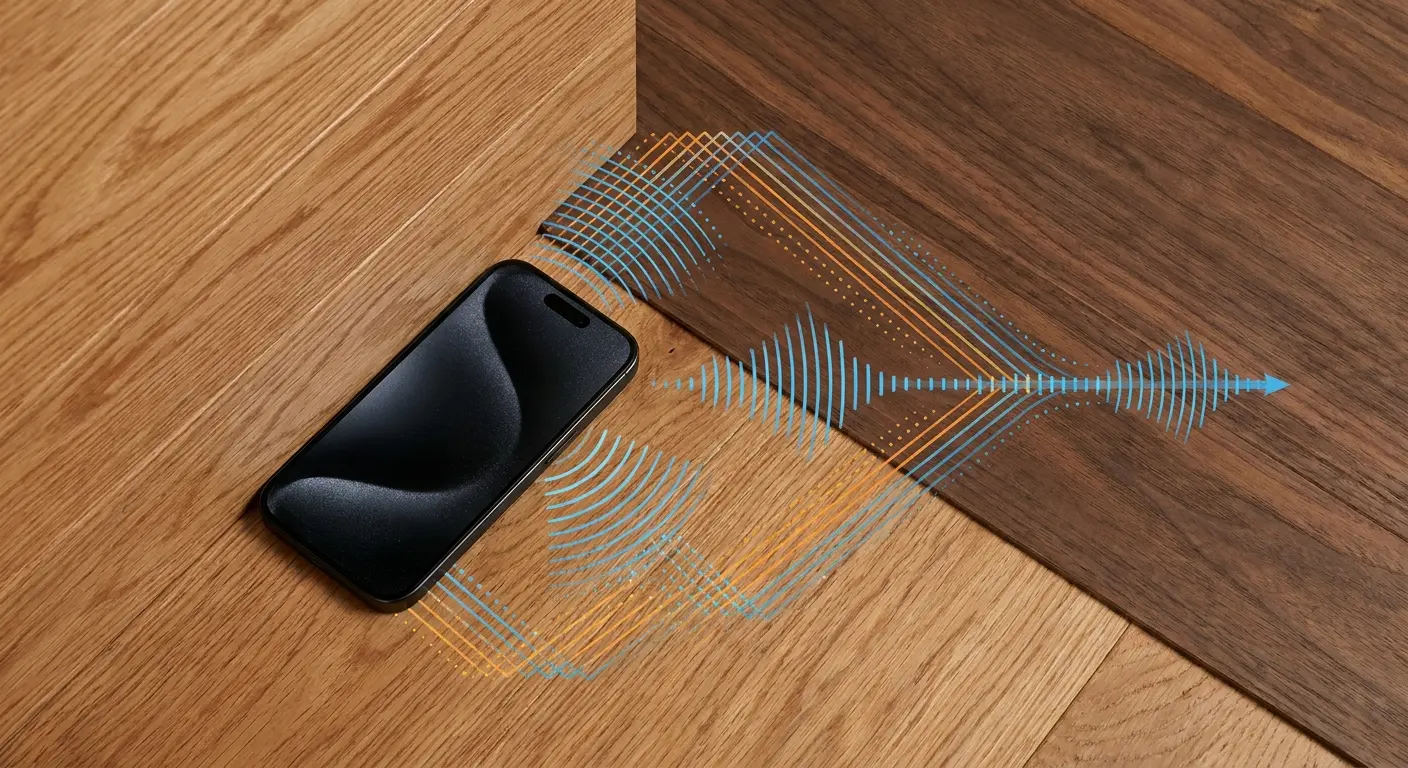
Wood desks, ceramic tiles, and glass tables reflect sound waves back into the room. Your phone gets louder because the surface acts as a passive amplifier.
Fabric, foam, and soft plastics absorb sound. A phone sitting on a couch cushion or a mouse pad will always sound quieter than the same phone on a hardwood table. This isn't about volume settings. It's physics.
If you're working from home and your phone sits on a desk pad, move it to the bare desk. You'll hear the difference immediately. The phone volume hasn't changed, but the amount of sound reaching your ears has increased dramatically.
Surface Quick Reference:
Hardwood Desk: Reflects sound well, boosts perceived volume by 25-35%. Best positioned flat or propped at 30° angle.
Ceramic Tile: Maximum reflection, bright tone. Can boost volume by 30-40%. Keep it flat with speaker facing up.
Glass Table: High reflection, can create resonance. Adds 20-30% perceived volume. Works flat or slightly elevated.
Fabric/Cloth: Absorbs everything. You'll lose 40-50% of your volume. Avoid or elevate completely.
Foam/Mouse Pad: Maximum absorption, kills 50-60% of your sound. Just don't.
Metal Surface: Variable reflection, can cause vibration. Adds 15-25% volume. Flat works, may need dampening.
Orientation Changes Everything
Bottom-firing speakers project sound forward when your phone stands upright (using a stand or propped case). When flat on a table, sound fires directly into the surface.
Propping your phone at even a 30-degree angle redirects sound toward you instead of into the table. You don't need a fancy stand. A folded napkin works. So does leaning it against a book.
Stereo separation also improves in landscape mode because both speakers (bottom and earpiece) fire outward instead of one firing down and one firing up. For professionals who need consistent audio clarity, best phone mounts for cars ensure optimal speaker positioning during calls and navigation.
My friend Sarah is a home cook who films recipe videos for her food blog. She kept her iPhone flat on a granite countertop and struggled to hear instructions over running water and ventilation fans. After propping the phone at a 45-degree angle against a cookbook, the same video became clearly audible without adjusting phone volume. The speaker's output angle changed from firing directly into granite to projecting toward her workspace, and the hard surface still reflected sound but now in a useful direction.
The Corner Trick
Place your phone in the corner of two perpendicular surfaces (where a wall meets a desk, or where two books form an L-shape). Sound waves bounce off both surfaces and converge, creating a louder focal point.
Use hard surfaces for this. Seriously. Wood, tile, glass. The corner becomes this makeshift amplifier that works way better than you'd think, no external gear required. You're just redirecting sound that would otherwise scatter into dead space.
The Settings Everyone Mentions and the Two They Always Miss
You've probably seen the standard advice: turn off volume limit, adjust EQ settings, disable sound check. Those help, but they're surface-level fixes that assume your iPhone is already performing at baseline.
The real gains come from settings buried in places most people never look. I'm talking about accessibility features that weren't designed as volume boosters but function as powerful audio enhancers when you understand what they're doing.
Late Night Mode Isn't Just for Nighttime
Late Night mode lives under Settings > Music > EQ. It compresses dynamic range, which means it reduces the gap between the quietest and loudest sounds in a track.
Quiet dialogue gets boosted. Loud explosions get tamed. The overall perceived volume increases because you're not straining to hear soft parts anymore.
This works brilliantly for podcasts, audiobooks, and dialogue-heavy videos. It's less effective for music where you want dynamic range preserved. Toggle it on for spoken content, off for music. The volume setting stays the same, but what you hear changes dramatically.
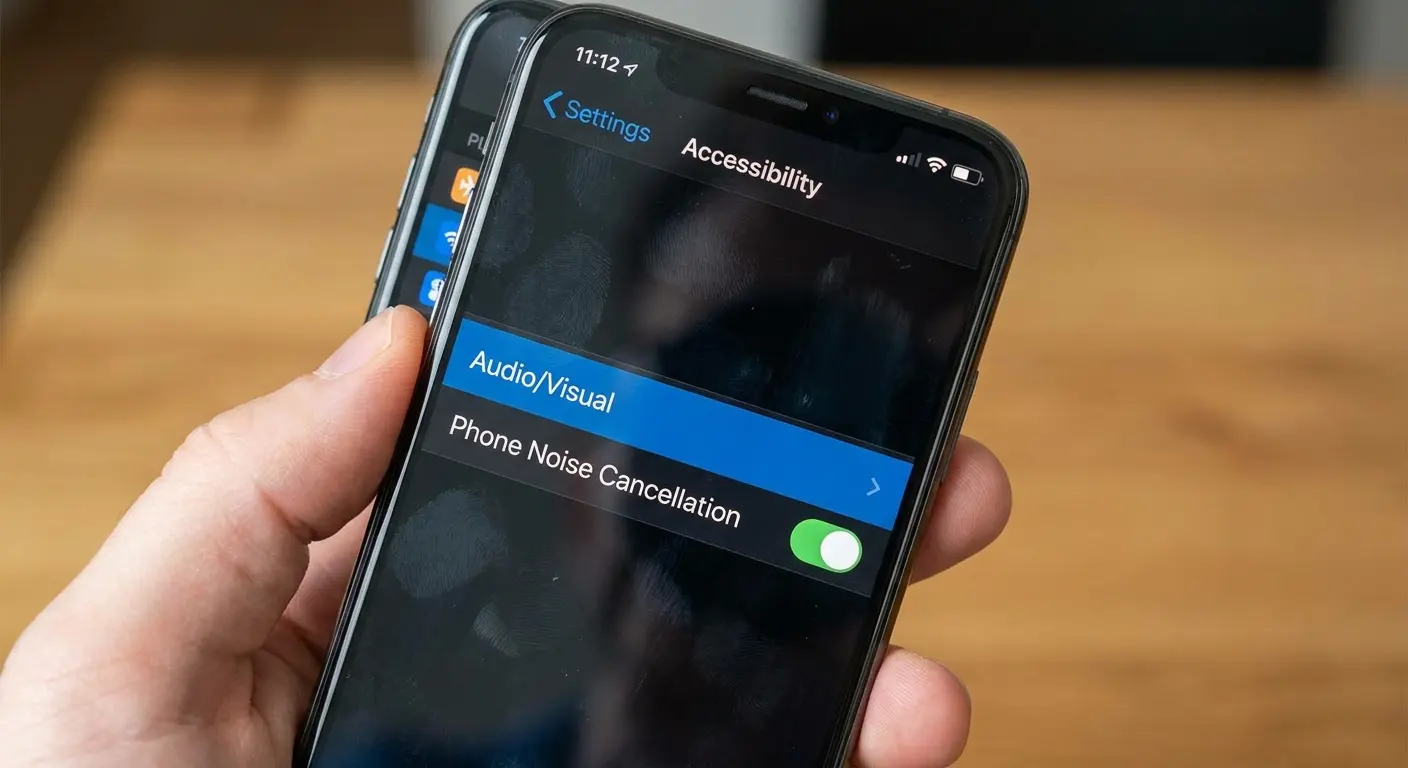
Phone Noise Cancellation (The Setting Hidden in Accessibility)
Settings > Accessibility > Audio/Visual > Phone Noise Cancellation.
This feature reduces ambient noise during phone calls by using your iPhone's microphones to filter out background sound. Most people don't realize it also affects speaker clarity during calls.
If you're in a noisy environment and struggling to hear the person on speakerphone, toggle this on. It won't increase raw volume on iPhone, but it will make voices clearer by reducing competing frequencies.
Headphone Accommodations Affect More Than Headphones
Settings > Accessibility > Audio/Visual > Headphone Accommodations.
Buried in here is "Transparency Mode" and "Custom Audio Setup," which some users report affects speaker output depending on iOS version and device model. Apple doesn't officially document this, but the setting adjusts frequency response based on a hearing test.
Run the test. If your iPhone thinks you have trouble hearing certain frequencies, it will boost them. This can make speech clearer and increase perceived volume without touching the volume slider.
Accessibility Features That Double as Volume Boosters
Accessibility settings exist to help users with hearing or vision challenges, but several of them function as powerful audio enhancers for anyone who needs more phone volume or clarity.
These aren't workarounds or hacks. They're legitimate tools that change how your iPhone processes and outputs audio. The fact that they live in Accessibility instead of Sound settings doesn't make them any less effective.
Quick setup process:
Navigate to Settings > Accessibility > Audio/Visual
Enable Mono Audio if listening through iPhone speakers (not headphones)
Test audio playback and note any volume increase
Check Balance slider position (should be centered unless compensating for obstruction)
If one speaker is blocked, shift Balance 10-20% toward the clear speaker
Enable Phone Noise Cancellation for call clarity in noisy environments
Run Headphone Accommod ations audio test even if using speakers
Apply recommended frequency adjustments
Test with real-world content (podcast, video call, navigation)
Fine-tune settings based on your primary use case
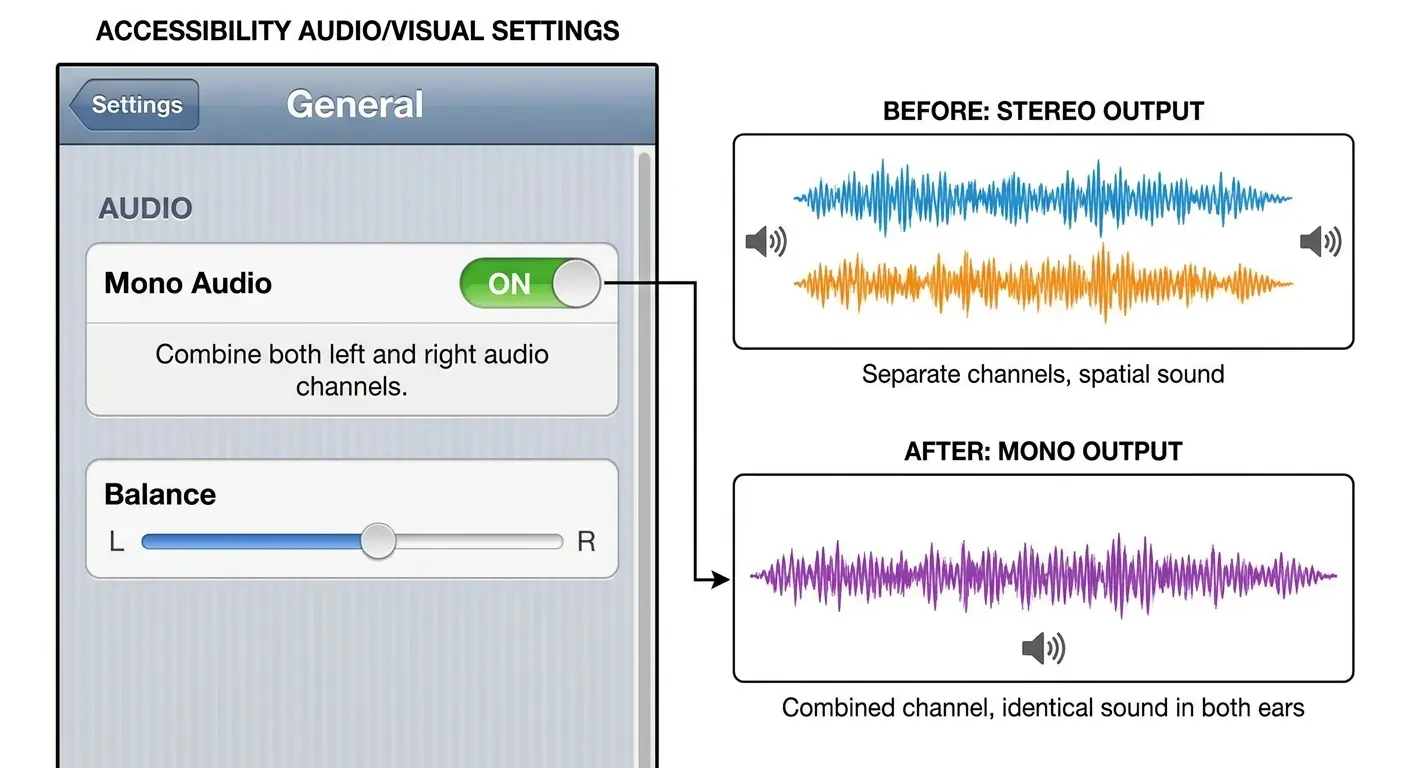
Mono Audio Combines Stereo Channels
Settings > Accessibility > Audio/Visual > Mono Audio.
Stereo audio splits sound between left and right channels. If you're listening through your iPhone's speakers (not headphones), you're often too close to the device for stereo separation to matter. (Stereo is pointless when your phone is six inches from your face anyway.) You're just dividing audio output unnecessarily.
Mono Audio combines both channels into a single output. You get the full mix through both speakers, which increases perceived phone volume and ensures you don't miss anything panned hard left or right.
This is especially useful for music mixed with extreme stereo separation or for videos where dialogue is isolated to one channel.
Balance Slider (The Accidental Volume Hack)
Right below Mono Audio sits a Balance slider. It controls left/right audio distribution.
If one of your speakers is partially blocked (by your hand, a case, or debris), you can shift balance toward the unobstructed speaker to maximize output. This won't fix a broken speaker, but it will help you get the most from the one that's working properly.
Don't push the slider all the way to one side unless you're compensating for a hardware issue. A slight adjustment (10-20% off-center) is usually enough.
When Dirt and Debris Are Actually Your Problem
Your speaker grills are absolutely packed with pocket lint right now. You can't see it without getting close with a flashlight, but it's there. Dust, debris, microscopic fibers from your jeans, all of it slowly building up over months.
And here's the thing: it happens so gradually that you never notice. Your volume was fine back in January. Now it's October and you're cranking the slider to max for podcasts that used to play fine at 60%. You blame the app, or maybe your hearing, or you convince yourself iPhones just get quieter over time.
Nope. It's lint.
The Soft Brush Method
A soft-bristled brush (like a clean toothbrush or a dedicated electronics brush) gently dislodges debris without pushing it deeper into the speaker housing.
Brush in one direction, away from the grill. Don't scrub back and forth. You're trying to pull debris out, not redistribute it.
Do this every 2-3 weeks if you carry your phone in a pocket or bag. You'll be surprised how much lint accumulates even in a relatively clean environment. Regular maintenance extends device longevity. Learn more in our guide on how to clean iPhone speaker without causing damage.
I know a delivery driver who kept his iPhone in his jeans pocket. Over three months, he noticed his navigation volume gradually decreasing. After inspecting the speaker grill under a flashlight, he found compacted blue denim fibers completely covering the mesh. A 30-second cleaning with a soft toothbrush removed the blockage, and his navigation app's volume returned to normal output levels without any settings changes. The physical obstruction had been reducing phone volume by an estimated 40% before he addressed it.
Painter's Tape for Stubborn Lint
Press a small piece of painter's tape (or any low-tack adhesive tape) against the speaker grill, then peel it away slowly. The adhesive grabs surface debris without leaving residue.
Don't use duct tape or high-tack adhesives. They can leave sticky residue that attracts more dirt or, worse, pull the mesh away from the housing.
This method works best after brushing. Brush first to loosen debris, then tape to remove what the brush missed.
Why Compressed Air Is a Bad Idea
Compressed air seems logical. It's not. The force can push debris deeper into the speaker cavity or damage the delicate mesh that protects the internal components.
If debris is deep enough that brushing and tape don't work, you're looking at a potential hardware issue that requires professional cleaning or repair. Don't make it worse by blasting air into places it shouldn't go.
External Solutions That Don't Require Bluetooth Pairing
Sometimes you need more volume right now, and you don't have time to dig through Settings or clean speaker grills. Passive amplification methods work instantly and require zero setup.
These solutions won't replace proper speakers for serious listening, but they're surprisingly effective for situations where you need a quick boost and don't have any gear handy.
The Cupped Hand Technique
Cup your hand around the bottom speaker (where it fires from the edge of your phone). Your hand redirects sound forward instead of letting it scatter in all directions.
This works better than you'd expect. You're creating a temporary horn that focuses sound waves toward you. It's not elegant, but it's effective when you need a quick boost and don't have any tools.
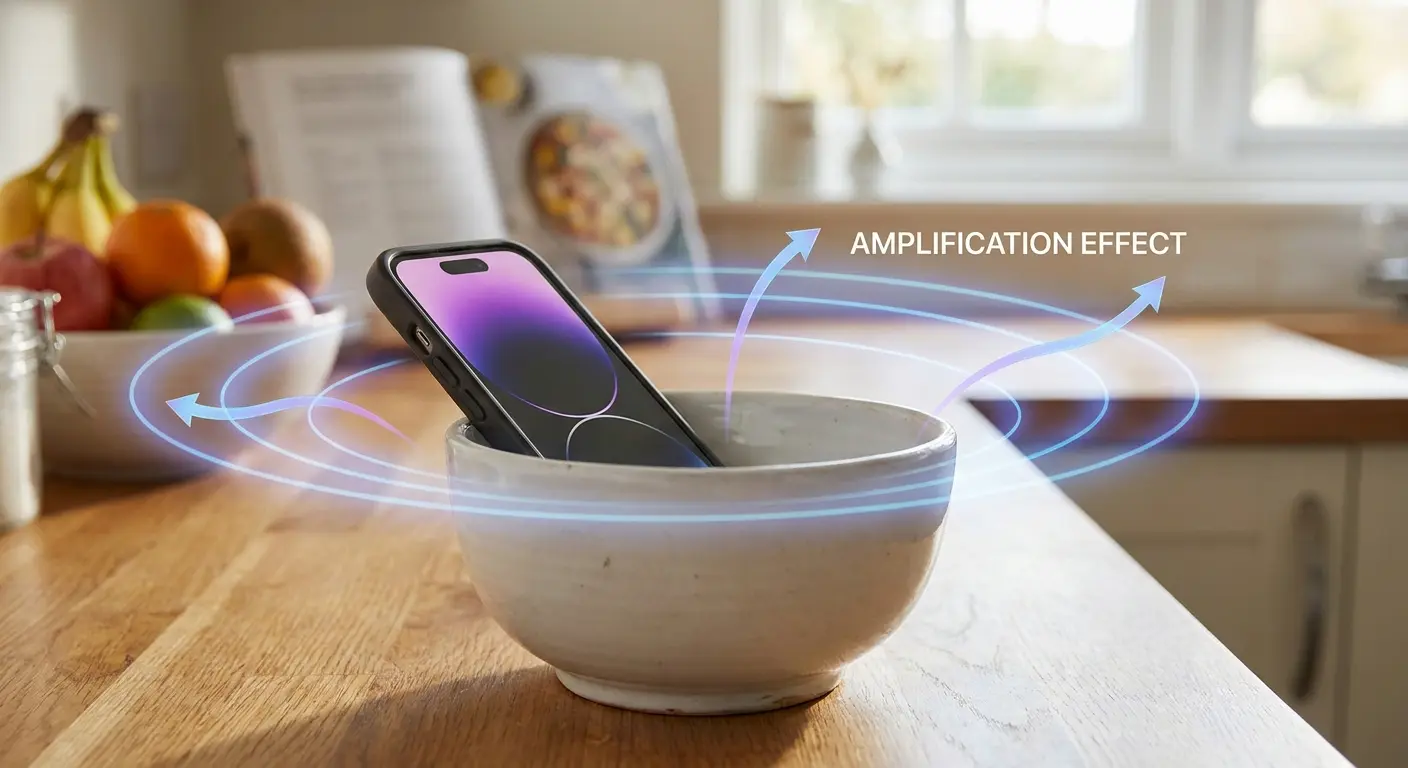
DIY Passive Amplifiers (Bowl and Cup Method)
Place your iPhone in an empty ceramic bowl or glass cup (speaker-side down, angled so the speaker fires into the bowl). The bowl reflects and amplifies sound waves.
Ceramic works better than plastic because it's denser and reflects sound more efficiently. The bowl's shape matters too. Wider bowls create broader sound dispersion, while narrower cups focus sound into a tighter beam.
This is genuinely useful when cooking, showering (if the bowl is outside the shower), or working in a space where you can't use external speakers.
Side note: I discovered this trick in college when my roommate and I were too broke for speakers. We'd put his phone in a mixing bowl for parties. Did it sound good? Not really. But it was loud enough to hear over conversation, and that's all we needed. Sometimes the dumbest solutions are the most practical.
When to Just Use a Bluetooth Speaker
If you need volume regularly and passive methods aren't cutting it, invest in a portable Bluetooth speaker. The setup time is minimal, and the sound quality will always outperform any passive amplification trick.
These solutions are for moments when you don't have your speaker handy or when carrying extra gear doesn't make sense. They're not replacements for actual speakers.
Why Your Charging Habits Affect Speaker Performance
This connection isn't obvious, but hear me out. Charging port health impacts overall device performance, including audio output. The relationship is indirect but measurable over time.
Your iPhone manages power distribution across all internal components through a complex system of circuits and regulators. When the charging port degrades, it creates electrical resistance that affects how efficiently power reaches every component, including the speaker amplifier.
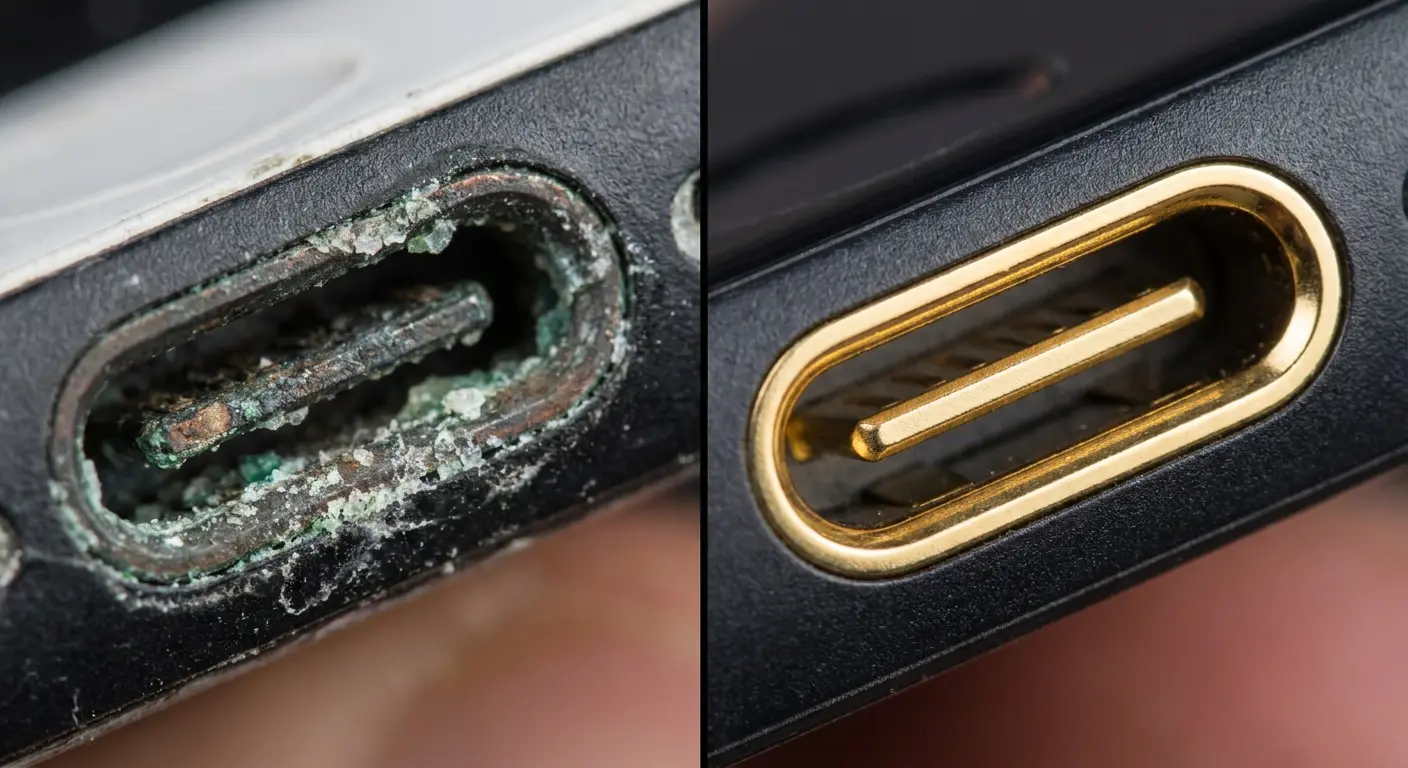
Corrosion Creates Feedback Loops
Moisture, sweat, and environmental exposure cause charging port contacts to corrode. Corrosion increases electrical resistance, which affects how your iPhone manages power distribution to internal components (including the speaker amplifier).
You won't notice this immediately. It's a gradual degradation that manifests as slightly lower max volume, occasional audio crackling, or inconsistent output levels.
If your iPhone has been through a lot (gym sessions, humid environments, beach trips), inspect your charging port. Green or white residue on the contacts indicates corrosion.
Cleaning the Charging Port Safely
Use a wooden toothpick or a plastic dental pick to gently remove debris from the charging port. Work slowly and avoid metal tools that can short contacts or scratch the port.
You're looking for compacted lint, dust, and pocket debris that prevents cables from seating fully. A poorly seated cable creates intermittent connections that stress the charging circuit and, over time, affect overall device performance.
Clean your port every 2-3 months if you use wired charging regularly. If you've switched to wireless charging, this becomes a non-issue. Proper port maintenance is essential. Our guide on how to clean iPhone charging port provides detailed steps.
Wireless Charging as a Long-Term Solution
Wireless charging eliminates port wear entirely. No physical connection means no debris buildup, no corrosion, and no mechanical stress on internal contacts.
If you've noticed gradual volume degradation and your charging port looks rough, switching to wireless charging won't fix existing damage, but it will prevent further deterioration.
This also extends the overall lifespan of your device, which is a nice bonus.
Rokform's Approach to Audio-Friendly Protection
Full disclosure: this is our gear, so obviously I'm biased. But the reason we designed our cases this way is because I got tired of choosing between protection and hearing my phone.
Rokform cases use precision-machined cutouts that align exactly with iPhone speaker grills. Hard polycarbonate construction reflects sound instead of absorbing it. The result is protection that doesn't compromise audio output.
Our Rugged Case and Crystal Case lines prioritize acoustic performance without sacrificing drop protection. The speaker cutouts are engineered to within 0.1mm tolerance, ensuring sound waves exit the case cleanly without deflection or absorption.
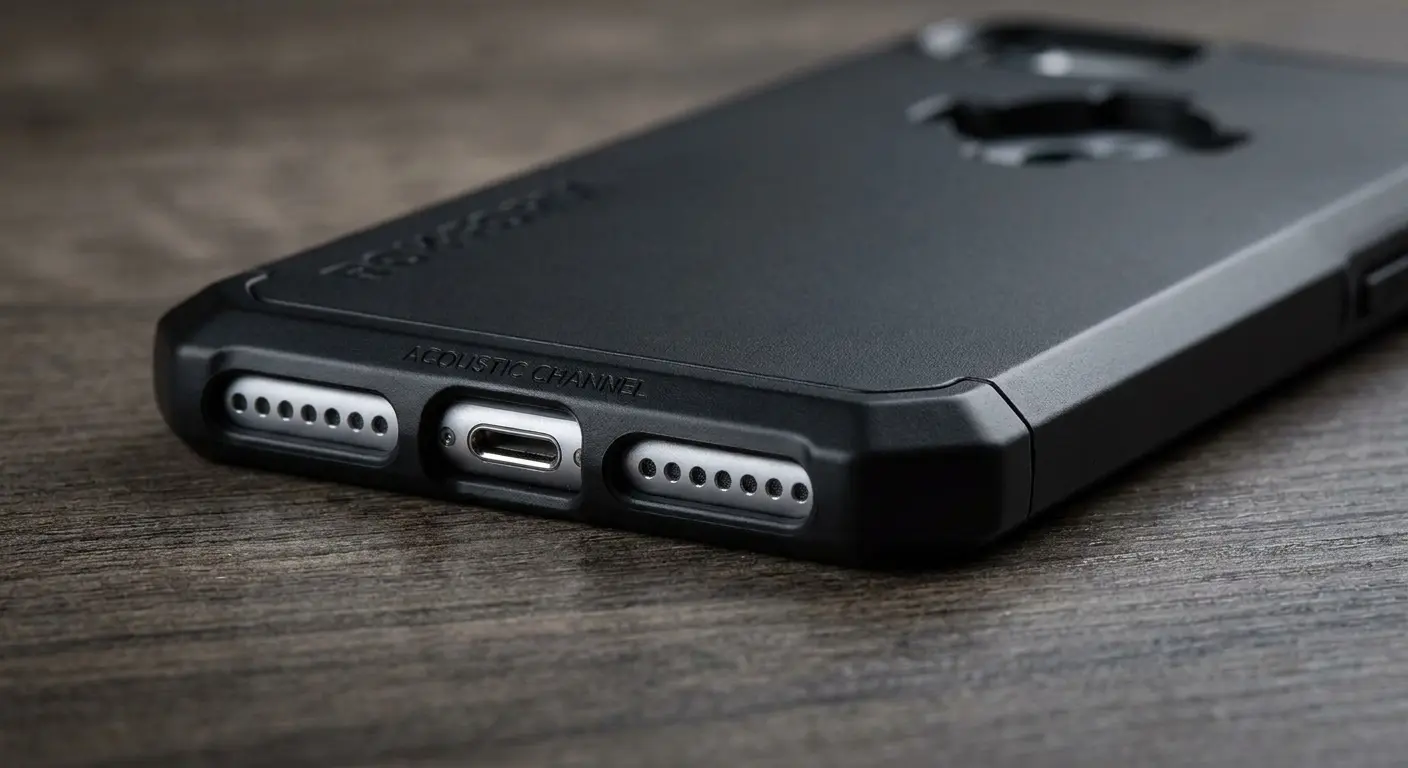
You shouldn't have to choose between protecting your phone and hearing it clearly. The right case design makes volume on iPhone a non-issue because it's built around the speaker placement instead of forcing speakers to work around the case.
Final Thoughts
Volume problems start with physical setup. Your case, your surface, your speaker grills. Software settings help, but only after you've eliminated the physical barriers that steal sound before it reaches you.
Clean your speakers. Audit your case. Move your phone off soft surfaces. These aren't workarounds. They're the solutions that most guides skip because they're not sexy enough to headline an article.
Your iPhone is already capable of impressive volume. You just need to stop blocking it. Understanding how to make iPhone louder begins with recognizing that most phone volume issues stem from physical obstructions, not software limitations. Fix the physical problems first, then optimize settings, and you'll get more output than you thought your device was capable of producing.

