


Last month I watched $800 drain from my bank account because I pressure-washed my steering head bearings without knowing what I was doing. The mechanic didn't even look sympathetic. Here's what actually ruins a motorcycle wash: it's not the soap you picked or your technique. It's your phone ringing while your hands are covered in degreaser, so you wipe them on your jeans (which are also wet), fumble with the screen, drop it, and watch it slide directly into your bucket. Or it's realizing halfway through that you can't remember if this cleaner is safe for aluminum, so you stop, go inside, track water through the house, Google it, forget what you read by the time you get back outside, and end up just guessing.
The actual washing part? That's easy. It's everything around the washing that's a disaster. We're tackling motorcycle washing from the angle nobody talks about: how to keep your essential gear protected and accessible while you're elbow-deep in suds. Because a clean bike matters, but so does not bricking your phone or losing track of your tools. Knowing how to wash a motorcycle properly means accounting for the real-world interruptions and workflow challenges that turn a simple cleaning session into a frustrating ordeal.
TL;DR
Protect your phone before you start (seriously), use way less water pressure than you think, dedicated motorcycle soap matters, clean your chain last, dry with microfiber not air, and for god's sake don't use dish soap. A magnetic phone mount keeps your device accessible without risk. Moisture kills electronics faster than you think, and post-wash lubrication extends the results.
Why Your Wash Setup Is Sabotaging Your Workflow
You start washing your motorcycle with good intentions. Ten minutes in, your phone buzzes. You dry your hands, walk inside, check the message, walk back out. Five minutes later, you need to verify which cleaner is safe for your specific brake components. You dry your hands again, unlock your phone with wet fingers that barely register on the screen, squint at the article, set it down on a toolbar that's now damp.
And yeah, you could just memorize everything, never check your phone, and work in perfect silence like some zen monk. But that's not happening. You've got group chats blowing up and you need to verify whether that cleaner will strip your clear coat.
The real issue: your phone needs to be nearby but protected. You need quick access without constantly drying your hands or risking water damage. Most riders solve this by leaving their phone inside (and losing efficiency) or keeping it in a pocket (and courting disaster). Neither works.
We've watched riders prop phones against toolboxes, balance them on seats, or wrap them in plastic bags. These solutions create more problems. Propped phones fall. Bagged phones overheat or become unresponsive through the plastic. Pocketed phones get soaked when you lean over the tank.
The workflow matters because rushed washes lead to mistakes. You skip steps. You use the wrong product because you didn't double-check. You miss spots because you're hurrying to finish before the next interruption.
Some study said it takes 23 minutes to refocus after an interruption, which honestly sounds made up, but I believe it because I've wasted entire afternoons like this. You're not just losing the 30 seconds it takes to dry your hands and unlock the screen. You're losing the mental thread of what you were doing.
That's when you forget whether you already rinsed a section or which product you just applied.
Washing a motorcycle well requires attention. You're checking for damage, feeling for contaminants embedded in the paint, noticing loose bolts or worn components. Constant interruptions pull your focus away from observation. You end up going through motions instead of inspecting.
Your phone isn't just for scrolling. You're using it to reference product dilution ratios, check service manual diagrams, or follow along with a detailing video. You might need to order a replacement part you just noticed is damaged. You want music playing without constantly adjusting volume with wet hands.
Take the rider who discovers a cracked coolant hose during washing. They need to photograph it, look up the part number, check inventory at local shops, and possibly order it online before reassembling everything. With their phone inside the house, this turns into a 20-minute ordeal of drying off, walking inside, researching, walking back out, and trying to remember what they found. With their phone mounted nearby, it's a five-minute task completed without breaking stride.
Traditional solutions fail here. Putting your phone in a waterproof case helps, but where do you put the case? On a nearby table means walking over repeatedly. In your pocket means it's inaccessible and at risk. On the bike means it's in the splash zone.
You need your phone at eye level, protected from water, and within arm's reach. That combination doesn't exist in most wash setups. Riders compromise on one or more of these requirements and deal with the frustration.
The Pre-Wash Ritual That Prevents Expensive Mistakes
Most damage from washing happens in the first five minutes. You're eager to start, so you skip steps. You spray water before checking if the exhaust is cool. You forget to cover the air intake. You don't remove your phone from your pocket before leaning over the wet tank.
Pre-wash prep isn't about perfectionism. You're preventing specific, expensive problems. Water in the air intake can hydrolock an engine. High-pressure spray on hot components can crack them. Moisture in electrical connections causes corrosion that shows up weeks later as mysterious electrical gremlins.
Start by letting the bike cool completely. Thirty minutes minimum after riding. Hot metal and cold water don't mix well, and you'll also avoid burning yourself on exhaust components.
Remove or cover anything that shouldn't get wet. Tape over the exhaust outlet. Cover the air filter intake. Protect any exposed electrical connections. Remove your phone, wallet, and keys from your pockets. Check that the fuel cap is sealed properly. Ensure the seat is locked down if it covers electronics.
This takes three minutes. But skip it and you'll spend your next weekend diagnosing why your bike won't start.
The Five Critical Pre-Wash Steps:
Let engine cool 30+ minutes after riding
Remove phone, wallet, keys from all pockets (seriously, check twice)
Tape over exhaust outlet and cover air filter intake
Apply dielectric grease to battery terminals
Set up all wash products within arm's reach
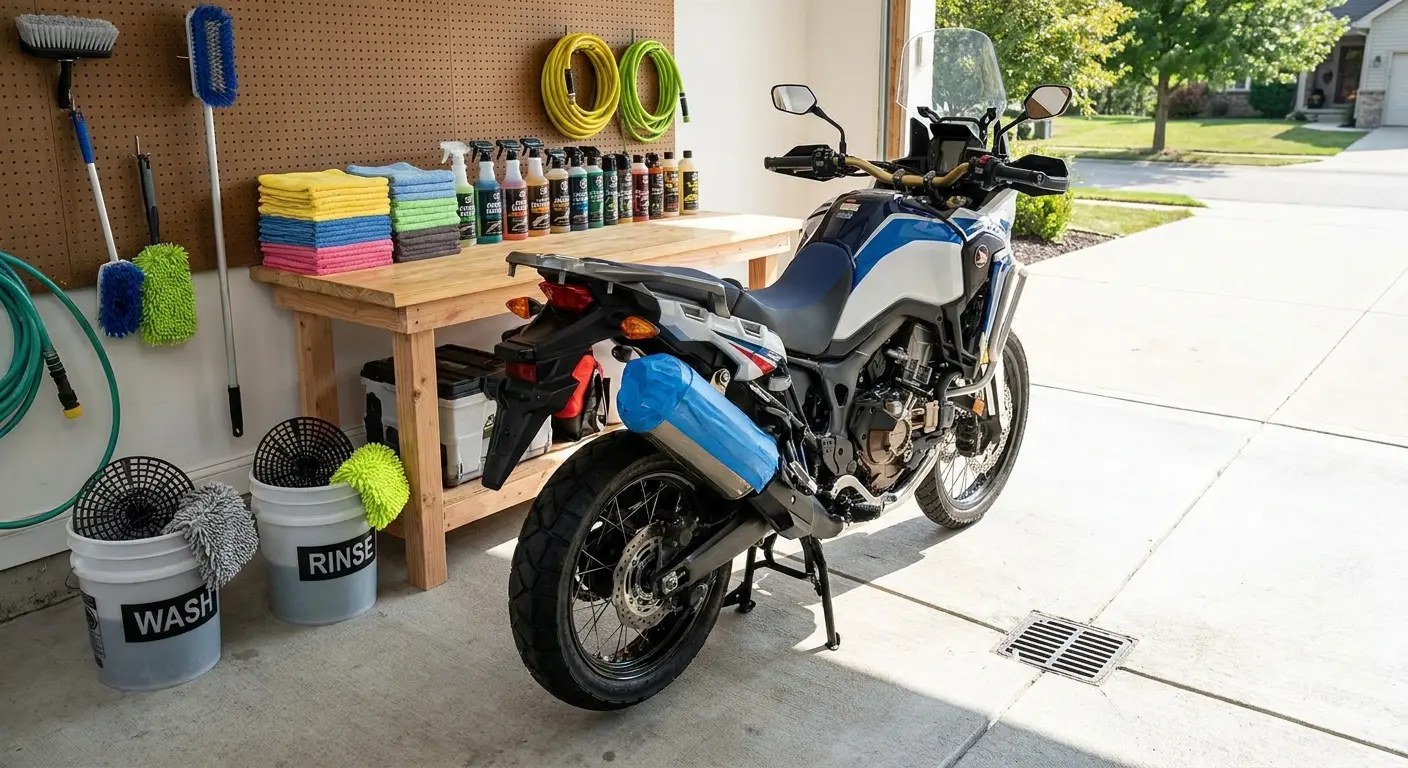
Organizing Your Wash Station for Efficiency
Your wash station layout determines how smooth the process goes. Poor organization means constant hunting for products, walking back and forth, and losing track of which step you're on.
Set up everything within a three-foot radius of where you'll be working. You should be able to reach any product without taking more than one step. This isn't about laziness; it's about maintaining focus on the bike instead of on logistics. When learning how to wash a motorcycle efficiently, workspace organization makes the difference between a 30-minute job and a two-hour ordeal.
Place your buckets on your non-dominant side. If you're right-handed, buckets go on the left. This keeps your dominant hand free for scrubbing while your other hand manages the mitt or sponge. Products should be lined up in the order you'll use them. Pre-wash spray, then soap, then wheel cleaner, then chain cleaner. You're not searching through bottles or second-guessing the sequence.
Tools (brushes, mitts, microfiber towels) go on a clean surface at waist height. A small folding table works perfectly. Never put tools directly on the ground where they'll pick up dirt that you'll then scrub into your paint.
The Electronics Protection Step Nobody Does
Your phone says it's water-resistant. That rating assumes clean water in controlled conditions, not the chaotic environment of a motorcycle wash where you've got soap, degreaser, and high-pressure spray going everywhere.
Water resistance degrades over time. Every drop, every seal compression, every temperature change weakens those gaskets. The IP68 rating your phone had when new isn't the rating it has now.
You can't just leave your phone inside because you'll need it. You're going to want to check something, change the music, or take before-and-after photos. Leaving it inside means constant trips that break your workflow.
Cover your battery terminals with dielectric grease before washing. Tape over any exposed connectors. If your bike has heated grips or accessory plugs, make sure they're covered or disconnected.
Water Pressure: The Line Between Clean and Damaged
High pressure feels amazing. You're out there like you're sandblasting a building, watching years of grime just evaporate. Very satisfying.
Also very stupid.
What you're actually doing is hydraulic-pressing water past every seal on your bike. Those rubber seals that keep your bearings happy? They're designed for rain and splashing, not for you standing two feet away with a 2000 PSI fire hose.
I learned this the expensive way. Pressure washed my front wheel. Really got in there, made it spotless. Three weeks later, notchy steering. Turns out steering head bearings don't appreciate having water forced into them at pressure levels that could strip paint. $400 lesson.
Bearing seals keep grease in and contaminants out during normal riding. They're not designed to resist direct high-pressure water spray. You can force water past those seals in seconds. That water mixes with the grease, creating an abrasive slurry that accelerates wear.
Steering head bearings are particularly vulnerable. They're right in the line of fire when you're rinsing the front of the bike. One careless blast with a pressure washer, and you've introduced water into a bearing assembly that's expensive and labor-intensive to replace.
Water under pressure doesn't just clean, it penetrates. Seals that easily resist splash and rain fail under direct pressure spray. The water finds any gap and forces its way through. This is why knowing how to wash a motorcycle properly includes knowing when less pressure delivers better results.
Painted surfaces suffer too. High pressure can lift the clear coat at stone chip edges, turning small damage into larger problems. You're not seeing this happen in real-time, but months later when the clear coat starts peeling, the damage was done during that aggressive wash.
Chrome and polished aluminum show pressure damage more obviously. High pressure can pit these surfaces, creating tiny craters that trap dirt and make future cleaning harder.
Water Source |
PSI Range |
Safe For |
Risks |
Best Use Case |
|---|---|---|---|---|
Garden Hose |
40-60 PSI |
All motorcycle components when used properly |
Minimal if kept 6+ inches from seals |
General rinsing, soap removal, overall washing |
Pressure Washer (Wide Nozzle, 2+ feet away) |
500-800 PSI |
Frame, wheels (not hubs), lower fairings |
Bearing damage if aimed at hubs, electrical issues if aimed at connectors |
Heavy grime on undercarriage, caked mud removal |
Pressure Washer (Standard Distance) |
1,500-3,000 PSI |
None without extreme caution |
Seal damage, paint lifting, electrical intrusion, bearing contamination |
Not recommended for motorcycles |
Bucket and Sponge |
0 PSI |
All surfaces |
None from pressure (technique dependent) |
Safest method for painted surfaces and sensitive areas |
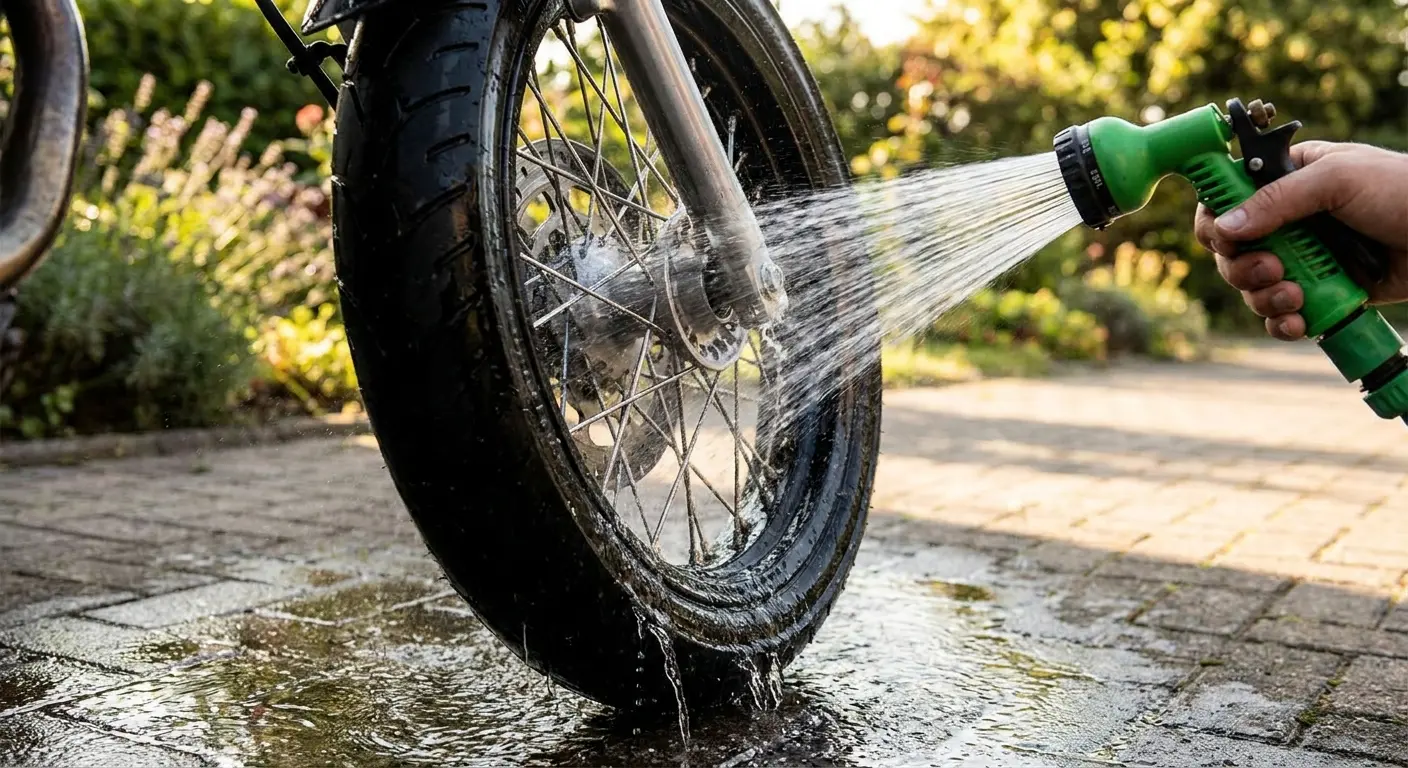
Garden hose pressure (around 40-60 PSI) is sufficient for rinsing. You don't need more. If dirt isn't coming off with garden hose pressure, the solution isn't more pressure but better chemical action from your pre-wash or soap.
Pressure washers deliver 1,500-3,000 PSI. That's 25 to 50 times the pressure of a garden hose. You can use a pressure washer on a motorcycle, but you need the discipline to keep it at least two feet away from any surface and never aim directly at seals, bearings, or electrical components.
Look, I'm probably paranoid about water pressure. My buddy uses a pressure washer point-blank on everything and his bike's fine. But I've also seen steering head bearings fail at 10,000 miles on bikes that got pressure washed weekly, so make your own call.
The Zones Where Pressure Causes the Most Damage
Certain areas of your bike are pressure-sensitive. You need to know where they are before you start spraying.
Wheel bearings sit right behind those seals you can see at the center of your wheels. Direct spray at the wheel hub forces water past the seals. You won't know you've done damage until the bearings start making noise or develop play.
The chain and sprockets need cleaning, but high pressure drives water into the chain's o-rings and x-rings, washing out the factory lubricant that keeps the chain alive. Use low pressure here or skip the pressure entirely and clean with a brush.
Electrical connectors are obvious targets, but even ones that look sealed can admit water under pressure. The ECU, ABS module, and various sensors all have connectors that are splash-resistant but not pressure-proof. Instrument clusters are another vulnerable spot. That clear lens isn't perfectly sealed. High pressure can force water behind it, fogging the display or causing electrical issues.
Exhaust outlets should never get direct spray while the bike is hot, but even when cool, you don't want to force water deep into the exhaust system where it can sit and cause rust from the inside out.
Soap Selection Beyond "Motorcycle Safe"
Every soap bottle says "motorcycle safe" on it. So does dish soap if you squint at the fine print. Here's what that actually means: nothing. Some soaps strip your wax. Some turn your rubber seals into beef jerky. Some leave a film that attracts more dirt than you started with.
Dish soap cuts grease effectively, which is why people use it. But it also strips any protective wax or sealant you've applied. You're creating more work for yourself by using a cleaner that removes the protection you'll need to reapply.
Automotive soap is better but still formulated for car paint, which is thicker and more durable than motorcycle paint. Bikes have more exposed metal, more rubber components, and more variety in surface finishes.
Dedicated motorcycle soap is pH-balanced to clean without stripping protection. You're paying more per bottle, but you're using less product per wash and you're not undoing previous protection work. When figuring out how to clean a motorcycle properly, product selection matters as much as technique.
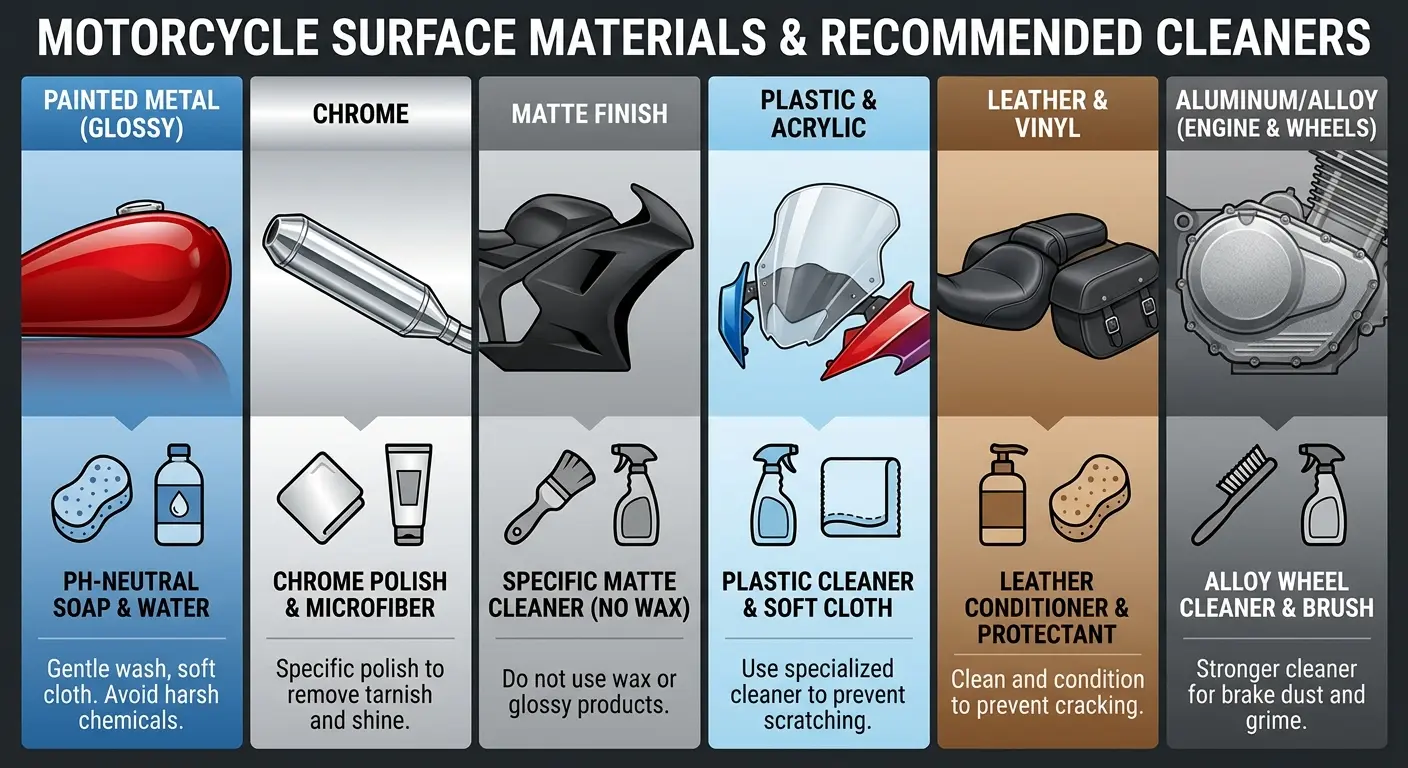
Matching Cleaners to Surface Types
Your bike isn't one material. You've got painted surfaces, bare metal, plastic, rubber, and possibly carbon fiber. Each responds differently to cleaners.
(Yeah, I made a table. I'm that guy. But it's actually useful, so deal with it.)
Surface Material |
Recommended Cleaner Type |
pH Level |
What to Avoid |
Why It Matters |
|---|---|---|---|---|
Painted Surfaces |
pH-neutral motorcycle soap |
6.5-7.5 |
Dish soap, alkaline degreasers, acidic cleaners |
Harsh pH strips wax and can dull clear coat over time |
Chrome/Polished Aluminum |
Dedicated metal cleaner or pH-neutral soap |
6.5-7.5 |
Acidic cleaners, abrasive compounds |
Acids cause oxidation; abrasives create scratches that trap dirt |
Plastic Fairings/Trim |
Water-based cleaner |
6.5-7.5 |
Petroleum-based solvents, citrus degreasers |
Solvents cause discoloration and brittleness |
Rubber (seals, hoses, grips) |
Mild soap, rubber-safe cleaners |
7.0-8.0 |
Harsh degreasers, citrus cleaners, solvents |
Degrades rubber elasticity and accelerates cracking |
Carbon Fiber |
Gentle pH-neutral soap only |
7.0 |
Any abrasives, harsh chemicals, rough scrubbing |
Damages resin layer and exposes carbon weave to moisture |
Matte/Flat Finishes |
Matte-specific cleaner |
7.0 |
Standard soap (adds gloss), wax, polish |
Changes finish appearance permanently |
Painted surfaces need pH-neutral soap that won't strip wax. You're looking for something that cleans through surfactant action (breaking the bond between dirt and paint) rather than through harsh chemicals that strip everything.
Chrome and polished aluminum can handle slightly more aggressive cleaners, but you still want to avoid anything acidic that will cause oxidation. Dedicated metal polish works better than soap for these surfaces anyway.
Plastic trim and fairings are sensitive to petroleum-based cleaners that can cause discoloration or make the plastic brittle over time. Water-based cleaners are safer here.
Rubber (seals, hoses, grips) degrades when exposed to harsh solvents. You want cleaners that are explicitly rubber-safe, which usually means avoiding citrus-based degreasers on these components.
Carbon fiber needs special attention. The resin can be damaged by abrasive cleaners or rough scrubbing. Gentle soap and soft microfiber are the only tools you should use here.
Degreaser Reality Check
Degreaser is not a universal solvent you spray everywhere. It's a targeted tool for heavy oil and grease buildup, primarily on the engine, chain area, and undercarriage.
The problem: degreasers work by breaking down oils. That includes the protective oils in rubber seals and o-rings. Spray degreaser liberally and you're aging every rubber component it touches.
You need degreaser on the engine cases where road grime has mixed with oil weepage. You need it on the chain and sprockets where lube has attracted dirt. You might need it on the swingarm if you've been riding in particularly grimy conditions. You don't need it on painted surfaces, chrome, or anywhere near rubber seals. Regular soap handles those areas fine.
Dilution matters more than riders realize. Full-strength degreaser is rarely necessary and always risky. A 4:1 or even 10:1 dilution (water to degreaser) handles most buildup while reducing the risk to rubber components.
Application method changes the results too. Spray it on and immediately rinse it off, you're wasting product and not giving it time to work. Spray it on, let it dwell for 2-3 minutes, agitate with a brush, then rinse. You're using chemistry instead of pressure to do the work.
My buddy Jake has a 2015 R6. Last summer he degreased his entire engine bay with undiluted Simple Green and let it sit for like 20 minutes while he grabbed lunch. Came back to find his coolant hoses looked like sun-dried earthworms. Cost him $300 in parts. A diluted solution applied only to the oily areas would have cleaned effectively without the collateral damage.
The Forgotten Zones That Collect the Most Grime
You wash what you see. The tank gleams, the fairings shine, and you call it done. Meanwhile, the areas that matter for bike longevity are still caked in grime.
The undercarriage collects everything the front wheel throws up. Road salt, oil, coolant, chain lube, dirt, and brake dust all accumulate on the underside of the engine and frame. You can't see it from your normal viewing angle, so it gets ignored.
This grime isn't just ugly. Salt corrodes aluminum. Oil buildup traps heat against engine components. Accumulated dirt makes it harder to spot leaks or damage during routine checks. Proper motorcycle cleaning means addressing these hidden areas that affect performance and longevity.
Chain and Sprocket Area Deep Cleaning
Your chain area is a grime magnet. Chain lube flings off during riding, coating the swingarm, wheel, and surrounding components. That lube catches dirt, which catches more lube, building up layers of sticky black crud.
This buildup isn't just cosmetic. Grime on the chain accelerates wear by acting as a grinding compound between the chain and sprockets. Buildup on the sprockets changes their effective tooth profile, causing uneven wear.
And real talk: it's also disgusting. That black tar-like substance that builds up on your swingarm? That's old chain lube mixed with road grime, brake dust, and probably some bugs. It has the consistency of roofing tar and smells like a mechanic's shop floor. You're going to get it on your hands. Accept this now.
Cleaning this area properly takes time. You need to remove the old lube and dirt without stripping the chain's internal lubrication or damaging the o-rings.
Start with a dedicated chain cleaner, not degreaser. Chain cleaners are formulated to dissolve old lube without attacking o-rings. Spray it on liberally and let it sit for a few minutes while you clean other areas.
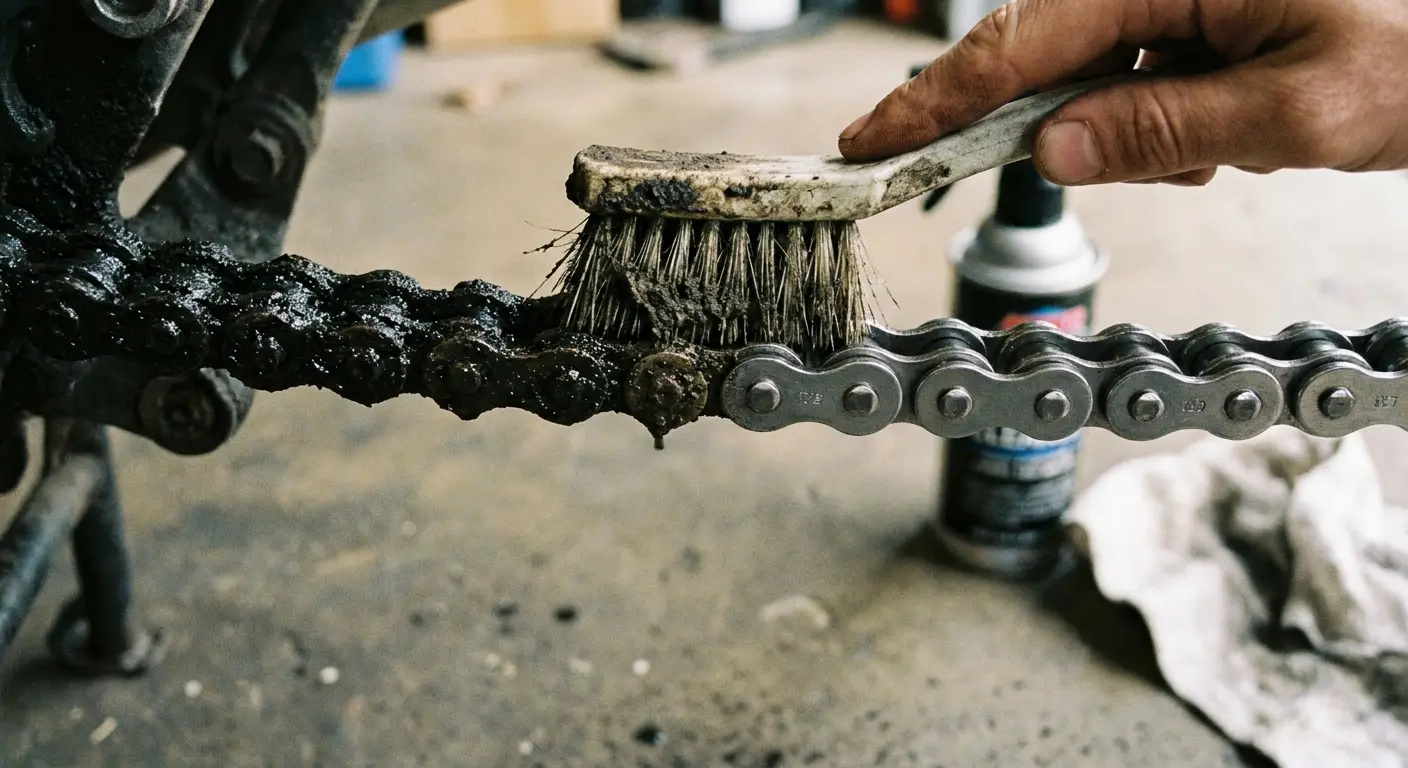
Use a chain brush with three sides to scrub the chain. Rotate the wheel slowly, cleaning a section at a time. You're not scrubbing hard; you're letting the chemical do the work while the brush removes the loosened grime.
The sprockets need attention too. A stiff brush gets into the teeth where grime packs in. Front sprocket covers trap dirt behind them, so if yours is removable, take it off periodically for thorough cleaning.
Rinse it off with low pressure. Garden hose pressure. You're trying to remove the cleaner, not drive water into the o-rings. Remember: o-rings keep the good lube inside the chain. Water forced past o-rings pushes the good lube out. Then your chain dies early, and you get to spend $300 on a new chain and sprockets. Ask me how I know.
Radiator Fins and Cooling System Exterior
Your radiator looks like a bug graveyard. Every highway ride adds another layer of dead insects that turns into cement when it bakes on. You don't notice until you're sitting in traffic on a 90-degree day and your temp gauge is climbing into the red zone. Then you notice.
Cleaning radiator fins requires a gentle touch. The fins are thin aluminum that bends easily. High-pressure water will crumple them. Aggressive brushing will fold them over.
Use low-pressure water from the back of the radiator, pushing debris out the way it came in. You're reversing the airflow direction, clearing the passages between fins. A soft brush can help dislodge stubborn debris, but brush parallel to the fins, never across them. You're sliding the brush between the fins, not scrubbing across them.
Check for bent fins while you're cleaning. A few bent fins won't significantly impact cooling, but large sections of damaged fins reduce efficiency. You can carefully straighten minor bends with a fin comb or a small flat-blade screwdriver, working slowly to avoid breaking the fin entirely.
And before you ask: yes, I've bent radiator fins with a pressure washer. Yes, I tried to straighten them. No, it didn't work. Now that section of my radiator looks like a crumpled accordion. Don't be me.
Oil coolers get the same treatment as radiators. They're often mounted lower and catch more road debris. Same gentle cleaning approach applies.
Drying Methods That Won't Leave Streaks or Water Spots
Air drying is tempting. You're tired, the bike looks clean, why not just let it dry while you put stuff away? Because water spots. Those white crusty marks that show up after the water evaporates? Those aren't just sitting on top of your paint. They're etching into it. Six months of air drying and your tank looks like it has permanent water stains. Because it does.
Water spots aren't just cosmetic. The minerals in those spots etch into paint and clear coat over time. What starts as a surface deposit becomes a permanent mark that requires polishing to remove. You need to dry the bike before the water evaporates on its own. That means working quickly once you've finished rinsing.
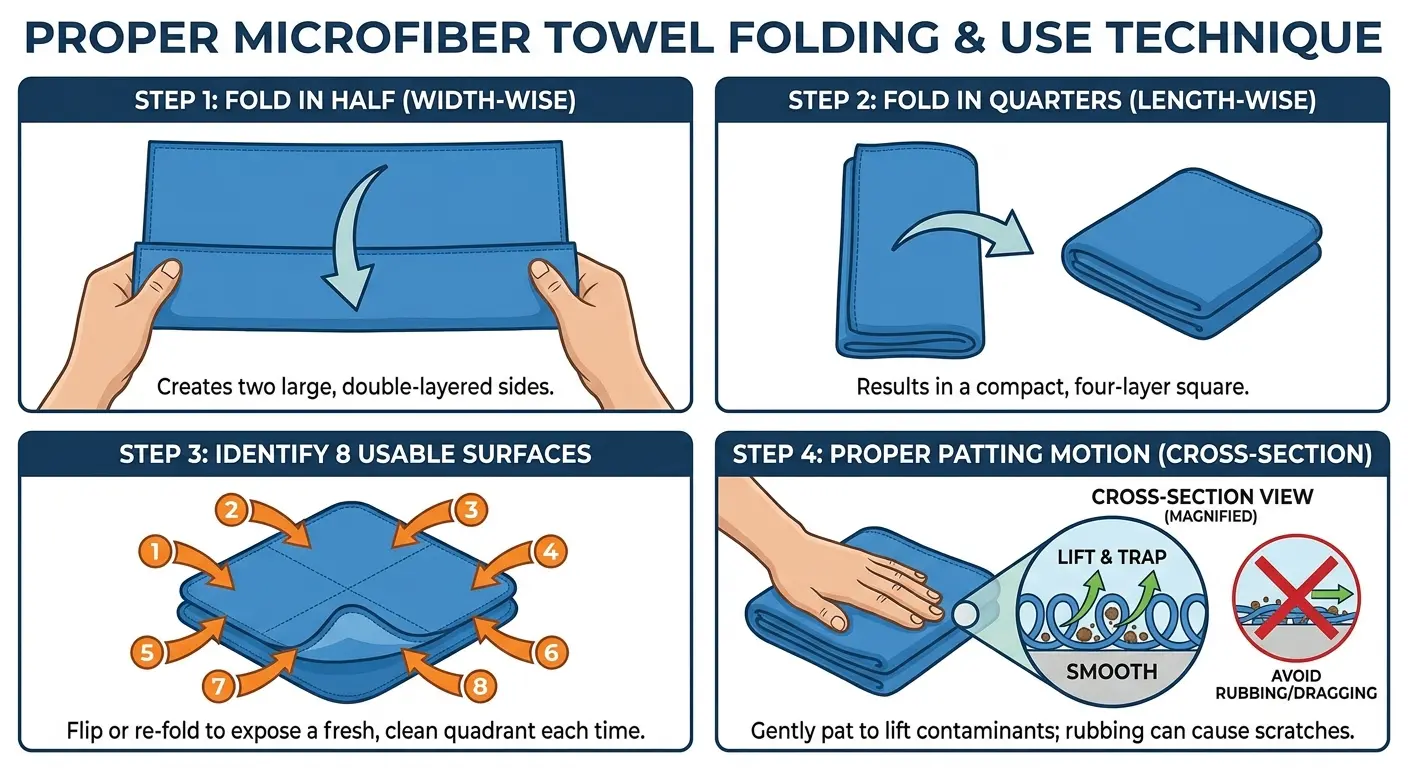
The Microfiber Technique That Actually Works
Microfiber towels aren't all equal. You need towels with high GSM (grams per square meter) for drying. 300 GSM minimum, 400-600 GSM is better. Thicker towels absorb more water per pass and reduce the number of times you need to touch the paint.
I know this sounds fussy. "Just use a towel" seems like it should be enough. But I've put swirl marks in black paint by using the wrong towel, and polishing them out took four hours. So yeah, spend the $30 on proper microfiber towels. It matters.
Fold your towel into quarters. This gives you eight clean drying surfaces before you need to switch towels. When one side gets saturated, flip to a fresh section.
Don't wipe, pat and drag. Press the towel against the surface to absorb standing water, then drag it across to pick up what remains. You're using the towel's absorbency, not friction, to remove water. This is crucial when learning how to wash your motorcycle without causing paint damage.
Work from top to bottom. Water runs downward, so drying from the top prevents you from re-wetting areas you've already dried. Tank, then seat, then fairings, then wheels.
Use separate towels for wheels and painted surfaces. Wheels collect brake dust and road grime that will scratch paint if you transfer it with a shared towel.
Crevices hold water that drips out after you think you're done. Use compressed air or a leaf blower to push water out of panel gaps, around mirrors, and from under seats before final drying.
Dealing with Hard-to-Reach Water Traps
Water hides in dozens of spots on a motorcycle. Behind mirrors, under fairings, in hollow frame sections, around the headlight assembly. You finish drying, wheel the bike into the garage, and ten minutes later there are drip marks down the side.
Compressed air solves this problem. A small air compressor or even a cordless air blower pushes water out of crevices before it can drip onto clean surfaces.
Focus on panel gaps first. Fairings overlap in multiple places, creating channels where water sits. Blow air into these gaps from different angles to force the water out.
Mirror stalks are notorious water traps. The adjustment mechanism creates cavities where water pools. Blast air around the base of each mirror.
Under the seat, water collects around the subframe and electrical components. Even though you tried to keep this area dry during washing, some water always finds its way in. Blow it out before it causes corrosion.
Hollow frame sections (common on sportbikes and some naked bikes) can trap water inside. If your frame has drain holes, make sure they're clear. If not, tilt the bike side to side to encourage water to drain from the open ends.
Post-Wash Protection: What Actually Works
Washing removes dirt but also strips away any protective layer that was on the bike. You're left with clean but unprotected surfaces that will attract dirt and contaminants faster than if you'd left the old protection in place.
Post-wash protection isn't about making your bike shinier. You're creating a barrier that makes dirt less likely to stick and easier to remove during the next wash. Knowing how to clean a motorcycle completely means knowing that protection is part of the process, not an optional extra.
Chain Lubrication Timing and Technique
Your chain is clean and dry, which means it's also unprotected. You need to lubricate it before you ride again, but timing and technique determine how effective that lubrication will be.
Lube a warm chain for better penetration. The heat opens up the chain's o-rings slightly, allowing lube to work into the internal surfaces where it's needed most. Ride the bike for five minutes or let it idle to warm the chain, then apply lube.
Apply lube to the inside of the chain (the side facing the sprocket) while slowly rotating the wheel. You're targeting the roller-to-sideplate interface where the chain articulates. Lube applied to the outside just flings off during riding.
Use less than you think you need. A thin coat that penetrates is better than a heavy coat that attracts dirt. One pass around the chain is usually sufficient.
Let the lube sit for 10-15 minutes before riding. This dwell time allows it to penetrate and adhere. If you ride immediately, most of it will fling off before it's done its job.
Wipe off excess lube with a clean rag. Any lube sitting on the surface will just collect dirt. You want lube inside the chain, not on it.
Paint Sealant vs. Wax Reality
Wax and sealant both protect paint, but they work differently and last different amounts of time. Wax is a natural product that provides a warm shine and moderate protection for a few weeks. Sealant is a synthetic polymer that lasts months but doesn't have the same depth
Wax and sealant both protect paint, but they work differently and last different amounts of time. Wax is a natural product that provides a warm shine and moderate protection for a few weeks. Sealant is a synthetic polymer that lasts months but doesn't have the same depth of shine.
My buddy with a 2018 GSX-R applied traditional carnauba wax after every wash, spending 45 minutes on application and buffing. After three rides in mixed weather, the wax was gone and water no longer beaded on the fairings. Frustrated with the constant reapplication, he switched to a synthetic sealant that took the same time to apply but lasted through two months and a dozen rides. The sealant provided better protection against bug splatter and road grime, making subsequent washes significantly easier. Durability matters more than depth of shine for bikes that get ridden.
For motorcycles, sealant makes more sense for most riders. You're not washing weekly. You want protection that lasts between rides and through varying weather conditions.
Application is straightforward: apply a thin coat to clean, dry paint, let it haze, then buff it off with a clean microfiber towel. Work in small sections (one panel at a time) to ensure even coverage.
Don't apply sealant to matte finishes, flat paint, or bare metal. These surfaces require specific products formulated for their unique characteristics.
Chrome and polished aluminum benefit from dedicated metal sealants that prevent oxidation. These products fill microscopic pits in the metal surface, creating a smoother finish that's easier to keep clean.
Keeping Your Phone and Essentials Safe During the Wash
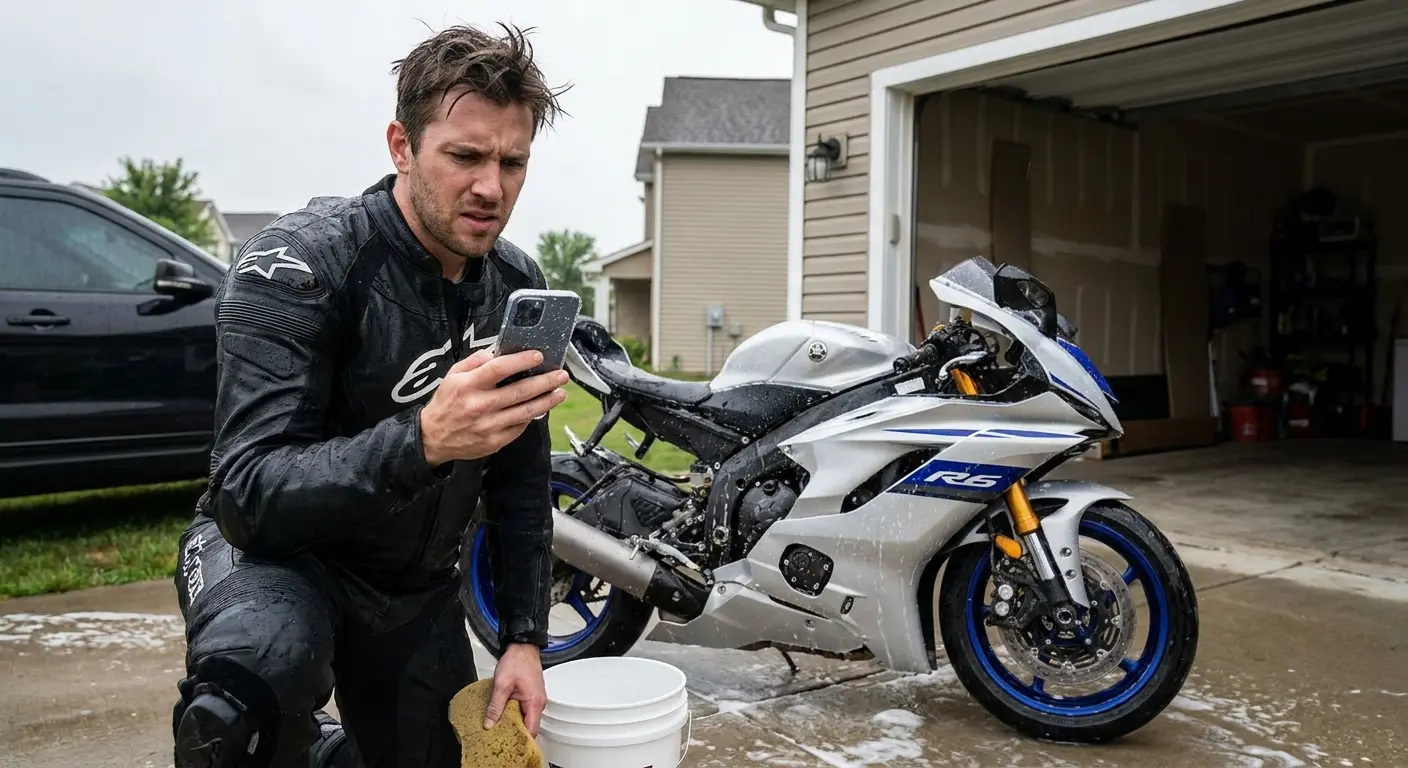
Real talk: I've killed two phones washing bikes. The first one I kept in my pocket like an idiot. Leaned over the tank, pocket got soaked, phone died three hours later. The second one I "protected" by putting it in a ziplock bag on my toolbox. Worked great until I bumped the toolbox and watched my phone slide off and land screen-down on concrete.
You need your phone during the wash. You're checking product instructions, following video tutorials, taking progress photos, or just keeping music playing. Leaving it inside doesn't work because you'll make a dozen trips back and forth.
Keeping it in your pocket is worse. You will lean over the wet bike. You will get your pocket wet. You will eventually soak your phone or crack the screen when it presses against the frame.
Waterproof cases help but don't solve the mounting problem. Where do you put the case? On a nearby surface means walking over to check it. In your pocket means it's inaccessible and still at risk. On the bike means it's in the splash zone.
So now I use a magnetic mount. Specifically Rokform, because I'm not getting paid to say this but their stuff actually works. The phone snaps on magnetically, stays there even when wet, and I can position it where I can actually see it without having it in the splash zone.
Could you use a different solution? Sure. Waterproof case in a dry spot. Leave it inside and make the trips. Whatever works. But if you're washing your bike regularly and you need your phone nearby, the mount thing solves the problem permanently.
Rokform's motorcycle phone mounts keep your device secure and protected while you work. The mount attaches to any metal surface near your wash area. A toolbox, a metal shelf, even a magnetic board you set up specifically for this purpose. The Rokform phone case has integrated magnets that lock it to the mount with enough force that it's not going anywhere, but release easily when you need to grab it.
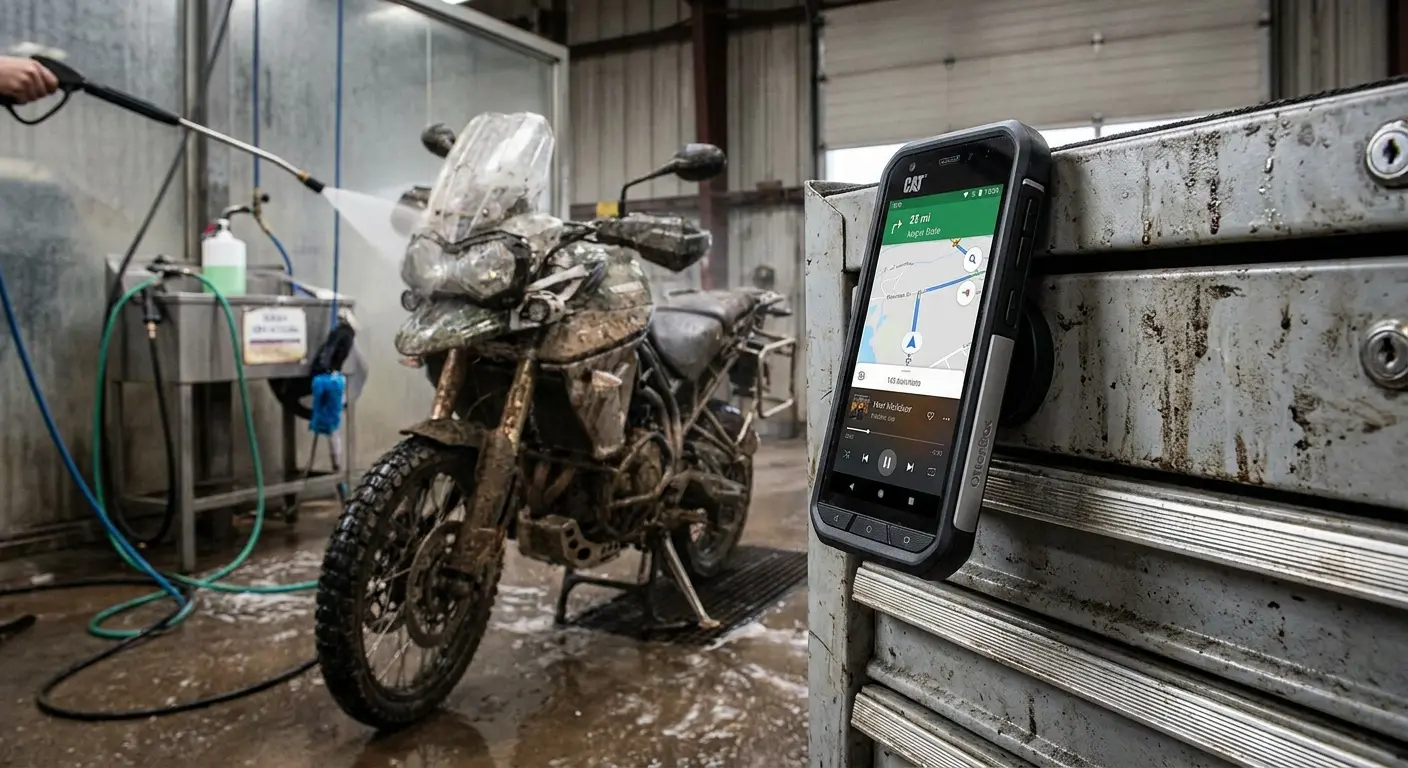
This setup keeps your phone at eye level and within arm's reach. You can glance at instructions, change music, or check messages without stopping what you're doing, drying your hands, or walking away from the bike.
The case itself provides protection from splashes and drops. You're not relying on the mount alone to keep your phone safe. The rugged case handles the impacts and moisture exposure that happen in a garage environment.
Position the mount 3-4 feet from where you're working. Close enough to see the screen clearly, far enough that it's not in the direct spray zone. Angle it slightly downward so you can read the screen without having to look straight up.
For riders who need to reference service manuals or tutorial videos during washing, this setup eliminates the frustration of trying to keep a phone dry while following complex instructions. You're not pausing the video, drying your hands, unlocking your phone, and trying to find your place again. The information stays visible throughout the process.
Final Thoughts
Your bike doesn't need to be showroom perfect. It needs to be clean enough that you notice when something's leaking or wearing out. Protected enough that rain doesn't wreck it. And the whole process needs to be simple enough that you actually do it instead of putting it off for six months.
Look, you're going to make mistakes. You'll spray water somewhere you shouldn't. You'll drop your phone eventually. You'll use the wrong cleaner on something and hope it doesn't matter. That's fine. The goal isn't perfection, it's knowing enough to avoid the expensive mistakes and catch the small ones before they become big ones.
Most washing damage happens from rushing or from repeated mistakes that compound over time. Water forced into bearings. Harsh chemicals on rubber seals. Scratched paint from contaminated towels. These problems are preventable when you understand what causes them and adjust your process accordingly.
Set up once, properly. Your phone mounted where you can see it. Products arranged in order. Tools within reach. The bike positioned for easy access to all sides. These small organizational steps save significant time and frustration.
Your bike stays cleaner longer when you protect it after washing. Chain lube, paint sealant, and proper drying prevent the immediate reaccumulation of dirt and protect against corrosion between washes.
Clean chains last longer. Protected paint resists damage. Maintained cooling systems prevent overheating. Pay attention to the zones that matter for longevity, not just the surfaces that show.
Wash your bike. Don't destroy your phone doing it. You're done.

