


Three hours into what should've been the perfect ride through Utah, I watched a guy nearly drop his Triumph while trying to fish his phone out of his jacket at 45 mph. He'd missed his turn twenty miles back. The wobble when he let go of the bars to dig in his pocket made everyone around him nervous. I've been that guy. Most of us have.
We spend weeks planning routes and researching gear, then wreck the actual trip with a hundred small choices we don't even realize we're making. The way you handle your phone when you need directions mid-curve. What you decide at gas stations. Whether you say yes to that side route when you're already tired. These micro-decisions stack up fast and quietly wreck more motorcycle road trips than any mechanical failure ever will.
Table of Contents
The Phone Mount Dilemma Nobody Admits To
Fuel Stop Strategy Beyond "Fill It Up"
Gear Access Points You're Probably Getting Wrong
The Real Cost of Saying Yes to Every Side Route
Managing Screen Time Without Killing the Adventure
Hydration Timing vs. Bathroom Panic
When Your Body Says Stop But Your Mind Says Push
The Overnight Spot Decision Tree
Meal Planning That Doesn't Involve Gas Station Jerky
Electronics Management in Multi-Day Scenarios
TL;DR
Your phone mount probably sucks. Get one that actually dampens vibration.
Stop waiting for the fuel light. Fill up 50 miles before you think you need to.
Pack by how often you need it, not by category. Rain gear goes on top, always.
Every "quick detour" costs 45 minutes. Choose wisely.
Check your phone three times a day, not thirty.
Drink water every 90 minutes. Plan bathroom stops around fuel stops.
Stop at 70% tired, not 90%. You can't judge your own exhaustion.
Pick overnight spots based on security and morning departure, not just price.
Eat actual protein every 4-5 hours. Gas station hot dogs don't count.
One charging station for all your electronics. Stop hunting for cables.
The Phone Mount Dilemma Nobody Admits To
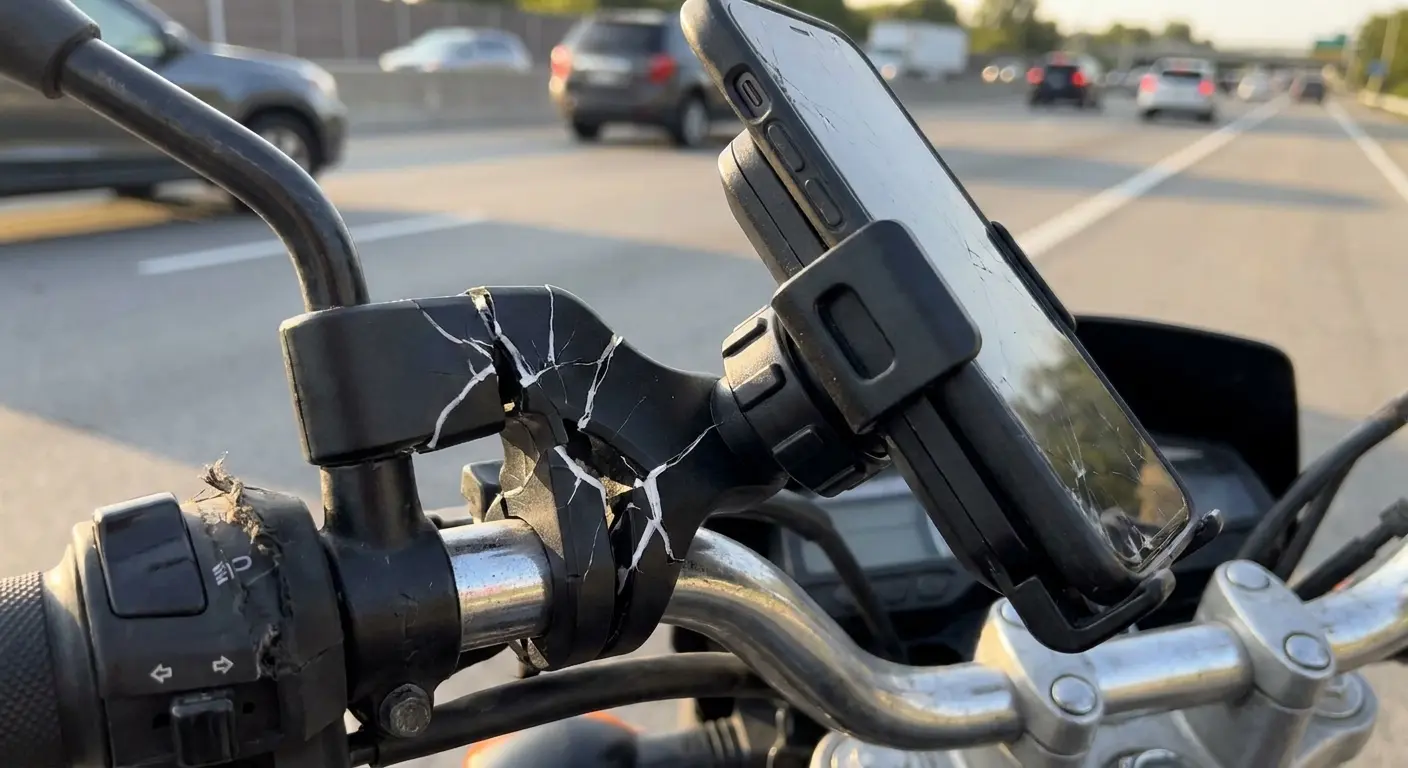
Nobody wants to admit they've almost crashed trying to check if that was their exit. But we've all done it. That split-second glance down at the phone in your tank bag, or worse, the full-on jacket-fishing-while-rolling maneuver. Your phone isn't optional anymore. It's your GPS, your camera, your weather radar, and your "where the hell am I sleeping tonight" backup plan.
You're 200 miles in when GPS reroutes you. Phone's in your jacket. Pull over again, fish it out while riding, or ignore it and hope. Happens constantly, yet trip planning advice skips right over it.
Riders either mount phones where they can't really see them or keep them buried in pockets, forcing dangerous mid-ride retrieval. My buddy Jake kept his phone in one of those tank bags with the clear window. Worked great until he hit that torn-up section of I-40 outside Amarillo. You know the one. Feels like riding a jackhammer. Screen was vibrating so bad he couldn't read it, missed the exit for our hotel, and we ended up adding 50 miles backtracking through evening traffic. He spent the next hour in a parking lot trying to find the after-hours check-in instructions while standing there with all his gear still packed. A decent vibration-dampening mount would have prevented the whole mess.
Why Standard Mounts Keep Failing
Suction cups lose grip. Adhesive peels from vibration. Cheap clamps crack on rough roads. You've tried at least two solutions that didn't last a season.
Sometimes it's just wobble that makes the screen unreadable, or the mount blocks your cluster, or attaching it takes so long you stop using it. Vibration damages more than you'd expect. Phone camera stabilization wasn't designed for sustained motorcycle vibration. Those OIS mechanisms shake apart over time. Mounts need to absorb vibration, not just hold devices. I switched to a quality motorcycle handlebar mount two seasons ago after my third cheap mount vibrated itself to death. Worth every penny just for not worrying about it anymore.
Mount Type |
Typical Failure Point |
Average Lifespan |
Best Use Case |
|---|---|---|---|
Suction Cup |
Loses grip from heat/vibration |
3-6 months |
Smooth roads, short trips |
Adhesive Pad |
Peels from sustained vibration |
6-12 months |
Fairings with minimal flex |
RAM Mount |
Ball joint loosens over time |
2-3 years |
All conditions, requires periodic tightening |
Magnetic Mount |
Phone slides during hard acceleration |
1-2 years |
Urban riding, frequent removal |
Rokform RokLock |
Twist-lock mechanism wears |
3-5 years |
Long-distance touring, rough roads |
The Glove Problem
Touchscreens and riding gloves hate each other. Stop for gas, need to check something, you're removing gloves constantly or jabbing at screens like an idiot. Touchscreen-compatible gloves work maybe 60% of the time in perfect conditions. Get them wet and forget it.
Seems minor until you're doing it fifteen times a day. Each removal is 30 seconds. Over a week-long motorcycle road trip, that's over an hour fumbling at pumps and rest stops. I've watched people try to zoom in on maps with winter gloves on. It's painful.
Phone Mount Evaluation Checklist:
☐ Dampens vibration sufficiently to protect camera OIS
☐ Allows screen visibility without blocking instrument cluster
☐ Mounts and dismounts in under 10 seconds
☐ Withstands temperature range of your riding environment
☐ Provides weather protection or compatible with waterproof case
☐ Accessible without removing gloves for basic functions
☐ Secure enough to prevent theft at gas stops
Fuel Stop Strategy Beyond "Fill It Up"
Okay, so your phone's mounted and you can actually see where you're going. Great. Now let's talk about the thing that'll strand you faster than any mechanical failure: your own terrible fuel planning.
Fuel stops eat up more time and mental energy than you're accounting for. Most people wait for the low fuel light, which means you're always slightly worried, stopping at whatever appears first even if it's inconvenient, and missing better stops 20 miles further.
Your bike's range is probably 180-220 miles depending on how you ride. You're planning fuel stops when the light comes on. Bad approach. You're always watching the gauge nervously, doing helmet math about making it to the next town, and passing up better options because you're not sure.
The 50-Mile Buffer Rule
Here's the rule: take whatever range your bike claims, knock off 50 miles, and that's when you start looking for gas. Not when the light comes on. Not when you're doing math in your helmet. Just a simple, dumb rule that kills the anxiety spiral.
You can pass the sketchy premium-only station because you've got options. You're no longer watching the gauge nervously or second-guessing yourself about distances. The buffer changes your entire mental state while riding.
Bike Type |
Typical Tank Size |
Conservative Range |
Buffer Trigger |
Ideal Stop Interval |
|---|---|---|---|---|
Sport Touring |
5-6 gallons |
200-240 miles |
150-190 miles |
Every 2.5-3 hours |
Adventure |
5-7 gallons |
180-240 miles |
130-190 miles |
Every 2-3 hours |
Cruiser |
4-6 gallons |
160-220 miles |
110-170 miles |
Every 2-2.5 hours |
Standard |
3-5 gallons |
140-200 miles |
90-150 miles |
Every 2 hours |
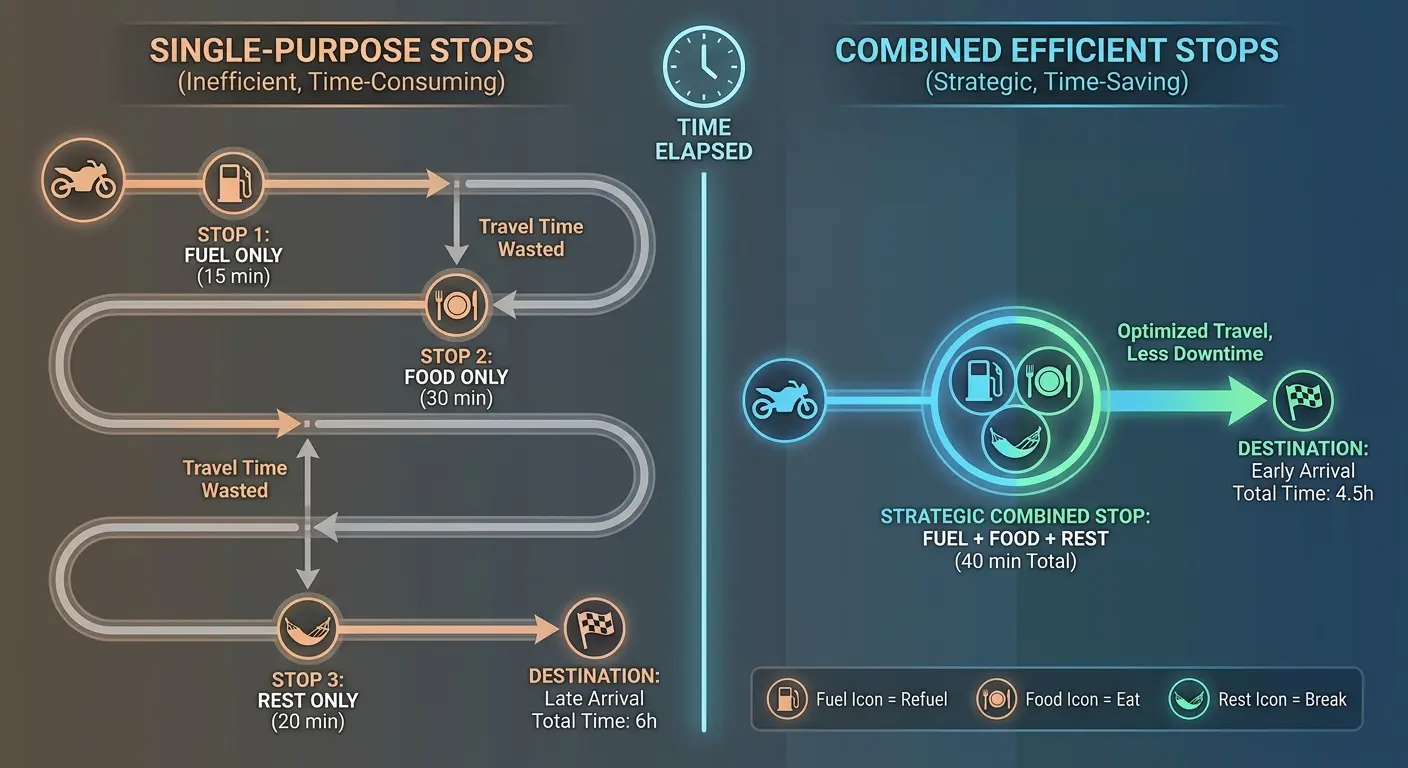
Combining Stops for Efficiency
Every fuel stop should accomplish at least two things. Fuel plus food. Fuel plus rest. Fuel plus gear adjustment. Single-purpose stops kill half your riding day.
A 10-minute fuel stop becomes 35 minutes when you stop again 30 miles later for food, then again for rest. Map fuel stops around towns with actual food options, not just gas stations. The extra 5 miles to reach a town with proper lunch is worth it. Better food, more effective rest, one stop instead of two.
Say you're planning a 400-mile day with three fuel stops. Structure them smart: first stop at 140 miles for fuel and breakfast (you're already 2 hours in, body needs food), second stop at 280 miles for fuel and lunch with a 20-minute rest, final stop at 380 miles for fuel only since the destination is close. Three stops totaling maybe 75 minutes versus five separate stops for fuel, breakfast, lunch, and two rest breaks that would eat 2+ hours. Understanding motorcycle maintenance helps too, especially on multi-day trips where efficiency actually matters.
Premium Fuel Myths on the Road
Your bike probably doesn't need premium despite what you've convinced yourself. Check your manual. Most modern bikes run fine on regular unless you're pushing performance limits, which you're not doing on a loaded touring bike in 95-degree heat.
Extra dollar per gallon adds up over a 3,000-mile motorcycle trip. Some people swear premium gives better mileage. The math rarely supports this. You'd need 10% improvement in fuel economy to break even, and you're not getting that unless your bike specifically requires premium for proper ignition timing.
Look, I ran premium for two years because I thought I was being careful with my engine. Then I actually did the math on a long trip and realized I was spending an extra $60 for absolutely no benefit. Now I only run premium when the manual says I have to.
Gear Access Points You're Probably Getting Wrong
You know what's buried at the bottom of your left saddlebag under three days of clothes? Your tire pressure gauge. You know what's in your most accessible pocket? Nothing, because you didn't think about it.
We pack by category (tools with tools, clothes with clothes) when we should be packing by how often we actually need to grab something. Rain gear ends up buried under clothes because you're optimistic about the weather. Sunscreen is somewhere. Your tire pressure gauge is playing hide and seek.
You end up unpacking and repacking multiple times daily. Each roadside stop to dig for something adds up. Over a week, you've wasted hours and created frustration that colors everything else.
The Three-Tier Access System
Tier one is anything you'll touch while riding or at every stop. Phone, wallet, registration, insurance card. These need pockets or tank bag. If you're digging in a saddlebag for your wallet at gas stations, you've already failed.
Tier two is daily-use items. Sunscreen, chapstick, snacks, basic tools, tire gauge, first aid basics. These go in your most accessible bag, usually tank bag or top of primary saddlebag. You should grab these without removing other items.
Tier three is everything else. Clothes, camping gear, tools you probably won't need, extra layers. Pack these efficiently in bottoms and backs of bags because you're only accessing them at the end of the day.
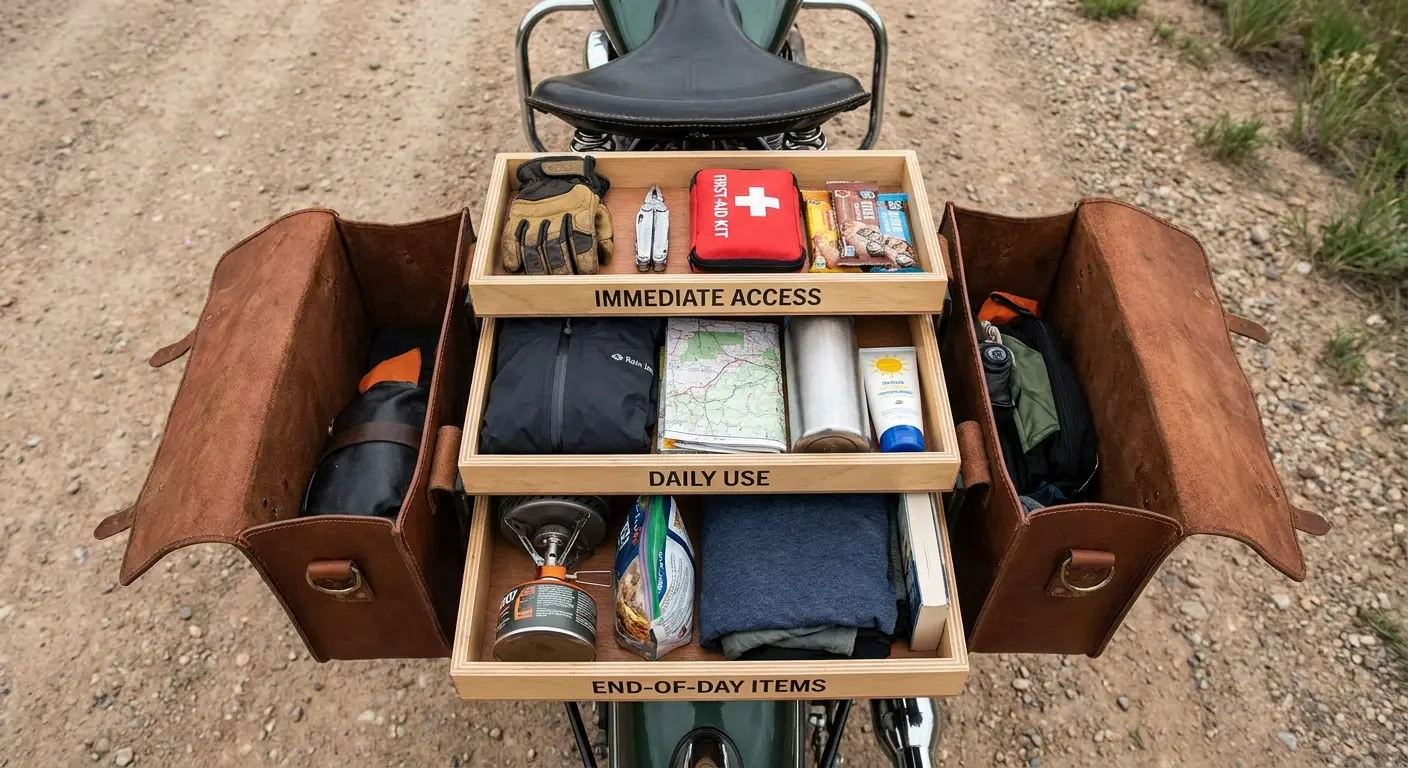
Gear Packing Template by Access Frequency:
Tier 1 (Immediate Access - Pockets/Tank Bag):
Wallet with license, insurance, registration
Phone and charging cable
Sunglasses/clear glasses
Earplugs (if you swap them out)
Tier 2 (Daily Access - Top of Saddlebags/Tank Bag):
Sunscreen and lip balm
Snacks and water bottle
Basic tool kit and tire gauge
First aid essentials
Rain gear (see exception below)
Camera if separate from phone
Tier 3 (End-of-Day Access - Bottom of Saddlebags):
Clothing changes
Toiletries
Camping equipment
Spare parts and extended tools
Extra layers for extreme weather
The Rain Gear Exception
Rain gear breaks the tier system. It needs immediate access regardless of how unlikely rain seems.
I've watched people unpack entire saddlebags on highway shoulders as rain starts because their gear was "efficiently packed" at the bottom. Rain gear goes in the most accessible external pocket or strapped outside your bag. You should grab it and put it on in under two minutes without removing anything else. Period.
Tool Kit Reality Check
You're carrying tools you can't use. Be honest. Most of us pack full socket sets, multiple wrenches, and specialty tools without knowing how to perform the repairs those tools enable.
Your tool kit should match your actual mechanical skill level, not your aspirations. Basic kit: tire repair, pressure gauge, multi-tool, zip ties, duct tape, spare fuses. That handles 90% of roadside issues you can actually fix. Everything else requires a shop anyway.
I carried a full socket set for two years before admitting I had no idea how to rebuild a carburetor on the side of I-70. Now I carry zip ties and a prayer.
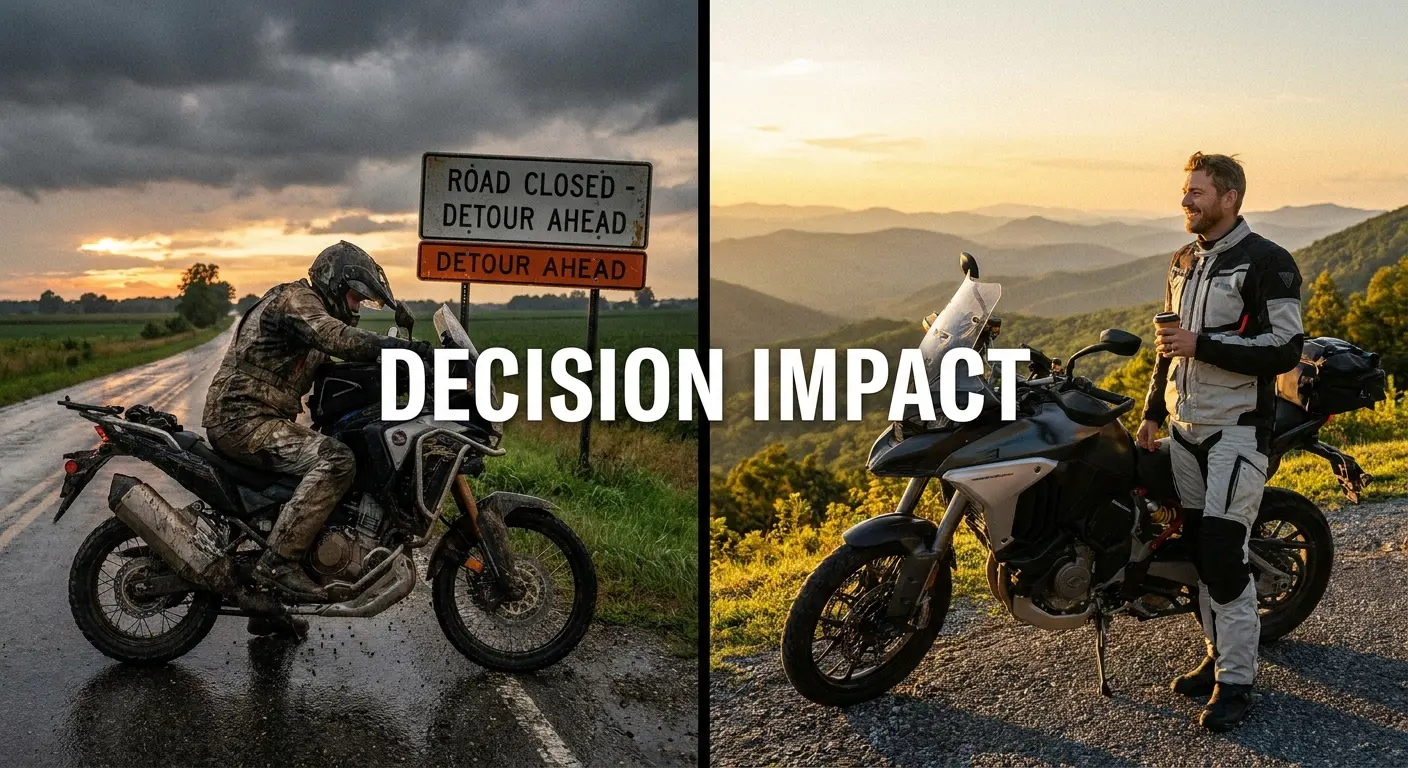
The Real Cost of Saying Yes to Every Side Route
"Let's be spontaneous!" sounds great at 2 PM when you're fresh and the sun is perfect and someone mentions a cool overlook fifteen miles off route. It sounds less great at 7 PM when you're still 100 miles out, the sun's going down, and you're so tired you're seeing double.
Someone mentioned a great overlook 15 miles off route. A sign points to a scenic byway. GPS suggests an alternate route that looks curvier. You say yes to all because that's what motorcycle road trips are about, right?
Wrong. Each yes piles up into exhaustion, late arrivals, and compressed recovery time. The difference between a good trip and a grinding one often comes down to which detours you decline.
The 30-Minute Rule
Every unplanned detour costs at least 30 minutes, usually 45. That's not just the extra mileage. It's decision-making time, slower speeds on unfamiliar roads, photo stops you wouldn't have made otherwise, and mental recalculation of your remaining day.
Three spontaneous detours and you've blown two hours. That's two hours you needed for dinner and sleep, so now you're arriving at 9 PM, exhausted, trying to set up a tent in the dark. You're not adding time to your schedule, you're stealing it from rest.
Evaluating Detours in Real-Time
Ask three questions before taking a side route. First: will this offer something genuinely different from what I'm already riding? If you're already on scenic motorcycle routes, another scenic route has diminishing returns. Who cares at that point.
Second: what's my energy level right now? If you're already tired, adding miles makes it worse. Simple math.
Third: does this delay push my arrival past something important like restaurant closing times or campground office hours? Most detours fail at least one of these tests. The ones that pass all three are usually worth it. Using a proper motorcycle trip planner helps you identify the best scenic routes in advance rather than making exhausted decisions at 5 PM.
You're riding through Colorado on a route that's already scenic. At 3 PM, you see a sign for a waterfall 12 miles off the main road. You're at 60% energy, and your campground check-in closes at 8 PM. The detour would add 30-40 minutes minimum. Question one: the waterfall is different from mountain riding, so it passes. Question two: you're getting tired, caution flag. Question three: you've got 5 hours until check-in and only 2 hours of riding left, so you have buffer. This detour probably makes sense. But if it were 5 PM or you were already exhausted, the same detour becomes a terrible choice.
Planned Flexibility
Build detour time into your schedule instead of stealing it from something else. If you're riding 300 miles, plan for 350 and use the buffer for spontaneous decisions. Eliminates the guilt and stress of running

